Time to preface this by saying that, yes, it has been indeed a long time since I blogged about anything in here. Seeing how the world basically stopped with the current pandemic, which, by the way, I hope everyone is being safe, and most importantly, being responsible, I thought of maybe jumping back into blogging any slice of life like I used to before – it aids in the boredom and it aids in maintaining my writing skills (more of lack thereof).
Earlier in the year, before the world changed, so to speak, as per usual, I wanted to expand my photography skills, albeit just being a hobbyist and not a professional. I still don’t own a mirrorless camera, but hopefully some time in the future, I would be able to do so. Reasons for not jumping ship just yet is that I invested so much on my DSLRs such as lenses, flashes, and other such gear. Now I know the flashes can still be used on the Nikon Z series and my Sigma EX lenses can technically be used using the FTZ adapter (not as good as the Art lenses though), but ah well.
As mentioned, I was always trying to find new techniques to learn and possibly master and one of the more notable techniques I learned last year was stroboscopic flash photography. That gave me an itch to find more techniques that I can practice and hone more skill in this hobby of mine.
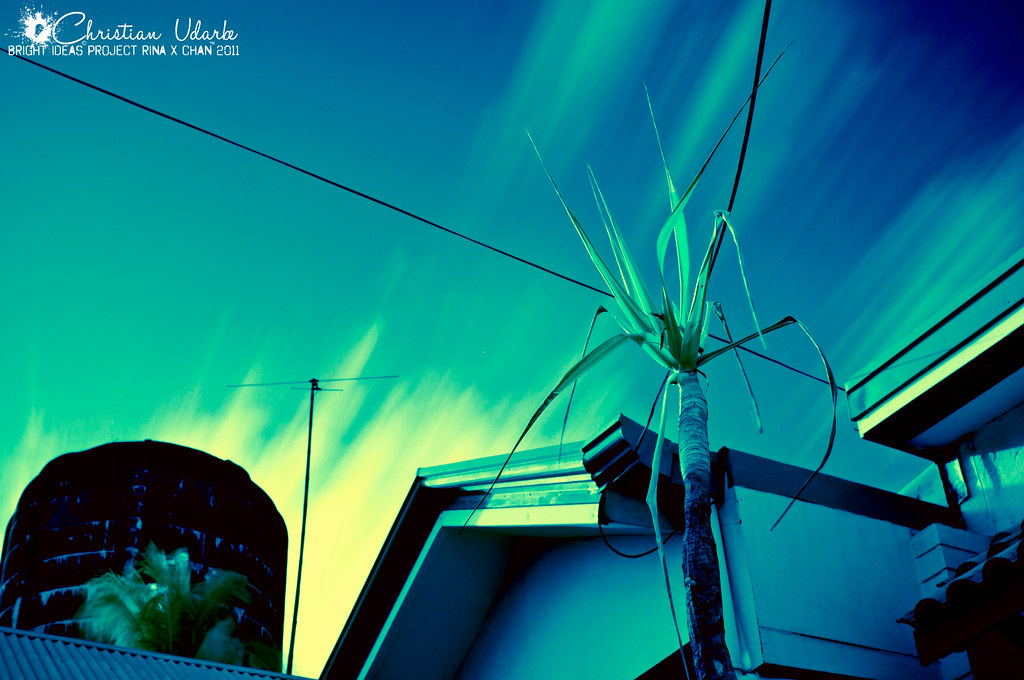
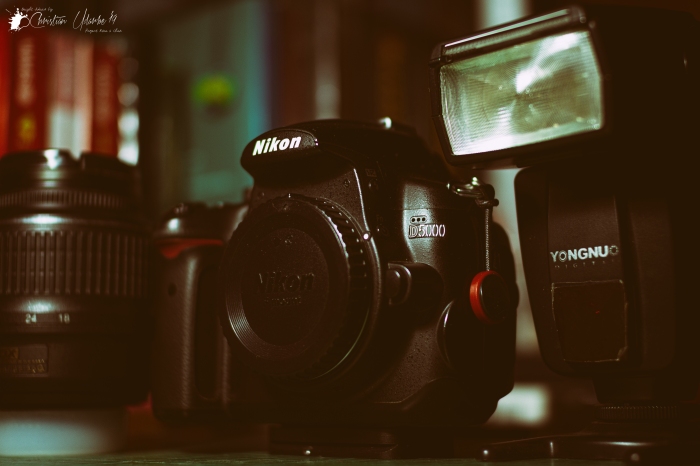
Then I remembered, I attempted infrared photography way back in 2012 when I still was using my Nikon D5000 as my main and only DSLR. I used a 720nm circular IR filter (ironically, it doesn’t filter out the infrared in the color spectrum, but hey, I am being pedantic) and of course, the later DSLR’s have a very strong low pass filter to block out IR, thus my attempts brought about little to no success.
Here are my previous attempts… prepare to cringe!
Fast forward to earlier in the year when I wanted to attempt IR photography again, I now use a Nikon D7200 as my main DSLR, and knowing more than I did back in 2012 (granted, I still have a lot to learn), I knew there is a low pass filter that will cause problems even if I used the same filter I did with the D5000.
Thus having spoken to other members in Flickr, the best advice was to just find an older DSLR, if I am not willing to convert my D5000 (which I wasn’t too keen since it was my first DSLR and had some sentimental value), and I stumbled on a Nikon D70 locally that was already converted to IR. This conversion usually entails removing the stock low pass filter and adding another that only accepts infrared in the color spectrum, specifically at the 720nm range, and this is usually the most common range for IR cameras or filters (or you know… I should stop being pedantic).
The range usually gives you interesting effects when you post process and below are some examples I found online:
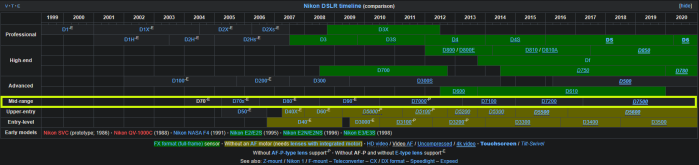
I decided to buy this Nikon D70 that is converted to only see infrared in the 720nm… A DSLR that is originally introduced and sold way back in 2004. And to no surprise, there are limited features, a smaller LCD screen (which mine has a broken LCD since, you know, second hand and all), a few auto focus points, etc. However, I am still happy with the camera overall, and it has become one of my favorite cameras to bring alongside my D7200 when out on trips (well, before… since you know… quarantine). Interestingly enough, the D70 is basically the great great great great grandfather of the D7200 in the Nikon DSLR timeline:
Via: Wikipedia
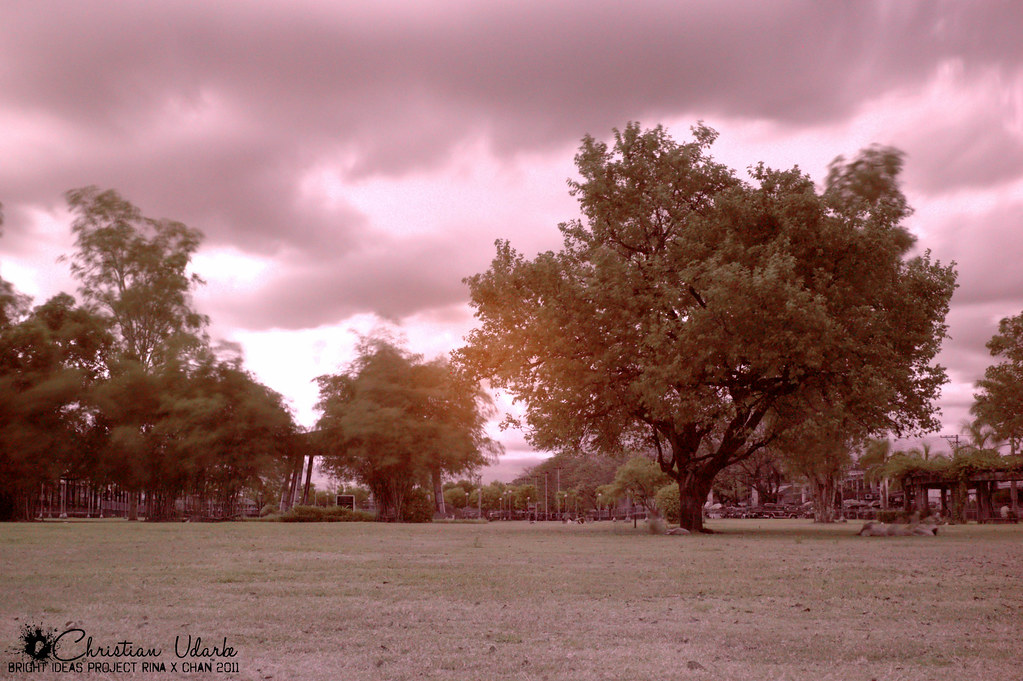
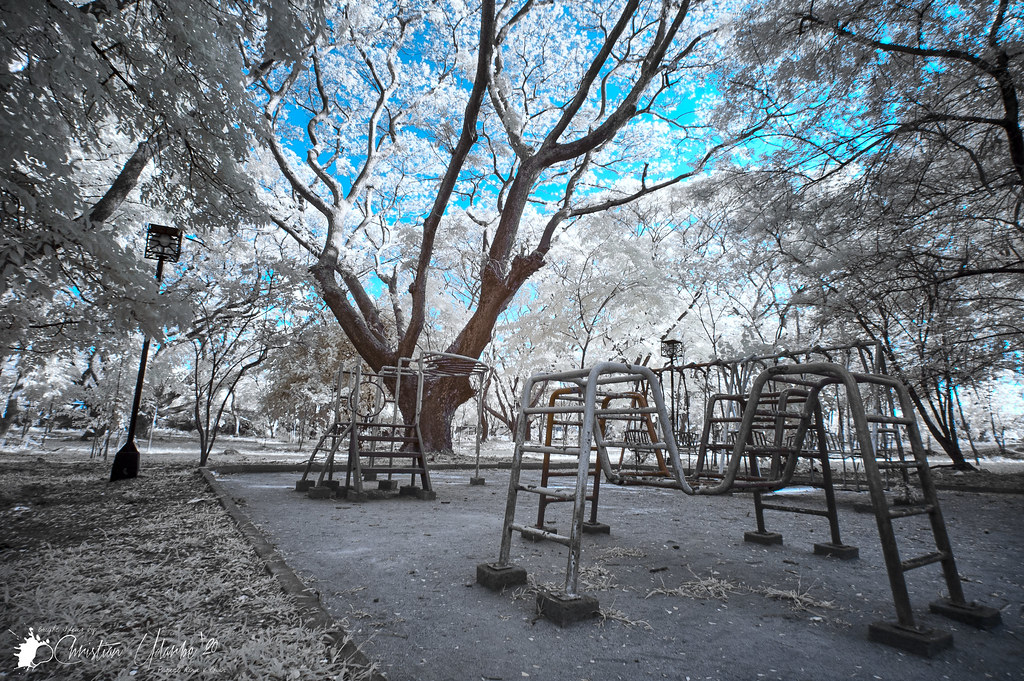
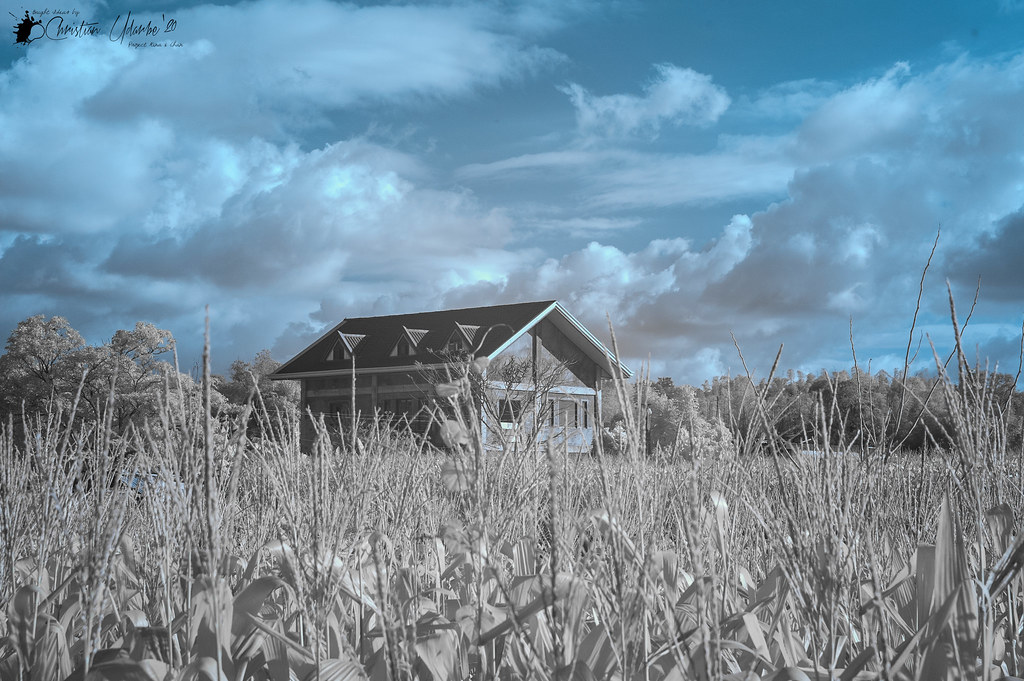
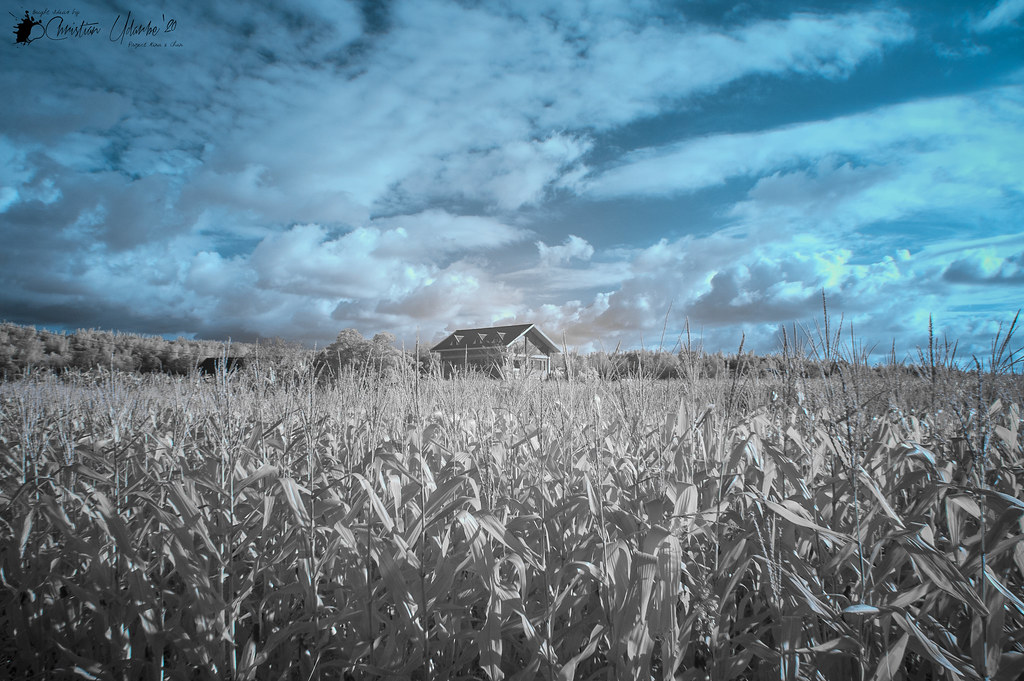
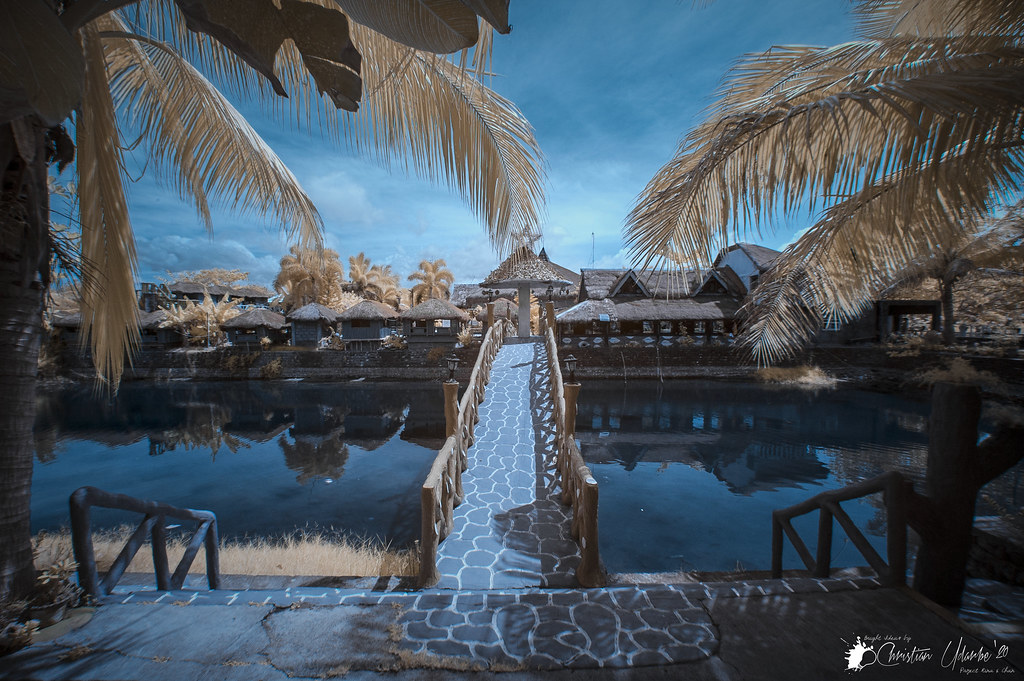
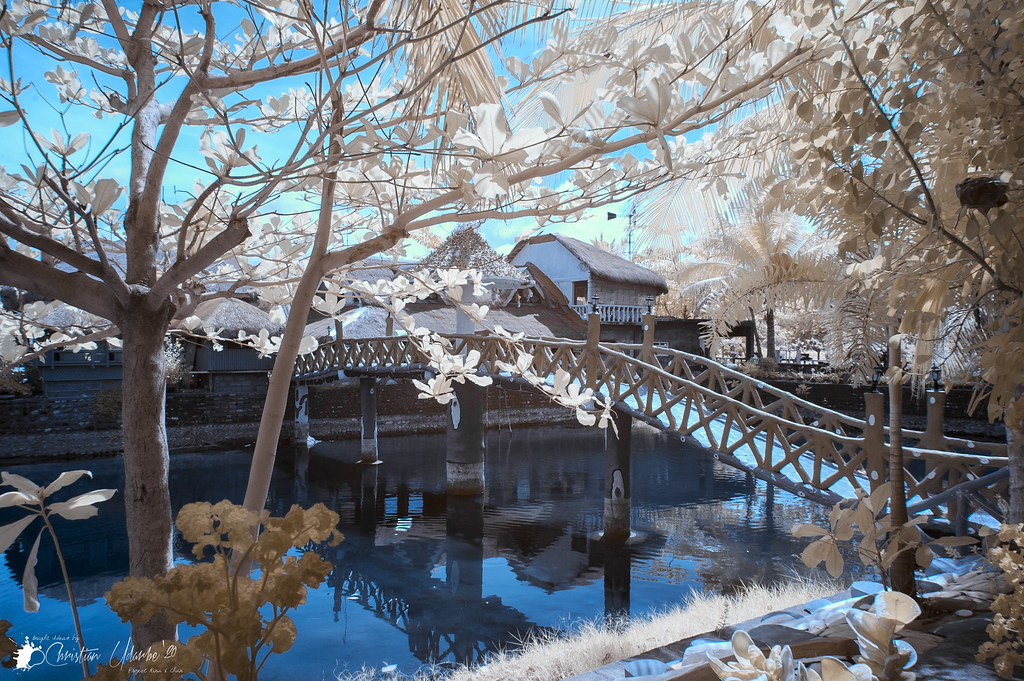
Now, let’s take a gander at my latest attempts in IR photography earlier in the year:
As you can see, and just like the examples I showed on how a proper IR photography would have been is that the foliage will usually look white or yellow (golden, if you will) and it gives such a foreign, almost fantasy, like photos. It is enough when we are out and about thinking of interesting photos with our regular cameras, but it becomes such a joy photographing in IR because you are not sure how it will look like since you still need to post process the photos lest you like it being all red and all. This hearkens back to the days of film and waiting for them to get developed and hoping they turn out well.
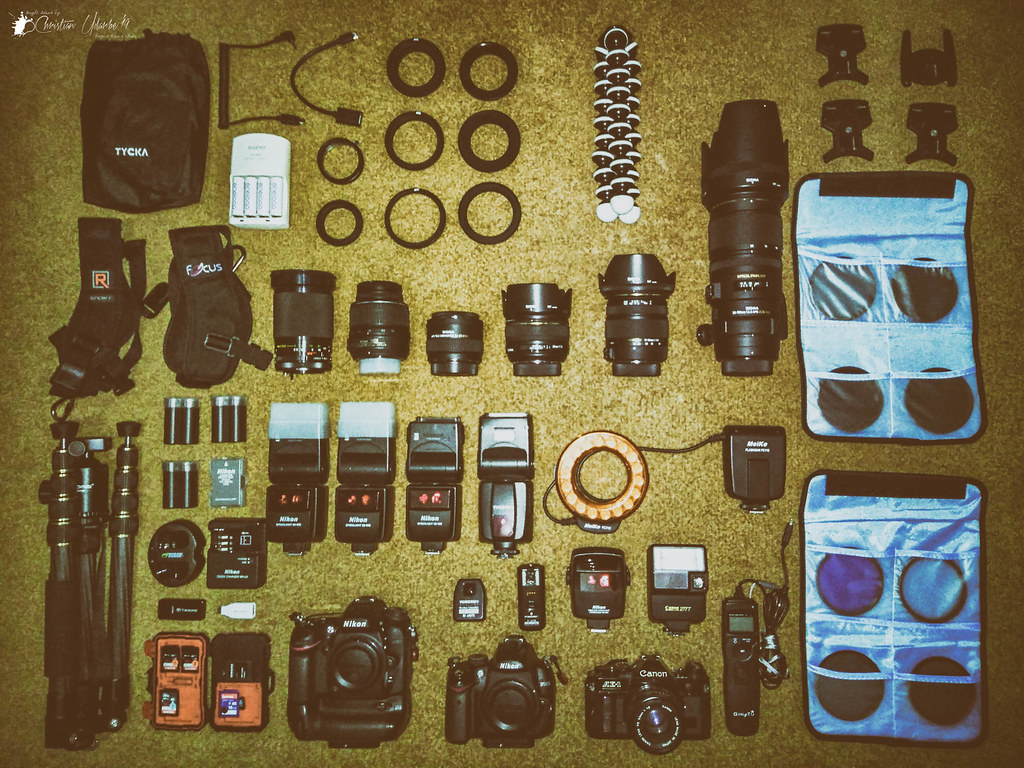
Now my usual gear that I bring along with me absolutely anywhere (again, before… cos of quarantine, but when it is lifted and the world is safer, this will still be my current go-to gear) now includes this camera and the whole gear would usually like this:
1. Nikon D7200 (with Nikon MB-D15 vertical grip)
2. Nikon D70 (720nm IR converted)
3. Sigma 17-50mm f/2.8 EX DC OS HSM
4. Sigma 10-20mm f/3.5 EX DC HSM
5. Nikon Speedlight SB-910 (never know when you need more light)
6. Nikon SU-800 Wireless Speedlight Commander (never know when you need some off shoe flash)
7. Black Rapid RS-Sport 2
8. SmallRig Shoulder Bag 2208
9. Others (like batteries for the DSLRs, flash/flash commander, SDHC/CF cards, simple cleaning supply, WB cards, etc)
And I must say, another good reason why I got this 16 year old camera was not simply just for IR photography, but to also show to other younger photography enthusiast that thinks that they need the “best” camera (whatever that is…) and blame their current gear when they don’t try and learn different techniques and master them. Sure, the D70 doesn’t have a larger MP count, not surprising; it doesn’t really have the best image quality, not surprising again; but I still feel it takes wonderful shots in IR and it goes to show if you upgrade your skills before your gear, you can pretty much shoot any camera from any brand, of any format (though admittedly, I need to start trying film soon!), from any generation (again, still need to work on my film skills!), under any condition, and still take great shots, and not do the noob move of blaming the gear.
If you want to also have a secondary camera to photograph in IR, I would also suggest what I was suggested: that is look for an older DSLR (preferably in the same system of your current camera, granted that you are also still using a DSLR like me, so you can use your current lenses) and then have it converted, or be like me, and find and hope you are luck enough to find a converted one already (I live in the Philippines so I say luck plays a bigger role here; otherwise I would have ordered from overseas).
In the US, you can check these sites out: kolarivision.com and lifepixel.com as they both sell conversion kits and even that of converted cameras of your liking. Of course, you can’t go wrong with eBay, too.
For tips on how to post process, I just went on to YouTube and watched as many videos. You will quickly learn that the most common way to edit these are swapping the blue and red channels. But of course, you can always fine tune them so you can get the effect you’d like and that is why I watched a lot of YouTube videos to see what I can mess about with.
And that’s that! Why I bought a 16 year old DSLR in 2020.
Gotta give my thanks to fellow Flickr user and now friend, Mark Bangert, for answering my questions and giving me the suggestions I mentioned in this post.
Again, I hope you all stay safe and responsible. Only together can we defeat this pandemic. And the earlier we cooperate with the restrictions, the earlier we can be free of it.
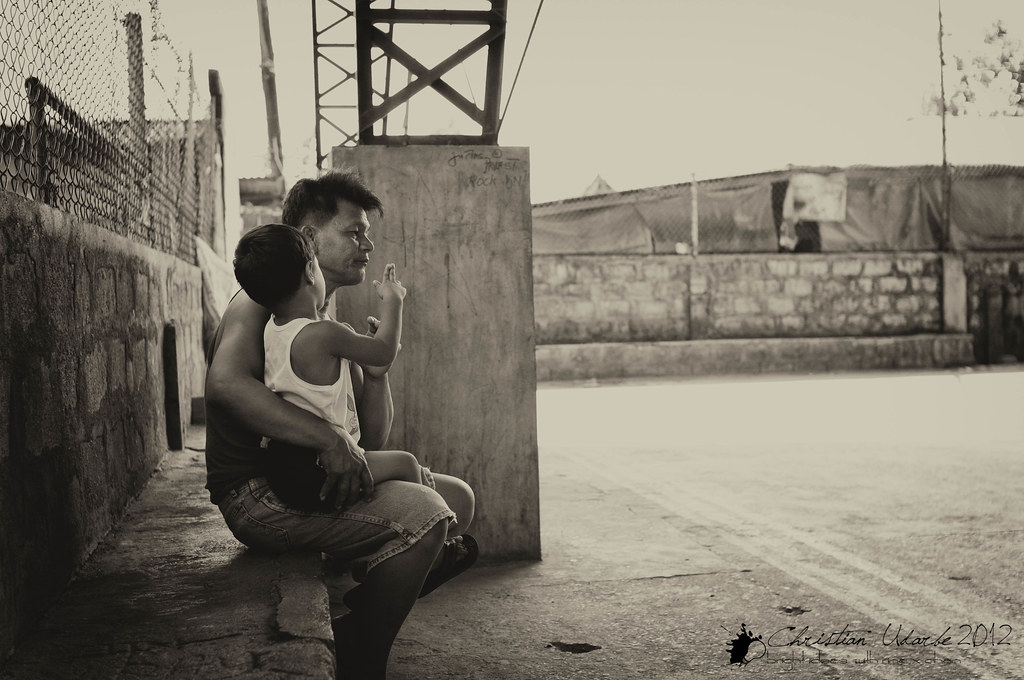
Like most, if not, all families, especially in the 90s, and being the youngest, I was often the one in charge of documenting family vacations, events, etc., and it was still mostly a film-centric photography back then.
Then came in point and shoot digital cameras, phones, and whatnot, my job as the family photographer has lessened through the years. And with that, photography has been an after thought and more of a chore to me.
Come 2010, in the middle of my first year in medical school, I was craving for a new outlet other than my then current (and still active hobbies to this day) hobby of PC gaming, collecting action figures, and playing/collecting guitars. I needed another escape…
Then I had the urge to try out digital photography, and in October of 2010, I purchased my first DSLR, the Nikon D5000, and a few months later, in December 2010, I then made a Flickr account, where I can place most of my photos and a much better archival manner than it would have been in Facebook and such – and in Facebook, it severely compresses photos unlike Flickr.
Not only will it be a great place for archive/backups or used as an image hosting service, but I knew I can learn from the photos of other members and get to ask questions in discussions within the groups in Flickr. Finally, the most important for me is that if there will be any comment, either compliment or criticism, it will be from strangers that will give honest to God feedback. And in terms of criticism, they will be more constructive that I can definitely learn from.
From December 2010-December 2018, many things have changed, from my style of photography, my skills (I hope), to my upgraded gear, I was still actively posting in Flickr, but I was never the one that is the most INTERACTIVE; I hardly reply to comments (I do, but not always), to private messages, to play along in group discussions, etc. I mostly post and run…
That changed earlier this year, where I thought it is time to start really building friendships in Flickr, interact in groups, and just increase my knowledge by befriending others and have them give me honest feedback, or simply have their photos that they’ve shared as an inspiration for my next photos in the near future.
And maybe that is why I fell in love with Flickr again – learning new things from other people’s photos, their feedback, and making new friends. Granted, there may be image hosting sites, maybe 500px, but I never made an account in other sites and stuck with Flickr through the years.
To put it into perspective, from December 2010-December 2018, I only amassed 450,000 total views for my account, then when I started being more interactive, from January 1, 2019-date of this posting, I have amassed more than 550,000 total views, thus, my total tally is now over 1 million total views for my account.
That number is mind-boggling for me! I am not a professional, and I will never be a professional. I am just a hobbyist and my day job is that I’m a physician. To think that I got a million total views and that I got more than half of that many views in less than a year, made me think, if I were more interactive in the past few years, maybe I could have broken the 2 million, maybe even 3 million total views by now, as more members will be aware of me and my photos for being more interactive.
But again, I have to get real, to think that there is still a million views in my account is really mind-boggling that there are people interested in seeing my photos, take the time to comment, and some others, interested enough to even follow me so they can keep tabs on my future posts.
And speaking of people following me, from December 2010-December 2018, I only have around 250 followers or less, and now, from January 1, 2019-date of posting, I now have nearly 400 followers – not a lot, sure, it isn’t anyways near a thousand, but hey, we are getting there… slowly yet surely.
Haven’t posted anything special in Flickr for my 1 millionth view, but I did just share a screenshot of the stat screen confirming 1 million views. However, here in WordPress, I think I just want to share my very first photo I post in Flickr and my most recent shot at the time of this posting.
Not necessarily my very first photo ever taken, but the first one I ever posted in Flickr. This is my upperclasswoman during one of our medical missions.My most recent and first attempt at stroboscopic photography
Now now, my most recent photo may not be the most impressive after all these years, but I am still proud of this shot since this is my first real attempt at stroboscopic flash photography. Another thing I love about my progress in digital photography is that I try to learn new techniques, never blaming my gear, even back then when I just had the Nikon D5000 and the kit lens, always thinking that it is my skills that I need to improve and learn many techniques. Up to this day, there is so many things I can learn, and this is one of them: stroboscopic effect.
It showcased, though not obvious, how I combined the things that I learned through the years, and how I took advantage of my current gear to take this shot. It goes as follows:
I setup my Nikon D7200 on the Zomei Z699C tripod; I then used the Nikon Wireless Mobile Utility in my Android phone to frame myself and to make sure I was in focus (for the most part, since I am moving during the stroboscopic shot); I set up my Ginto Intervalometer’s delay and interval per shot, so I can be at the ready and anticipate the shot when I click on the shutter release; I then set up the flashes, the SB-910 facing towards me from above, the 2 SB-600 behind me facing the wall, and then the Nikon SU-800 Wireless Speedlight Commander on my D7200 hotshoe, set up on repeater mode and trigger the flashes each at 1/64th power, 4hertz, and a total of 8 flashes (based on my readings, you divide the number of total flashes you want by the speed/frequency of the flashes or hertz you desire, thus why I got 2 seconds shutter speed); knowing that I am shooting at 2 seconds based on the frequency and total number of flashes I want, I may be way overexposed, so I used my cheapo Andoer 77mm ND8 to lower down the exposure.
And thus, even if it isn’t my sharpest of photos (obviously, since this is a stroboscopic effect and I tried to stay still in one place instead of full motion), but it really showcased how I can just think of a shot and use the things I learned throughout the years, and use the gear I have collected throughout the years, and most importantly, I am not full of myself that I will not crave to learn new things.
Now let us look back at my very first DSLR and its kit lens, albeit I did get a flash for it back in the day (not a Nikon one, but Yong Nuo one), a sling strap for it (not the Black Rapid, but a knock off), and other accessories for my Nikon D5000, I want to show my first DSLR in its simplest… when I had nothing but itself – inspired me to work on my craft, have dreams of the gear that I have now, but never to ignorant that my photos that are bad or awful back then is due to the camera I have, instead, it was my lack of knowledge and skill. It taught me to be better.
Then fast forward to today, and my current camera and all the gear I have collected through the years (most of them are hand-me-downs from the Nikon D5000 days), though it may be a big upgrade from where I started (albeit not being mirrorless), and admittedly, the photos I’ve been taking have been what I envisioned in my head and have it come to fruition, I still owe it to my years using the Nikon D5000 and kit lens that made it an absolute pleasure to photograph with my Nikon D7200 and all my lenses, flashes, and all the rest of my gear, today. I don’t think I would have enjoyed shooting this much with my current gear, heck, I may not even have an improvement of my skills, if I always blamed my gear for bad photos. That is why the Nikon D5000 and kit lens is still with me, because I learned a lot and improved my skills.
The OG! Nikon D5000 with the 18-55mm kit lens. Forgive the photo quality, I just used my Oppo A3s phone that is awful in every way.To current gear, well for the most part. Of course, if I took a pic of every single peripheral, it will just be more messy. Again, sorry for the quality of the photo… You can hardly see the lenses on the right and the flashes on the left. Ah well.
Hopefully this post will serve as a reminder that we all started somewhere: I started in Flickr without even getting a single view per day, now here I am, averaging at least 2000 views a day – that may not be a lot compared to others, but for me, I never thought I would see such a thing for my account, not look, I have broken a million views, and more than half of that was amassed less than a year!
Look at my first photo, so simple, didn’t even use the popup flash for goodness sake, to my most recent, where I used a new technique that took advantage of my 3 flashes in repeater mode, combined with other techniques I learned through the years,
Then see my starting DSLR to my current DSLR and gear.
We all start somewhere. Thought I often dreamed of those numbers and those gear when I first started out, I knew, what was more important, was to upgrade my skills before I upgrade my gear.
With upgraded skills, comes upgraded photos, comes more views in your chosen site, and more confidence for when you finally upgrade your skills to ensure that you’d take advantage of the features of your new gear. But never ever be content with your skills. Especially if you are just a hobbyist like me and not a professional… Never be content with your skills… always find something to improve… read new techniques… experiment. And never blame your gear.
DISCLAIMER: I am not a professional reviewer; I review the things I buy as a consumer. I am not at all sponsored. I am an average consumer, giving my consumer thoughts.
Introduction:
I mentioned this before in a post that my LYNCA WATERPROOF MEMORY CARD CASE WITH BUILT-IN USB 3.0 CARD READER, that I also happened to have reviewed before, has bit the dust. In my review, I also mentioned its flaw in that the contact where you connect the USB cord has no rubber seal or gasket to inhibit water from seeping into it and causing problems on the reader itself. And so, it get water damaged because there was indeed water seeping into the flaw and destroying the card reader and rendering the LYNCA WATERPROOF MEMORY CARD CASE WITH BUILT-IN USB 3.0 CARD READER a glorified SD card case. (It is nice to note, I have since bought a Transcend USB 3.0 Card Reader to transfer my photos to my PC)
I stumbled upon the JJC BC-2XQD1 Multi-Function Battery Case for the Nikon EN-EL15 battery that also houses an XQD card and that got me thinking if they had one that can house an SD card or 2, because this may help with organization and when I travel or have shoots.
I then found the JJC BC-UN2 Multi-Function Battery Case that can house different battery models (one of which is a Nikon EN-EL15), and lo and behold, it holds an SD card! Make that 2!
My only caveat is that I have 3 EN-EL15 (1 from Nikon and 2 from Wasabi Power), 4 SD Cards (2x SanDisk Extreme PRO 32GB, 1x SanDisk Ultra 32GB, and 1x SanDisk 16GB), and 1 MicroSD Adapter. Technically, I can house all my cards if I do purchase 3 cases, but it can get crowded in my bag if I have so many of these cases that I juggle around to get a battery or a specific card.
The JJC BC-3SD6 Multi-Function Battery Case is similar to the JJC JJC BC-UN2 Multi-Function Battery Case as it universally houses different types of batteries and 2 at that. It now houses 6 SD Cards and it also houses its own JJC CR-SDMSD1 USB 3.0 Card Reader.
This is near perfect, only that I have 3 EN-EL15 batteries. Thankfully though, when I do go out on shoots, travel, or whatnot, I obviously have 1 of the EN-EL15 batteries in my D7200 already, so the other 2 are on standby, thus this case can still work for my needs.
The only problem will be when I’m at home since this only houses 2 batteries and the third battery will become, well, a third wheel of sorts. However, I have Obsessive Compulsive Personality Disorder, so the 3rd battery, if charged, will be placed in my dry box in certain container, in a certain orientation, to remind me that it is indeed charged. The 2 batteries in the case will always be charged, but in the event that I used up one of the batteries at home, I will then move the 3rd battery in the case, so I can still remind myself that these are the charged ones. The consumed battery will now be relegated to the container where the 3rd battery was, and now in a different orientation telling me that it is consumed. If in the rare chance that I am out and about and I consumed a battery and need to replace it, the consumed batter will be placed in the case UPSIDE DOWN to tell me that I used that battery already. And lastly, I did place a sticker with a number, so I know in what order of batteries I have already used. So there, my long, unnecessary explanation on how I can still use this albeit only housing 2 out of my 3 EN-EL15 batteries, along with how I use my batteries in a certain order. ANYWAY!
So I ordered one in Lazada, but to my chagrin! I didn’t read what I ordered! I ordered another model!
The JJC BC-3LPE6 Multi-Function Battery Case is marketed as a case specifically for the Canon LP-E6 or LP-E6N and no mention of the Nikon EN-EL15! I was trying to cancel it but the order was already processed and on its way to the logistics facility.
Panicked and disappointed in my obvious brain farting moment, I decided to research if the 2 batteries are similar enough in dimensions for me to still use this with having to do something really drastic to it.
First off, when reading my intended order, the JJC BC-3SD6 Multi-Function Battery Case, as it universally fits other types of batteries, I looked to see if there was the Canon LP-E6 or LP-E6N in the compatibility list, and thankfully it was there! So in theory, if this also houses the LP-E6 or LP-E6N, and that it houses the EN-EL15, then the model I ordered should be able to accommodate my batteries, right?
Unconvinced, I looked through the interwebs and found the data sheet for both batteries from a 3rd party manufacturer and compared the dimensions, and by looking at the dimensions, in theory again, this model should fit my batteries. I should breathe a sigh of relief now, right?
Still unconvinced and in desperation mode, funny how desperation makes one think creatively, I recalled that there is a battery provider stall in the local mall and decided to have them visit. I explained if I can see both the Nikon EN-EL15, as well as the Canon LP-E6, that they both had on hand, and compare the dimensions since I screwed up my order. The salesman was very understanding and made me compare the batteries, and there was a very great chance that it will fit.
As the item arrived, I was all worried if it really does fit, and well, it did! That was the first time I screwed up an order for anything, so that was an eye opener and I really need to triple check my orders before confirming.
That’s enough of my introduction and a bit of story time, now let’s go for some specs!
The specs will be for the JJC BC-3LPE6 Multi-Function Battery Case, but the dimensions will be similar across other models. I will however include the measurement for this particular model’s cut foam for the battery and that of the USB card reader.
Weight
Net Weight(g)
106g
Gross Weight(g)
121g
Size
Full Size
126*88*31mm
Package
Packaging type
Carton
Packing size
90*165*33mm
Material
PC+Silica gel+EVA
Product Highlights: 1. 2 in 1 multi-function battery case
2. Fits different battery models
3. Can store extra memory cards
4. Made of high quality PC material, sturdy and durable
5. Protects your cards from dust, shock and water splashing
6. Better protection for your battery, make it away from short circuit
Capacity: 1. Canon LP-E6/E6N x 2
2. SD Card x 6
3. JJC CR-SDMSD1 USB 3.0 Card Reader x 1 (Sold Separately)
Below are the measurements of the cut foam for the battery and USB Flashdrive or Card Reader. Both the foam to hold the batteries/Card Reader and the SD Cards are held in place with 3M adhesive.
The case has a black semitransparent frosted finish (the only finish). You can see a yellow trim, and that is the rubber gasket in yellow (only color), and it can be removed as it is not permanently placed – that provides pros and cons which will be discussed later. This is for “water splashing” protection.
In the above picture, you can also see how the latch is not the usually unlatches “upward” in relation to the top half of the case.
Plastic is made of polycarbonate (PC), silica gel, and ethylene vinyl acetate (EVA); now I am no expert with these materials and such, but by JJC’s wording “Made of high quality PC material, sturdy and durable” and the fact it “Protects your cards from dust, shockand water splashing”, it sounds like this can take a beating when dropped, but in my review below, I didn’t do the drop test.
All packaged simply, as well.
I would also like to mention the other models available:
I will not mention the other models that only house one battery.
Now let us move on to the actual review.
Review:
Let’s start with the build quality and overall aesthetics: the build quality is indeed high. Even being made of entirely plastic, with only metal rods holding the hinges for the latch and the hinges for the 2 halves of the case, it still feels quality. Aesthetically, it only comes in a semitransparent black frosted finish and a yellow rubber gasket, and in that aspect, I’m alright with; most of my gear is already black anyway, but the yellow accent helps with what would be yet another pure black item. Love the clean lines and the overall simplicity of the design; I believe I mentioned this before in my review of the LYNCA WATERPROOF MEMORY CARD CASE WITH BUILT-IN USB 3.0 CARD READER, that I didn’t like the suitcase look of it and would have rather had clean lines and simple design. And that’s what I got with this JJC BC-3LPE6 Multi-Function Battery Case.
The foam is held in place with 3M adhesive as mentioned in the specifications portion of this post, and it certainly hold the foam in place when removing batteries/SD cards from their housing. It also helps that the cutouts for the SD cards and that battery is such a snug fit that when opening the case, there is no chance of them falling off their cutout foam housing. Of course, the batteries may fall off with force if held upside down, but that is why the battery cutouts are on what is the bottom half of the case.
Not sure if it was because I got the wrong model since this is for the LP-E6/LP-E6N models, but at first it was a bit tough placing my EN-EL15 batteries (albeit, reading back to how I checked the data sheet for their dimensions, read the JJC site for the max dimensions of the cutouts, and going to the mall to physically compare the dimensions, it should have fit without too much force). Maybe a millimeter off the width, but eventually, the foam, with a bit of coercion, was able to accommodate the EN-EL15 a lot easier now since it loosened up a bit.
As for the SD card cutouts, again, they fit snugly, but my only gripe would be the notch on the side in order to lift it from the housing; it is a tad too small even for my pinky to fit in and easily lift of the card (and note, I have small hands, owing to the fact I’m a small guy). It is possible, but really fiddly, and if you are in a hurry to change SD cards, this may slow you down. Finger nails, as long as you have a reasonable length that won’t gouge someone’s eyes out, then you can indeed lift it off from the housing, but still not as intuitive.
Both are minor gripes, but gripes to take note of.
Now let’s talk about the rubber gasket that is not permanently placed. It is great for cleaning purposes, for being a bright yellow rubber gasket, in time it may get scuffed up, and removing it from the case makes it a breeze to clean up and looking as new. The bad thing about that is that it is quite easy to accidentally remove it from the case, and it you are not paying attention, may drop it and lose it.
At first, I wouldn’t care if I did lose it as its purpose is to prevent dust or water from going in for the most part, but I soon realized that it has yet another purpose.
Upon discovering that, it is now imperative not to lose the gasket and being unable to lock down your case (in desperation, I guess you can just use a rubber band to tie the case down).
As mentioned, I didn’t have the drop test (LOL), but it looks sturdy enough to survive a certain fall, from a certain height, on a certain pavement, and at a limited number of times.
As for the “water splashing” protection, I decided to test it as an actual water proof test by submerging the case in water for at least 2 minutes. Without any of my batteries of cards inside, of course (LOL).
Since I use a pail of water as I was lazy to wait around in the sink of the bathroom to do this test, I submerged each side for a minute each (thus 2 minutes total), thoroughly dry it off before opening it.
Overall it is indeed dry, but expect some residual water between the top half of the case and the gasket and it can cause a splash back unto the case. But this minute amount of water is not a cause of concern. And if you did accidentally drop this case in the pool, surely you will try and recover it quickly, then dry the exterior thoroughly, and opening the case to remove the items inside it and place them aside just to avoid any water that may have entered the case.
My only concern at this point are the metal rods used in the hinges if they are stainless steel. But only time will tell after this test.
Now let’s have my final thoughts!
Final Thoughts:
As someone that is very particular with organization, both when out shooting or even in storage at home, this is a perfect item for me. The fact that it house 2 out of my 3 EN-EL15 batteries and can hold all up to 6 SD cards all in one case, this is a great add on for my photography gear when I’m out; instead of looking for my extra battery, then look for my SD card case separately, and it is another thing too keep in mind to make sure I don’t leave any of the separate items. Having them in one case, makes it tidier in any of my bags, and again, they are all in ONE case, as opposed to being separate.
I wished the USB card reader cutout was a little more of “standard” size of USB flashdrives, so I could have place my Transcend card reader there along with an OTG dongle, so absolutely everything is one place.
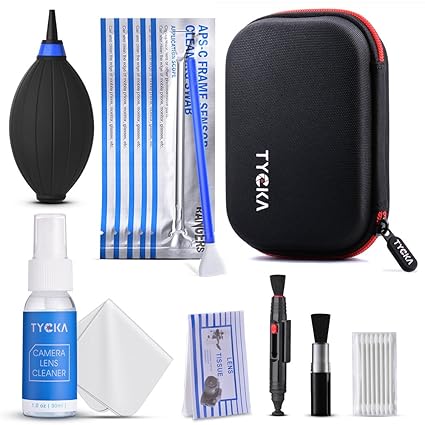
So for now, the OTG dongle and my card reader are on a separate case, as well as my tools and microfiber cloths are still on separate cases, but I’m alright with that. Especially when I’m looking at the Tycka cleaning kit that comes with a nice hard case. I can then put my tools and cleaning accessories also in one case, and who knows, maybe the OTG dongle and card reader as well.
My next possible purchase
Going back to the JJC BC-3LPE6 Multi-Function Battery Case, do I recommend it? ABSOLUTELY. And if you are reading this review, most likely you are also particular with organization, both on the shoot or for storage at home, and this one is perfect for that need.
Right off the bat, this is not a review of the Sigma 30mm f/1.4 EX DC HSM lens for Nikon F-Mount, since this is an older lens and that it is no longer being manufactured as the EX lenses have been usurped with the Art lenses of Sigma. You may still find this in eBay, or anything of the like, as pre-loved or even new old stock. So with that, you can just check other reviews from yesteryear elsewhere. This is just my experience with this lens since I first got it and how it is still part of my gear to this day – seven years later.
Around October 2010 is when I first gotten my Nikon D5000 with the 18-55mm f/3.5-5.6 kit lens. I shot a lot with this setup along with a Yong Nuo YN465 that I got around a few months after. Like in my previous blog post, I said to improve your skills with the gear you have at that time before even thinking of improving you gear. And at September 10, 2011, I then added the Sigma 30mm f1/.4 EX DC HSM to partner my standard zoom kit lens to further improve my skills.
I never bought another lens, heck even flash, and that of a camera body until 2017. So from 2011-2017, I have the Nikon D5000, the 18-55mm f/3.5-5.6 kit lens, the Sigma 30mm f1/.4 EX DC HSM, and Yong Nuo YN465, as my primary gear. Of course, I have tripods, flash triggers, sling straps, etc., but those were my primary gear whenever there was an even or if I traveled.
I decided to get a prime lens as one of my first ever upgrades since the fix focal length will help me think about my shot; it forces me to frame better and actually use my legs and not just rely on zooming in on the subject. On top of that, I force myself not to crop my shots as much as possible (with exceptions of course), so this really forces me to think about my composition with a prime lens.
I was looking at a AF-S DX Nikkor 35mm f/1.8G prime lens, but I always like looking at the long game, in spite of not wanting to upgrade or buy more gear immediately without first improving myself, since it is nice to dream and have a goal to shoot for, I wanted to have my own version of a trinity of lenses (plus a prime) from the same manufacturer, because my obsessive compulsive personality disorder will its ugly head. However, the AF-S Nikkor 14–24mm f/2.8G ED, the AF-S Nikkor 24–70mm f/2.8G ED, and the AF-S Nikkor 70–200mm f/2.8G ED VR II are way to expensive to even think of having them as goal for me back then, and well, they are still too expensive especially for a hobbyist like myself that does photography for fun and not as a profession. Thus, I needed to look at third party lenses.
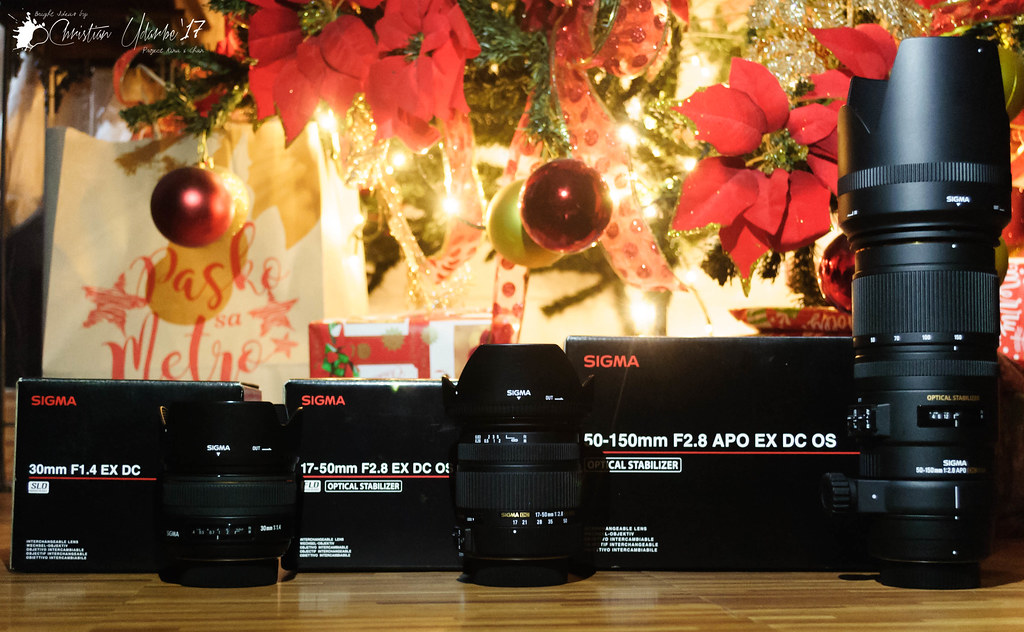
I stumbled into the Sigma 30mm f1/.4 EX DC HSM from the guys at DigitalRev TV back in 2011 (I believe this is one of the very 1st videos I watch of Kai, Lok, and Alamby, and immediately became a fan of DRTV to the point that when they all eventually left, I still follow them in their social sites and in their own YouTube channels). Performance wise, may not be the best of the primes at that year, but something about it that I fell in love with, and of course, the price may be more than that of the AF-S DX Nikkor 35mm f/1.8G, though if I look at the long game and collect my other lenses from the same make, then Sigma will, in the long run, be cheaper than the Nikkor lenses. And thus, I took the chance and my mother bought me the Sigma 30mm f1/.4 EX DC HSM to learn from and eventually be the centerpiece of my version of trinity lenses from Sigma (that I was able to complete in 2017, but as a prime lens, standard zoom lens, and a telephoto lens… still looking out for the Sigma 10-20mm f/3.5 EX DC HSM wideangle to really be a part of the trinity and the prime now being the extra lens).
The moment I got it in my hands and placed it on my Nikon D5000, I knew I will have an amazing time with this lens, learning from it, and eventually improving with it. Like I said earlier, I got a prime since it will force me to think about my shots, make use of my legs; having it with a f/1.4 aperture, I can get those amazing bokeh (yes, I was all about the bokeh when I first got it, but “grew up” and learned when to shoot at a larger apeture and when not to for the sake of the composition), and with it being wide open, I can have better low light shots. Still quite sharp at wide open and focuses fast as you can imagine with a prime lens. So I was really enamored with Sigma and will definitely use this prime lens as the center piece of my trinity of Sigma lenses when the time comes (and that would be 6 years later).
As time went on, life took over for the most part, so I was at a point where I wasn’t really shooting photos regularly or at all. I even forgot my usual Lightroom workflow. Neglect did set in and it come be seen by the wear it got through the years. Not so much as dents, but more of faded logos and such, and the finish lost a bit of its luster. Performance wise, it mostly back focuses at wide open and can be quite soft nowadays at wide open (though since getting the D7200 with AF fine tune, it is sharp at wide open, but even back then with the D5000, I rarely shoot wide open due to the narrow depth of field that still introduces more soft shots or miss-focus; I mostly shoot with f/2.8 with this lens and go as high as f/2 since getting it at 2011, with rare times shooting at f/1.4 even when it was really sharp then), but shooting at f/2 or f/2.8 still is quite sharp with lovely bokeh. I might have it calibrated sometime in the future, but with my current D7200, the AF fine tune did help with its sharpness at wide open.
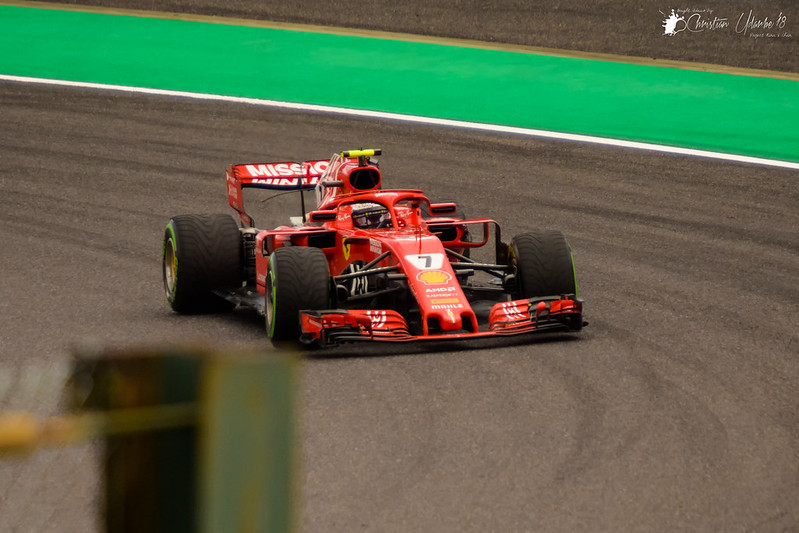
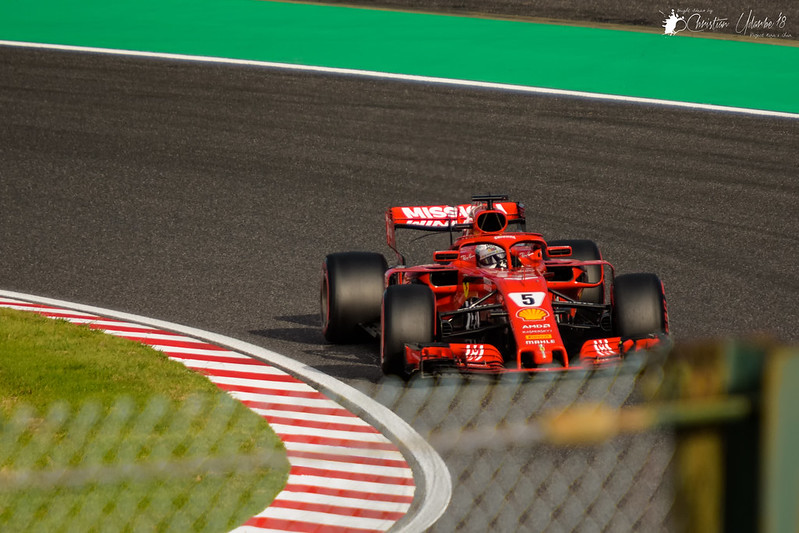
Around 2017, I finally got a new lens in the Sigma 50-150mm f/2.8 APO EX DC OS HSM (for future Formula 1 races, since the earlier that year, I was saddened I didn’t have a fast telephoto lens to photograph the cars during the Singapore Grand Prix; as with my other posts where I mentioned Formula 1, I like to remind people I am a F1 fanatic since 1996), which along with Sigma 17-50mm f/2.8 EX DC OS HSM, were part of my dream lenses to complete my version of the trinity of lenses with my Sigma 30mm f1/.4 EX DC HSM (again, I’d like to point out “my own version of trinity”, since the trinity is usually a wide angle lens, a standard zoom lens, and a telephoto zoom lens. Basically to cover most focal lengths. But my version is the 30mm prime, the 17-50mm standard zoom, and the 50-150mm telephoto zoom… hoping to finally get a wide angle in the Sigma 10-20mm f/3.5 EX DC HSM). Even though I got new lens, I wasn’t really enthralled with photography like I used to. I was happy, and it looks great beside my 30mm, but I was still not back to where I used to be as an hobbyist in photography… I wasn’t as passionate.
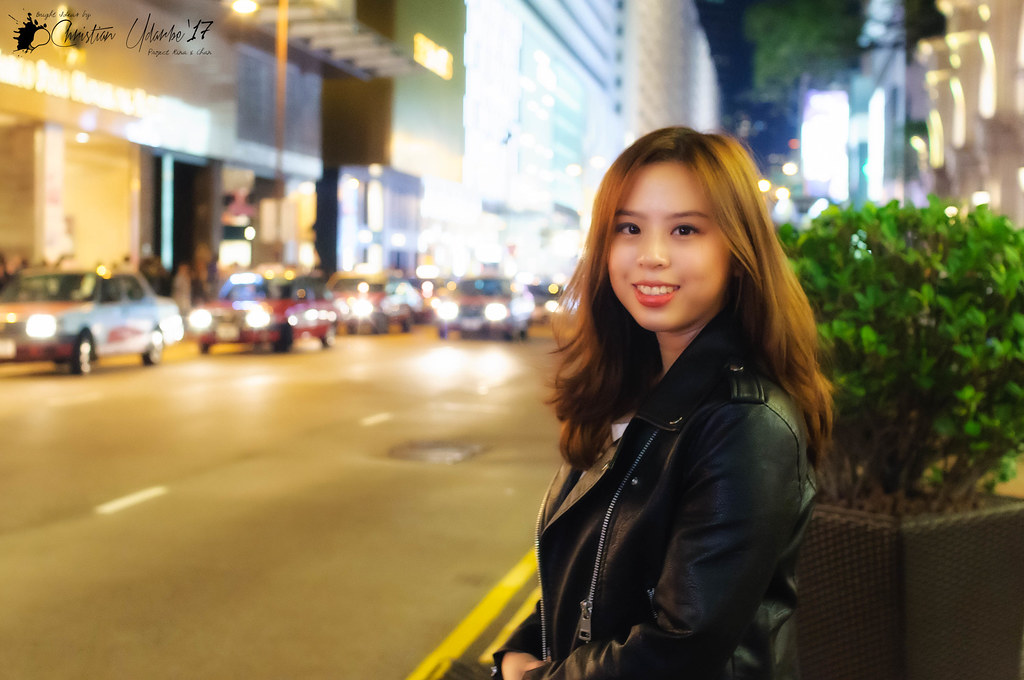
It wasn’t until I went to Hong Kong with my sister in 2017 that I also met up with one of my closest friends. She showed me around Hong Kong at night, and street photography being my favorite genre of photography when I was really passionate, I took one photo of her that made me fall in love with photography all over again. And it was shot with my trusty Sigma 30mm f1/.4 EX DC HSM.
Note that the shot is not sharp at all even if I did shoot at f/3.3, but my other settings could have been better, but remember, I was really not into photography at a certain phase (around 2015-early 2017), I wasn’t as passionate, and didn’t care to remember any of my techniques. With that said, even if this shot could have better, there was something about this shot that made me want to return to photography; learn my techniques again and improve on them; get new gear, since at this time, I know that I have outgrown my D5000, albeit not remembering my old techniques; remember my Lightroom workflow and such.
It was a simple photo, could have been better technique wise, but it made me fall in love with photography again, and it was shot with Sigma 30mm f1/.4 EX DC HSM, showing that it can still get me excited.
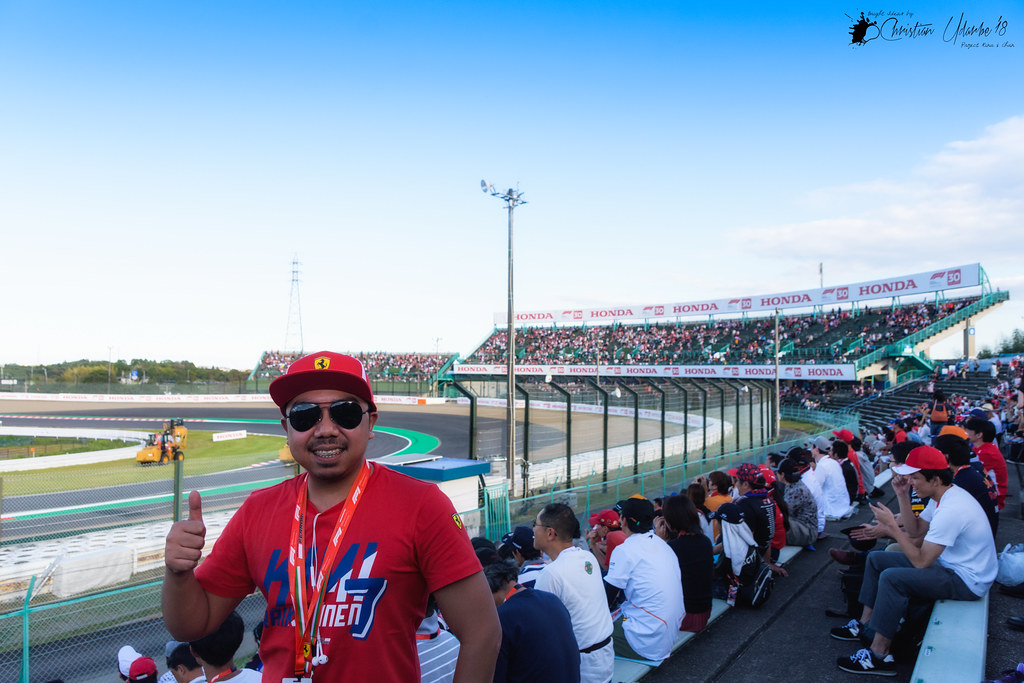
Seven years later, nearing eight years, the Sigma 30mm f1/.4 EX DC HSM is still my go-to lens for anything even if I already have the Sigma 17-50mm f/2.8 EX DC OS HSM as my standard zoom lens. On travels or whatnot, I bring both the Sigma 30mm f1/.4 EX DC HSM and Sigma 17-50mm f/2.8 EX DC OS HSM, with the Sigma 50-150mm f/2.8 APO EX DC OS HSM when I know I will use it like last October 2018 for Japan and the Formula 1 race. But the Sigma 30mm f1/.4 EX DC HSM will always be part of my gear. And at times, my only lens I take with me.
Is it because it out performs my other lenses? No (except the kit lens of course). Apart from the sentimental value because my mother bought it for me and it is my first lens upgrade, not to mention the MANY memories I’ve taken with it, but the fact that I am so familiar with its performance (and its deteriorating sharpness/rear focusing problem), I’m so familiar with its focal length (45mm equivalent since I use crop sensor bodies…), and I feel at home with it.
In time, I will have it calibrated so it can be sharp again at f/1.4 and and have less rear focusing (both partly fixed with D7200’s AF fine tune), but either way, this will still be my favorite lens, even if it never out performed out primes back in its day, and especially today.
Do I recommend this for you? No. There are better primes out there now for F-mount, either for crop sensor or full frame, and with the advent of Z-mount, in time, other F-mount lenses will also lower down in price.
Will I ever let this go? NO. Like above, no matter how other primes in the market can outperform this, it is the sentimental value and memories that makes me hold on to this hard. And that is not to say that this is an awful lens for photos. I can still take amazing shots with this! As I will demonstrate with my favorite shots through the years of using this lens.
Seven years later… still my go-to… still making memories… and technically, the one that started it all.
Now let’s look back seven years ago to my earlier shots to my more recent shots with the Sigma 30mm f1/.4 EX DC HSM; how I improved (if I really did improve; also the evolution of my watermarks lol), and why this lens is still my favorite that I own. Just my favorite shots I’ve taken with the lens (not absolutely all! That would be a nightmare to share… but I will still like my Flickr photostream so you can see all my other shots with this lens and my other lenses, on the D5000 or D7200, etc).
Note most shots were taken with the D5000, but by 2018 I have switched to a D7200 (I will make a future post as to why I opted for the D7200 over the D7500).
With that… I still love my Sigma 30mm f/1.4 EX DC HSM for seven years and counting. And here’s to more years and memories!
Simply, no, you do not need to get a “better” camera, you need a better technique first.
I’ve been into digital photography since 2010, but prior to that, I have been the designated family photographer when my dad got tired of doing it himself. We got Kodak, Olympus, and such, film cameras that auto-focuses and the like, since he can’t lend me his Canon AE-1 Program SLR for I was much too young to really understand how to manually shoot and that in film. However, that taught me the basics of photography, and what I feel is important, that is recognizing the moments and compositing/framing it.
When I finally got my own DSLR, and that is the Nikon D5000, I made sure to understand the features that it has, and of course, take advantage of those said features; learn to shoot in M-A-S-P modes; learn how and when to shoot in full manual focus when time permits or stick to auto focus as to not miss the moment; learn how to make use of lighting (since at that time I only had a pop up flash); experimented with different genres; learn how to post process RAW files; of course, still trying to learn how to frame and compose; and one thing that others take for granted, that is how to properly hold the camera – an important simple technique that can help increase the shot’s sharpness especially if the shutter speed is a tad slower.
I then outgrew the pop up flash, then got a Yong Nuo YN465 flash, so I can learn how to use a speedlight on shoe; directly pointing at the subject, bouncing it off the ceiling, etc. After some time, I then got me the Yong Nuo RF-602 flash trigger to learn how to control an off shoe flash.
And to this point, it was just my Nikon D5000, the kit lens, and the Yong Nuo YN465. I had dreams of getting “better” camera bodies, but definitely better glass. However I knew, the most important way to improve my shots is to continue to practice and improve my technique first.
In fact, I keep blaming myself if a shot isn’t as good as I’d hoped for, thinking it must be my settings, my technique, my lack of vigilance, to make the shot better. It was never my gear… And I still do blame myself to this day if I have shots that isn’t as good as I’d hoped for, and I’ve since upgraded my DSLR body.
But yes…
We all started somewhere, and this is where I started.
I thought of making this post, because since I started digital photography in 2010, through the years, I have gained a notoriety among my friends, family, colleagues, etc., that I am the go-to-guy for photography related things.
They knew I was passionate about photography as I am with my other hobbies like computers, other tech, gaming, anime/manga, Formula 1etc. And much like anyone else, once you are passionate about something, you learn the craft either by enrolling in university or you can easily be self taught by reading/watching a lot of references, and I am the latter… more self taught than anything. It gets easier to be self taught, too, if you are really passionate about it… (plus not being graded helps as well… wink wink)
But being the go-to-guy, I get loads of questions as to what gear they should get. Of course, it depends on their uses, their budget, and finally, their level of skill at that moment. If they are the type that just like taking quick photos for travel, dining, or other such things, not worrying about post processing or such; not a lot of extra cash to really spend a lot on interchangeable lens cameras; and just really starting out, I will advise them of a gear that is appropriate for them.
However, there are those that really want to get into the hobby and art of photography that feel that they immediately need to get an EXPENSIVE camera, because, of course, they think it will help them get great photos. Surely, a great camera will help you get great shots to an extent, but I still feel that you have to start somewhere and learn the proper technique first.
I also do not recommend the most expensive gear right away to beginners, because what if this was just a spurt of the moment or a fad of a hobby for them? They get the most expensive gear, then somewhere down the line, they realize they aren’t into it after all.
Whenever I get into a new hobby, I always know that I need to get a good enough item in respect to my new hobby; not too expensive, but at the same time not too cheap; not too feature filled, yet not so featureless… Goldilocks is what I was after.
And of course, that is what I usually tell anyone that asks me what camera to get, start with a mid-level camera, be it a DSLR, MILC, MFT, whatever… be it Nikon, Canon, Sony, Fujifilm, Olympus, etc…
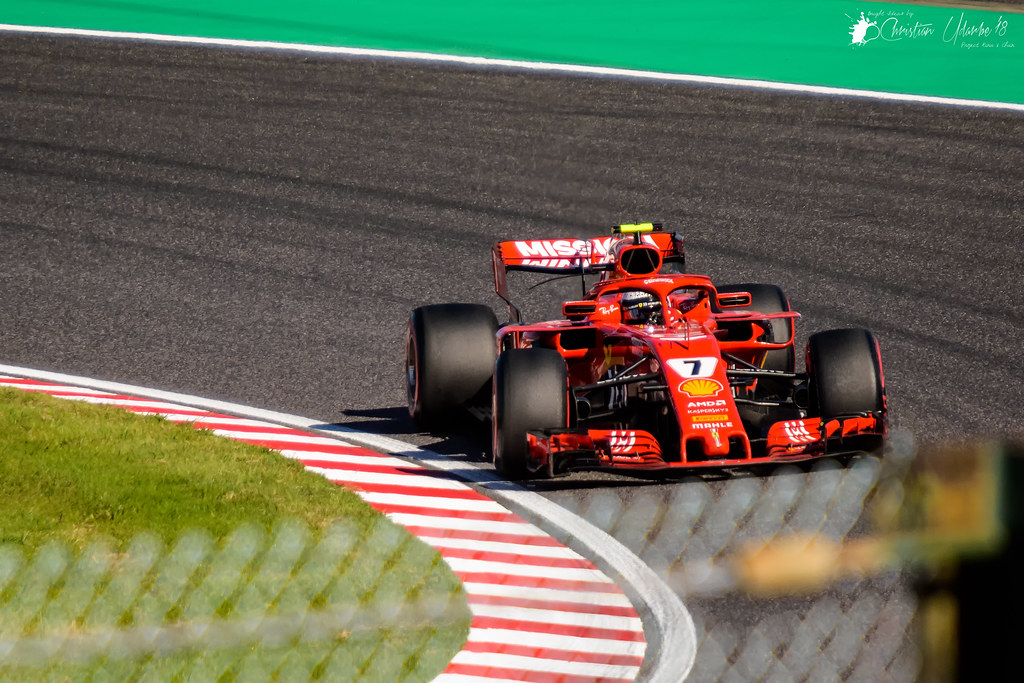
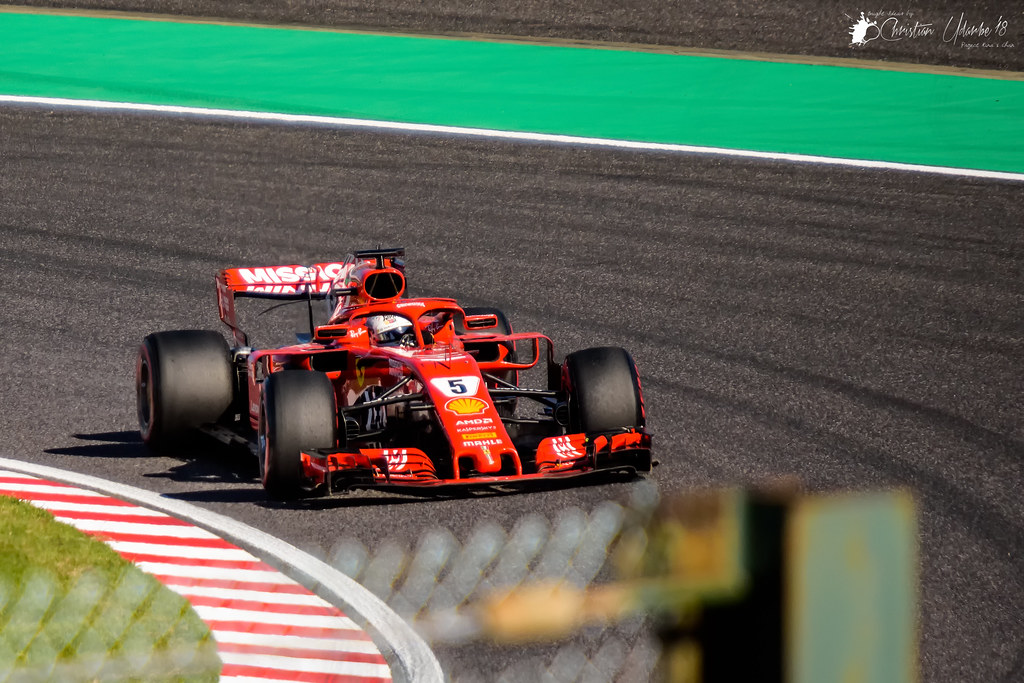
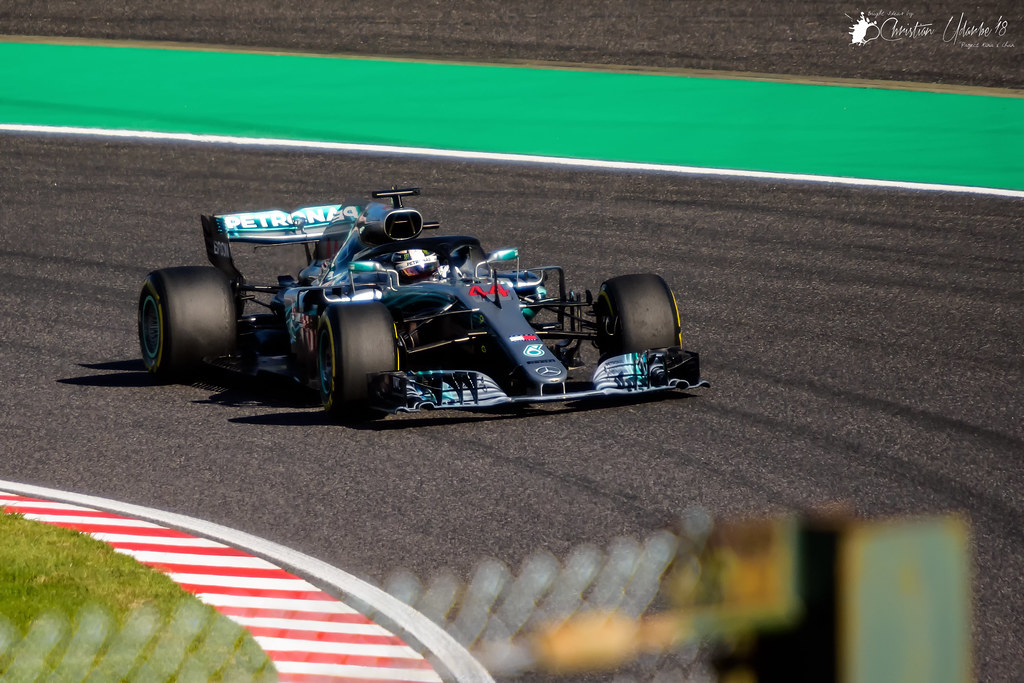
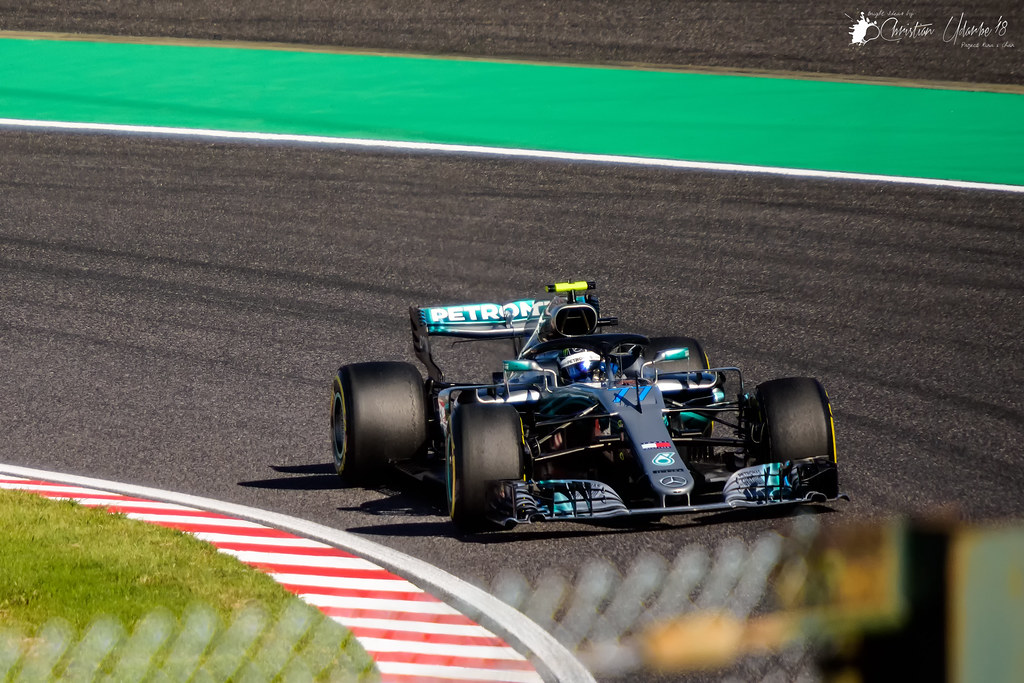
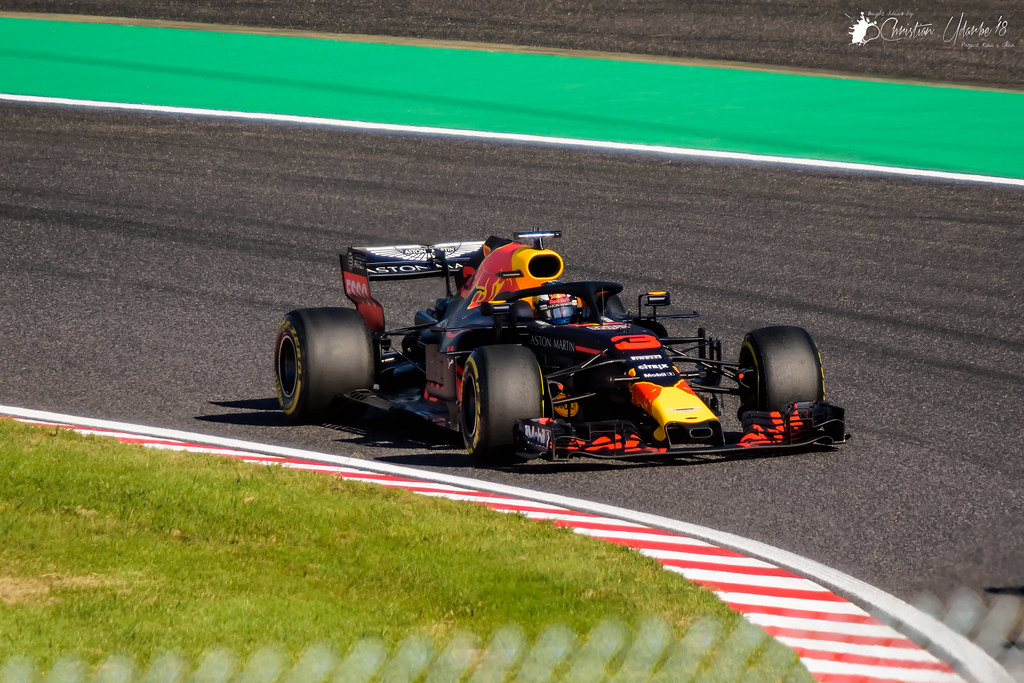
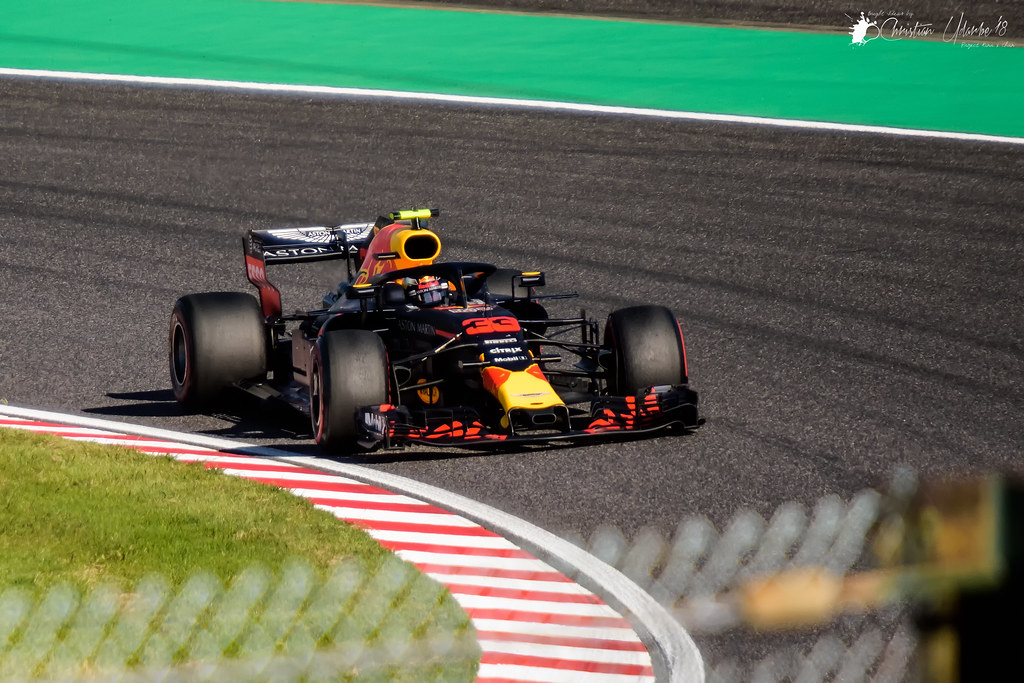
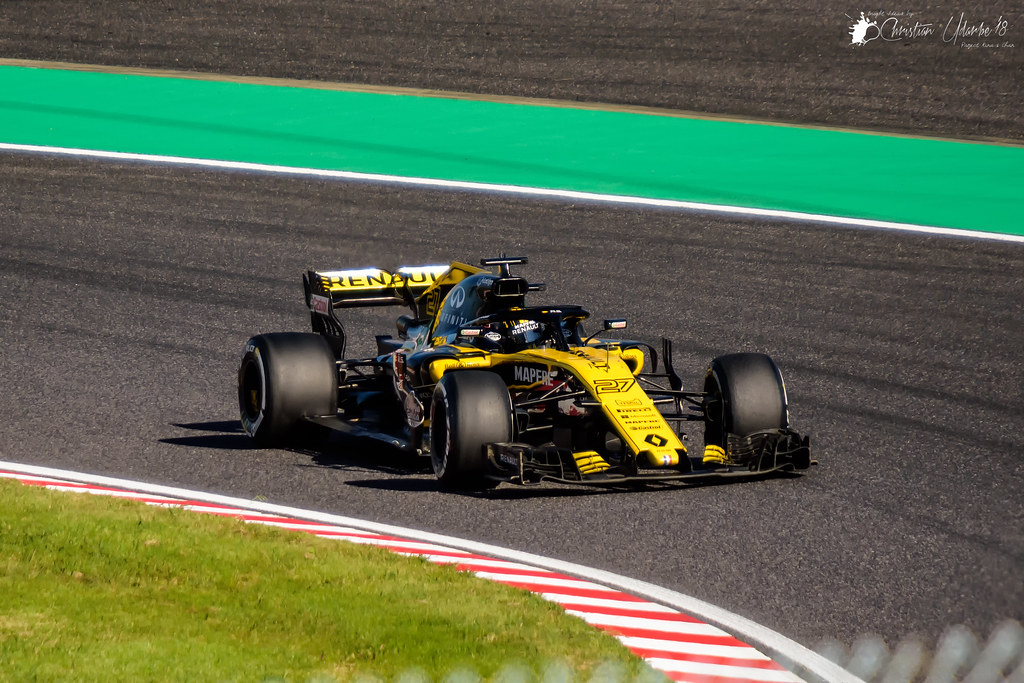
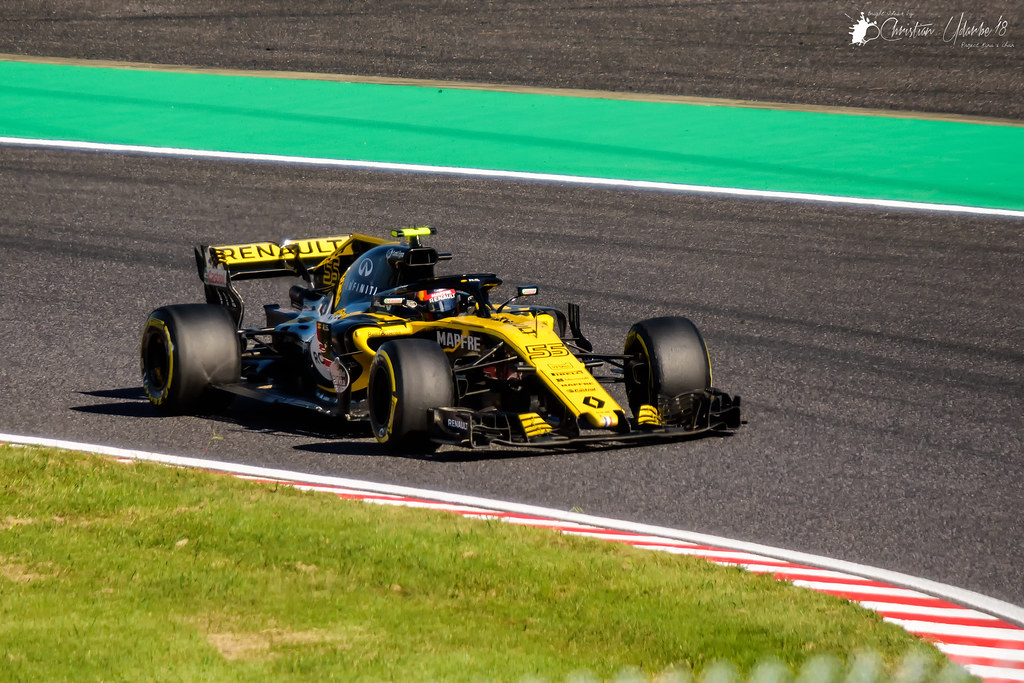
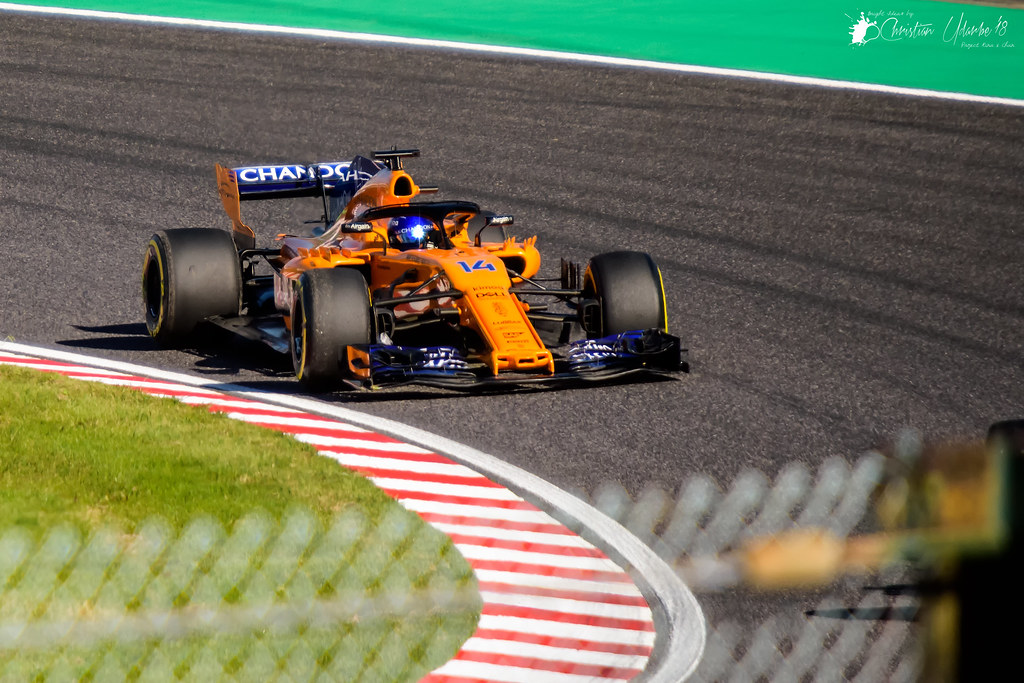
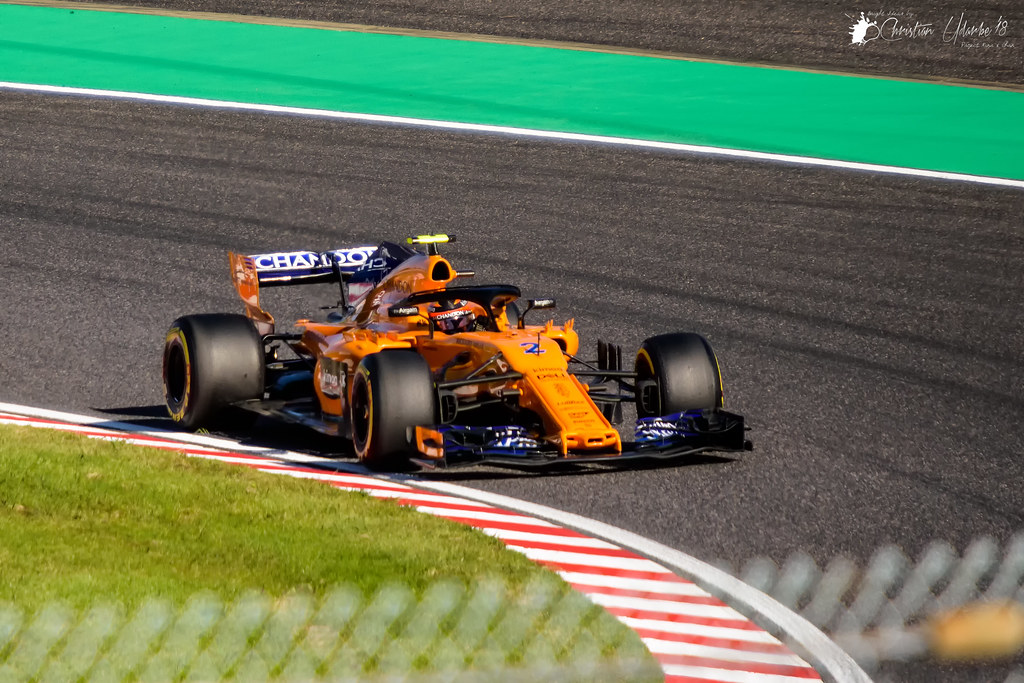
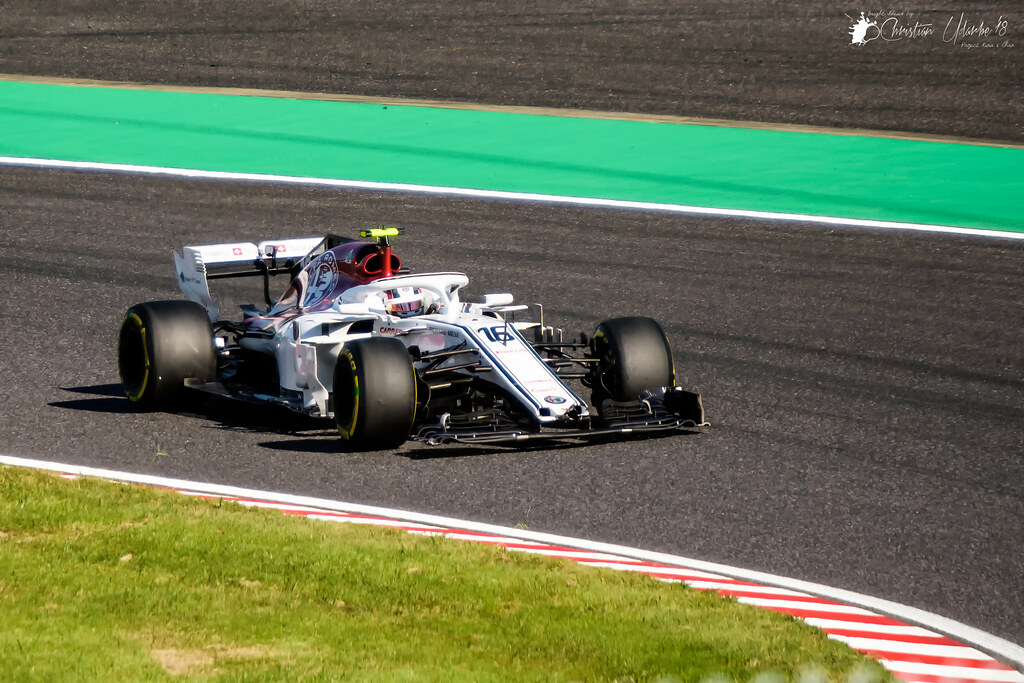
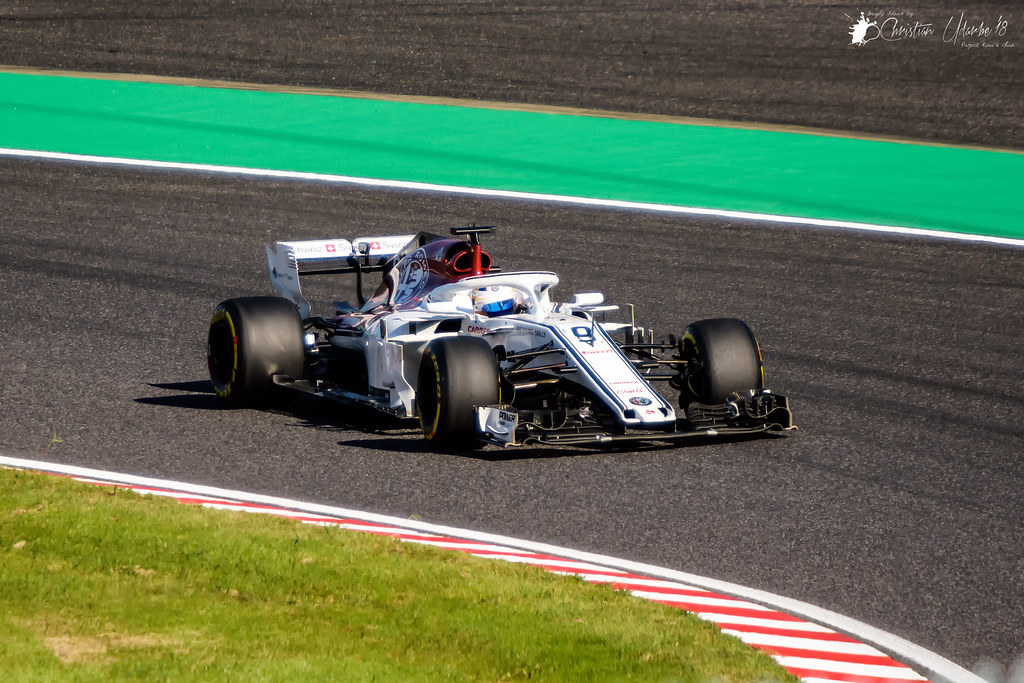
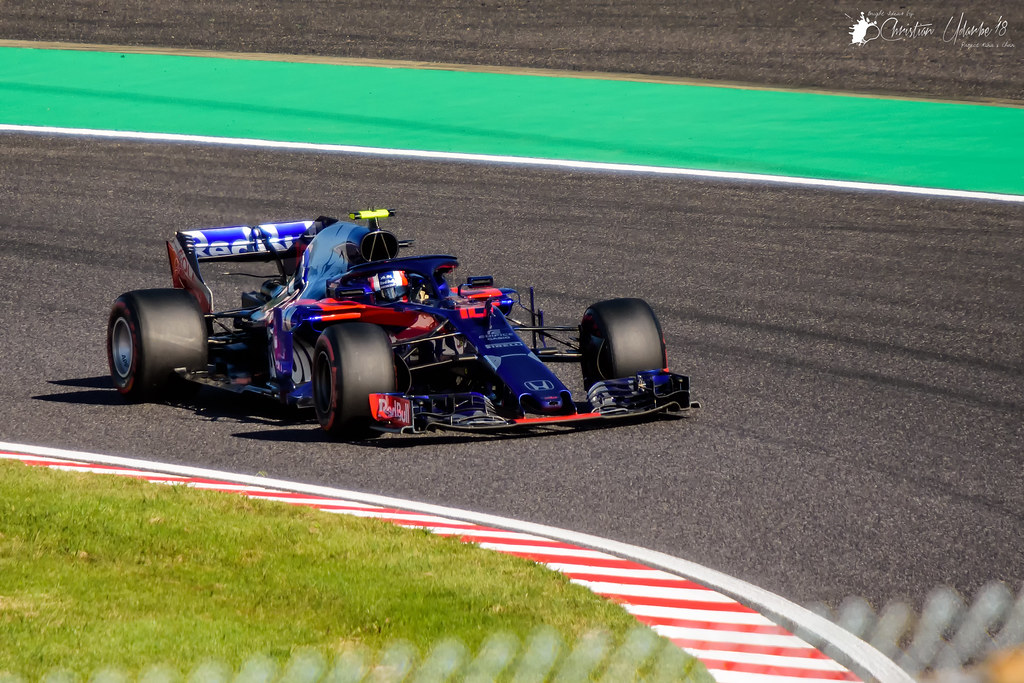
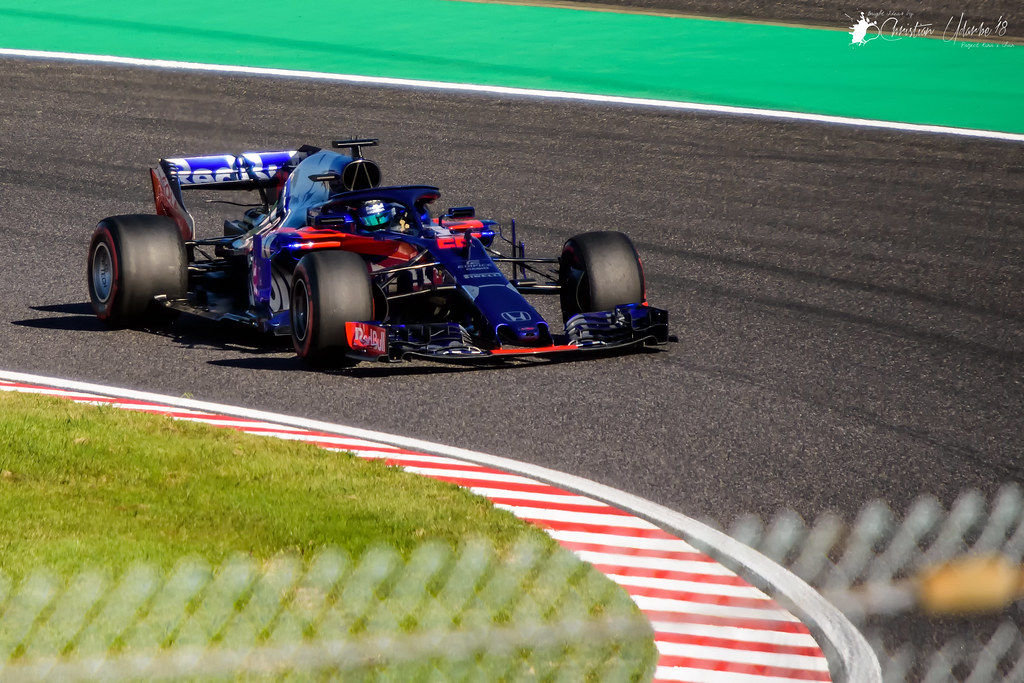
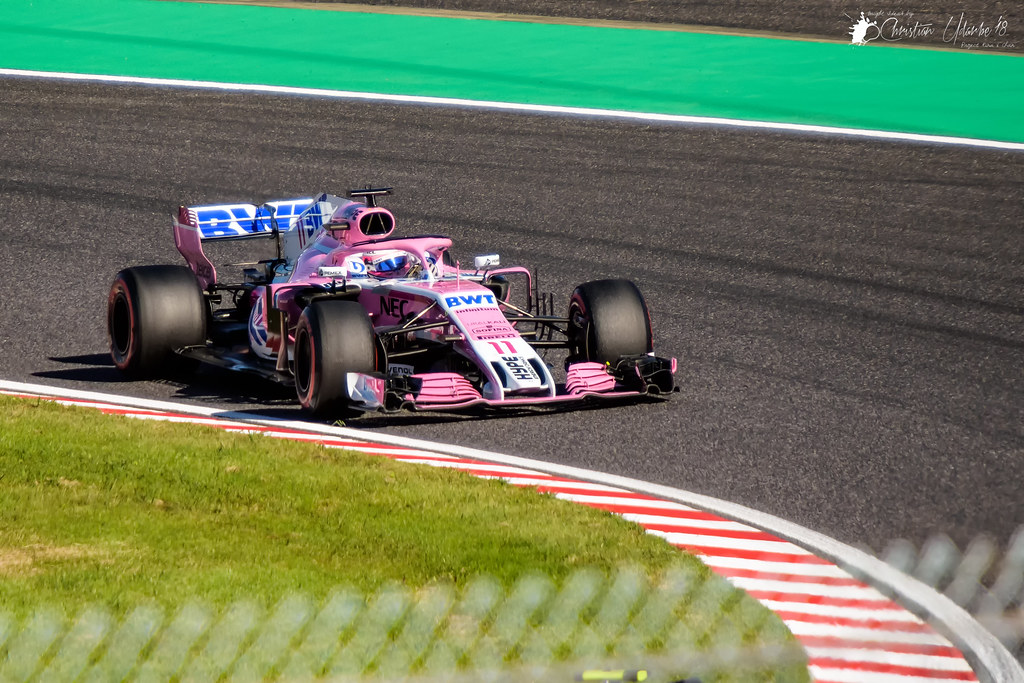
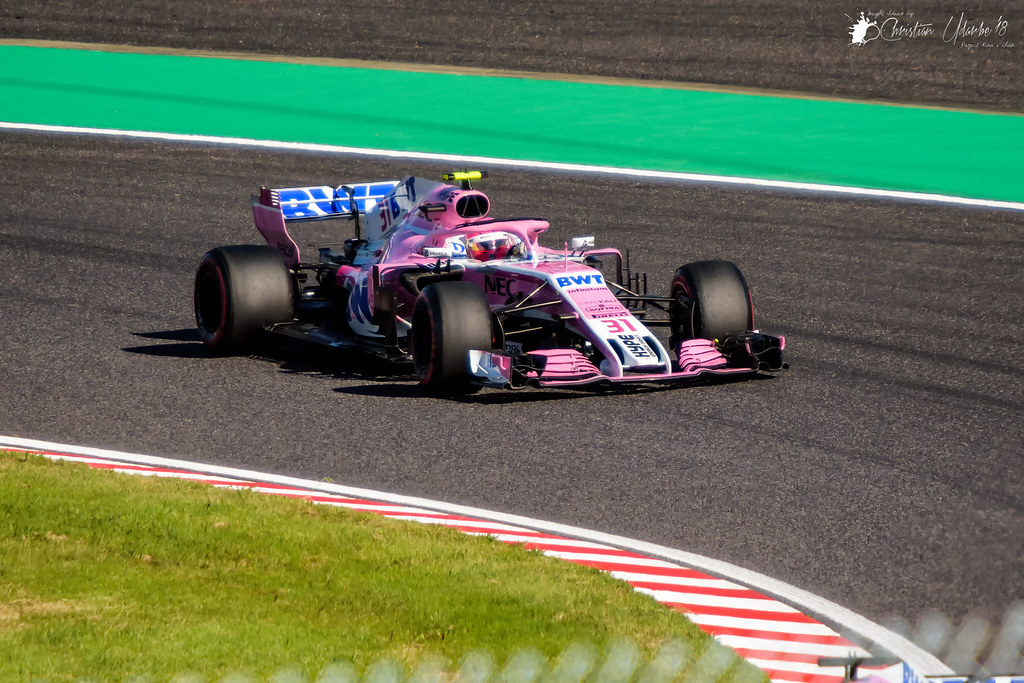
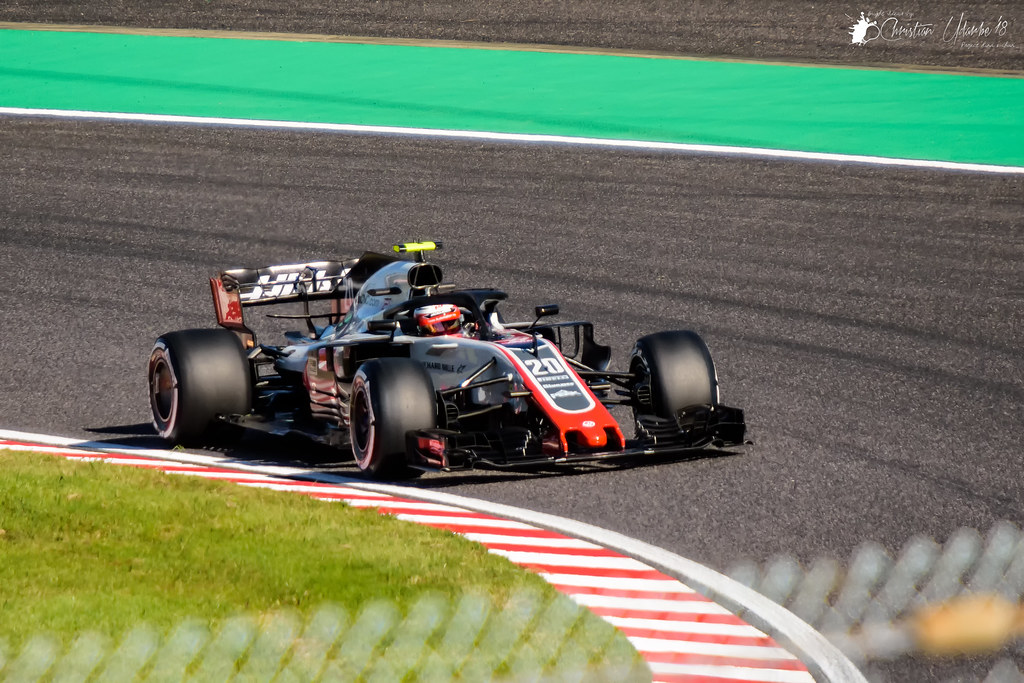
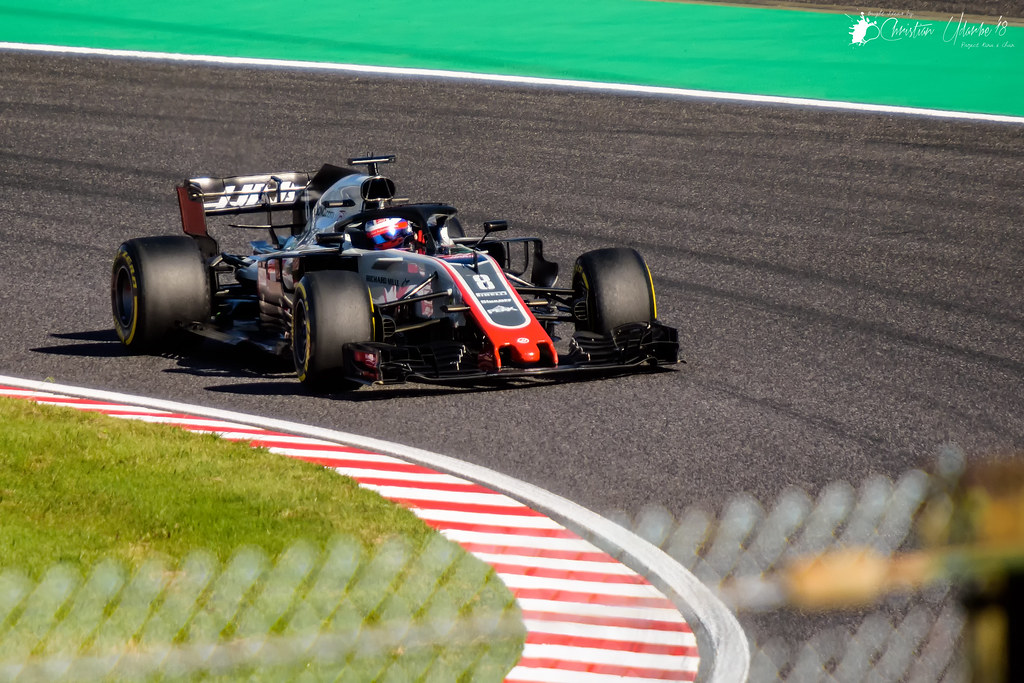
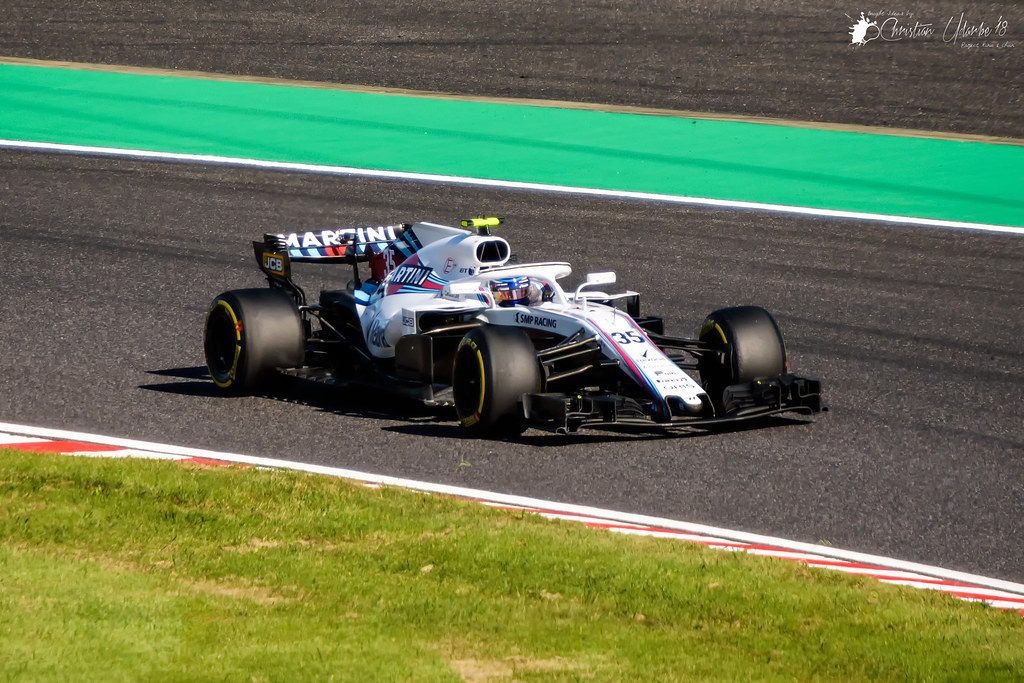
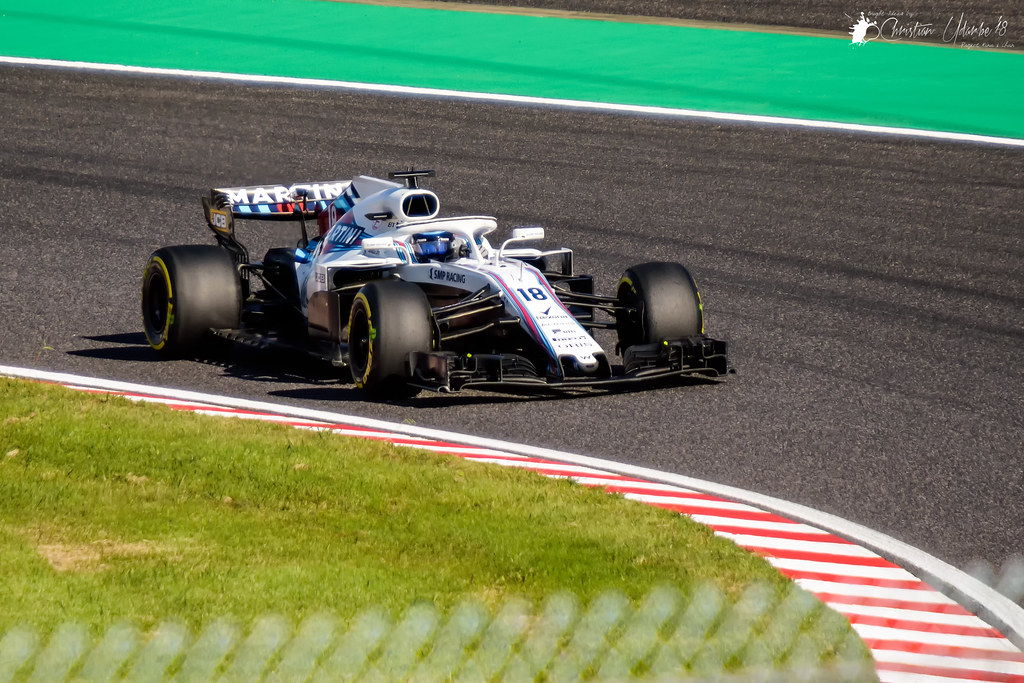
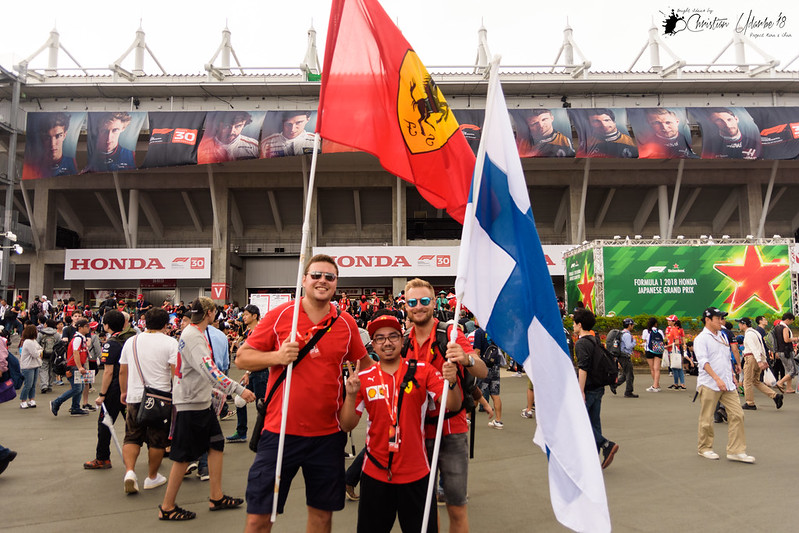
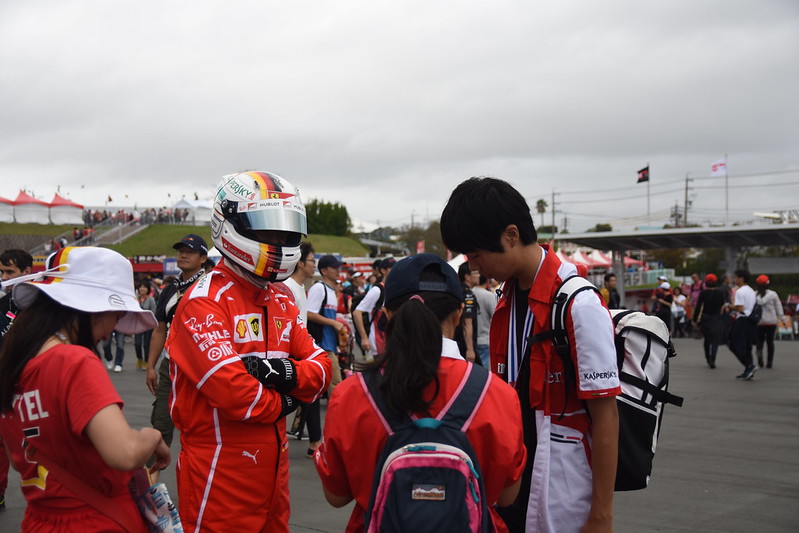
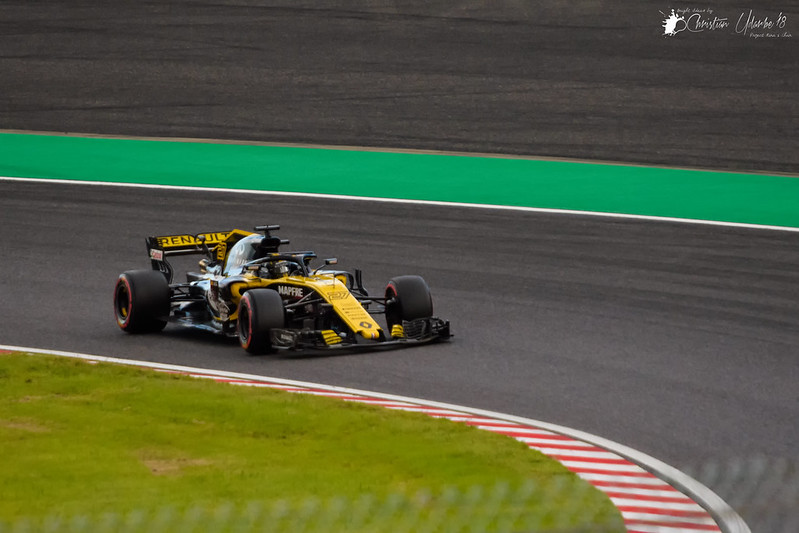
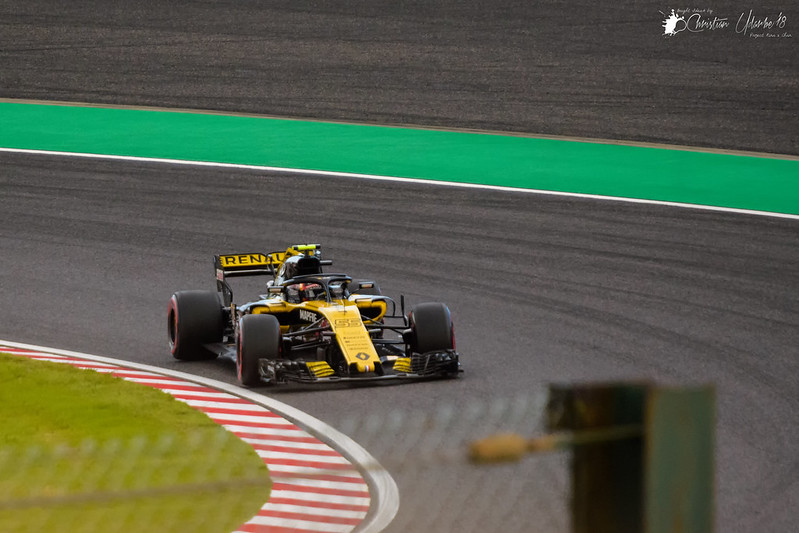
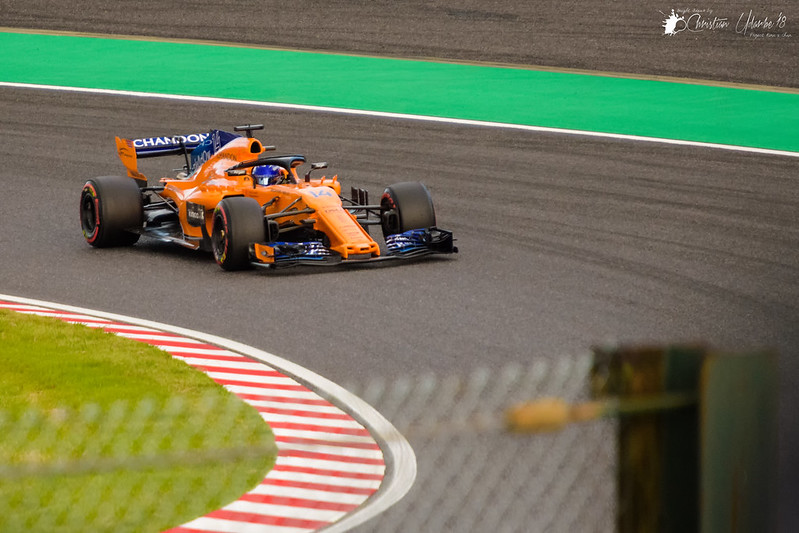
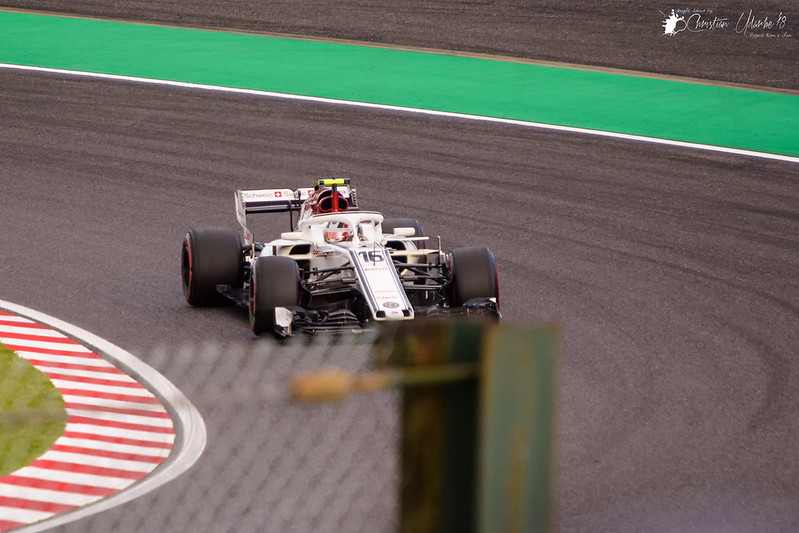
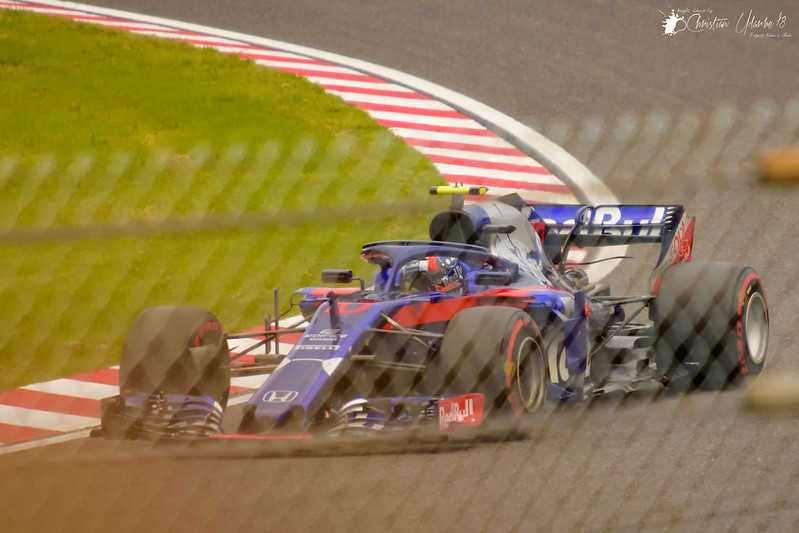
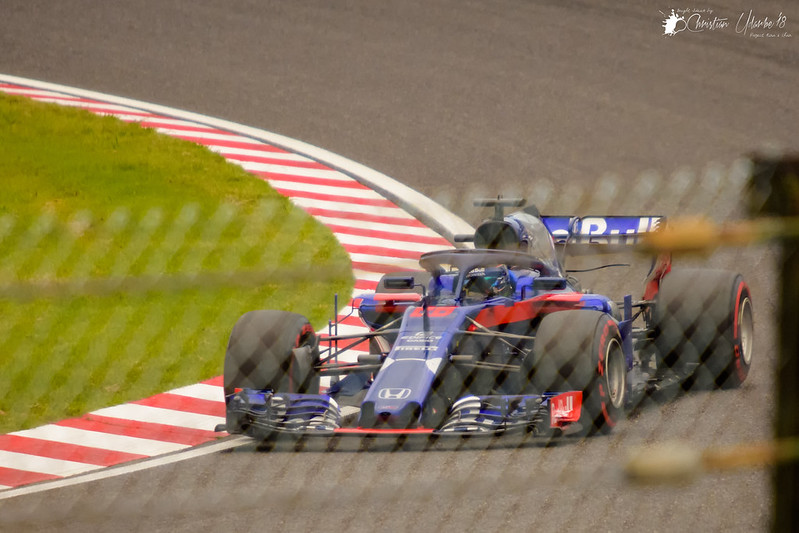
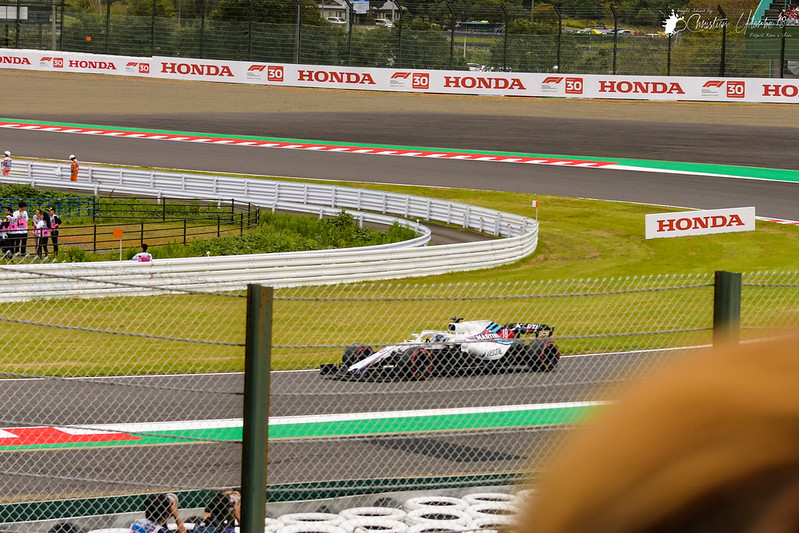
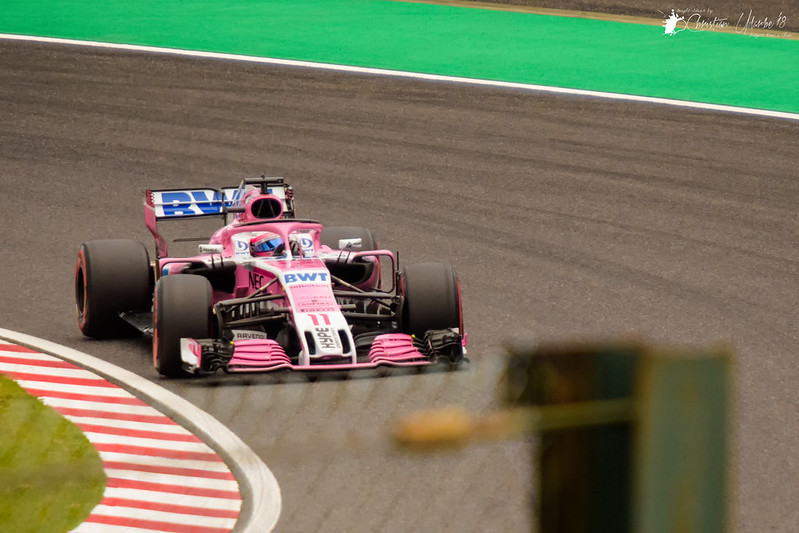
Then after getting the camera body, with most likely a kit lens, I will say, get out of your comfort zone, read the frickin’ manual, get to know the features, learn compositing/framing, proper hand holding of camera, post processing, and of course, don’t be afraid of using AUTO FOCUS; they are still under the impression that if they use auto focus, they aren’t “pros”… I mean… photography isn’t our profession… we really aren’t pros in the first place. Another thing is, most pros do use AUTO FOCUS. Think of a wedding, if one person shoots in completely manual, at wide open, thus having shallower depth of field, most likely you will have out of focus shots. Same thing for me, if I shot Formula 1 cars, which F1 is my favorite sport, in Singapore 2017 and Japan 2018, at full manual focus, I will not get any keeper at all (I can stop the aperture down, etc, to get most of them in focus, but yeah, you get the idea).
I will also tell them to learn to use the Manual, Aperture Priority, Shutter Priority, and Program modes. Along with the manual focusing, they feel that shooting completely manual mode them “pro”. Truth be told, I see friends posting photos in their social pages that are really not the sharpest of shots, awful framing, overly done post processing (too much clarity and texture; too much vignetting; too much saturation; and my pet peeve since I love black and white, a very BLAND black and white photo).
Granted I do shoot manual mode and manual focus if the situation calls for it. But I make damn sure my technique and skill that I have honed thru the years help me get a sharp shot and proper exposure.
Then they all go blaming their gear if their shot isn’t good or as they imagined.
So, in short, get a camera that isn’t going to hurt your wallet, but just enough features to help you learn and progress in the art of digital photography. Stick with your gear and don’t go thinking you need the most expensive gear to help you get better shots if your technique isn’t there to begin with. Hone you skills; hone you technique; have a feel for the moments and compose them; learn how to use ambient light, the lack thereof, and how to use your popup flash; have instincts as to what settings your camera needs to have for a certain situation…
Then when you outgrow some of you gear, like the pop up flash, then that is the prime time to upgrade! If you have outgrown the kit lens, then buy a new lens! Then when you feel that lens is now limiting your range, get another lens to pair with it! Until you have gotten the lenses you dreamed of (and in my case, I collected flashes along with lenses), and you feel that your camera can no longer help you grow creatively and and your craft, that is when you start thinking about getting a new camera body (preferably the same system as your previous camera, so you can still use the previous lenses, flashes, etc).
Just remember, we all started somewhere… This way you can also appreciate where you started and how far you’ve come. This way you can appreciate your brand new camera when the time comes and appreciate the differences from your previous camera. This way you have the confidence and skill to go beyond where you are now and learn new techniques and make new memories with your new gear.
We all started somewhere.
2011: around 3-4 months after I got my Nikon D50002018: When I upgraded to the Nikon D7200 (I will make another post as to why I chose the D7200 and not the D7500)2017: When I collected my dream lenses. L-R: Sigma 30mm f/1.4 EX DC HSM purchased Sept 2011; Sigma 17-50mm f/2.8 EX DC OS HSM purchased Dec 2017; and Sigma 50-150mm APO EX DC OS HSM purchased Nov 2017.2019: Knolled shot of my complete gear sans my shoulder bag and back pack.And it started with these back in 2010.
A common misconception about my current PC is that I spent a lot all at once. This isn’t my first ever build, in fact this is probably my 6th or 7th build now, and when I say build, yes, I meant a PC that I bought the individual parts and had a friend over the years teach me how to build PCs until I can finally build PCs on my own. This doesn’t mean, however, that this is only my 6th or 7th PC I owned, nope, since my family had a PC that isn’t necessarily built by me, nor is it something that I can call my own.
Every time that I build a PC, I always start with the essential parts to get the PC up and running. This means that I may not have had a sound card, a disc drive (back in the day when they were more ubiquitous), or even a video card just yet. I then just add those other parts later down the road when I have saved enough money. Same goes for the peripherals.
This is especially true back then, since in those days, and when I first built my current PC, I was just a student, relying on me saving whatever I can from my allowance that my parents give me, heck, I even have to ask my parents to buy certain parts for me as a reward for my good performance in classes and such. Granted, now that I have a job, I can buy all the parts I want for a new build at once, but I will still most likely do the same thing I have done in the past – that is, build upon my build.
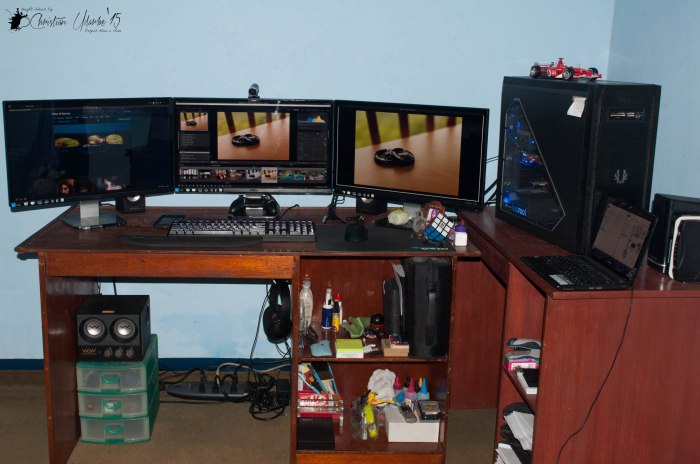
The purpose of this post is to give a bit of hope and inspiration for those who want to build a dream PC with multiple monitors, RGB lighting, a racing simulator, etc., and feel bad that they can’t achieve it overnight, over a month, or heck, over several years. A PC build, in my eyes, is evolutionary. My current rig was first built last 2012, which means I still rock the i7 3770 processor, and it is still a great processor and overall rig.
What I first do in new builds is of course, think of the end goal as to what I want to achieve with this build. Its final version so to speak.
I then start canvassing for parts and see where I can get a great deal. Let’s go back to 2012, I first bought my Intel i7 3770, 8GB (4GB x2) G. Skill Sniper 1600 RAM, a Corsair GS700 PSU, an ASRock Z77 Extreme 4 motherboard, and a Bitfenix Shinobi case. I then just used my 23″ LG IPS monitor, 17″ HP TN panel, and my 500GB Seagate HDD from my previous build and the other peripherals like keyboard, mouse, speakers, etc. Notice, no GPU just yet.
2012
I then added an after market CPU heatsink, the DeepCool Ice Blade Pro, and shortly after, I got to save enough money, and it so happens, the new nVidia cards just released, so I got the GTX660Ti.
That is when I started to think about upgrading my peripherals starting with the keyboard. I always wanted a mechanical keyboard, so I got the Ducky DK9008 Shine 2 Cherry MX Blue mechanical keyboard.
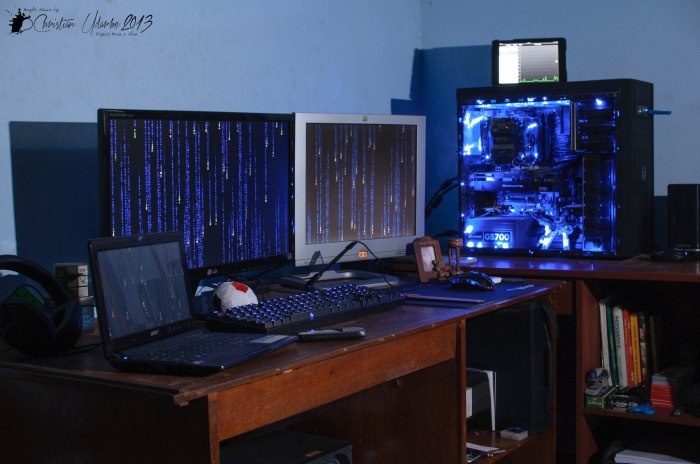
2013
Sometime passed again, and this time I upgraded my mouse to the Razer Deathadder (first and last time I ever bought a Razer product…) and replaced my monitors with 2 23″ Dell 2340L IPS monitors.
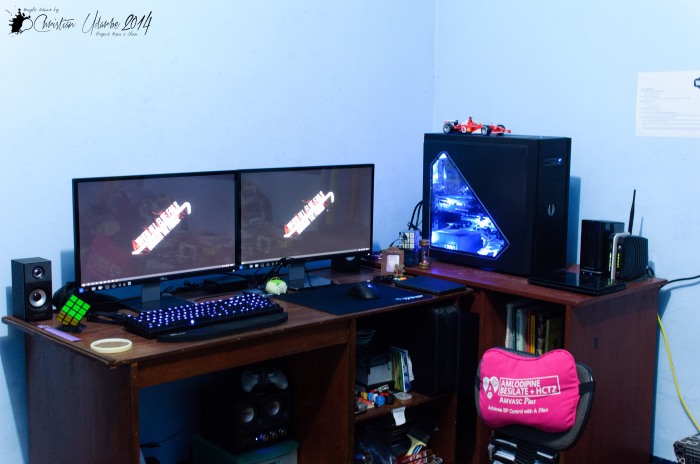
2014
Another time has passed, I then upgraded my GPU to a Radeon R9 390, my first AMD/ATI GPU ever, since I have always been buying nVidia cards (and I have since returned to nVidia with my latest GPU, and with my experience with the R9 390, I think I will not go back to a Radeon card any time soon… more on this later), and added yet another 23″ Dell 2340L IPS monitor to finally reach one of my goals… having a triple monitor setup. I am no stranger to multimonitor setups, since I have always been using a minimum of 2 monitors since 2008, but only in 2015 did I finally get triple monitors. And yes, no cable management under the desk! CRINGE!
2015
A year later, I got a better chair, this isn’t like the DX Racers or something, but it did the job. I also got a new printer. I also finally made a little effort to fix the cables under the desk. Having the printer helps hide the cables. Oh yeah, I also got a Logitech G600 MMO gaming mouse. This mouse has become a legendary mouse for me as it is one of the few pointing devices that was perfect for me and my uses. Sadly, it broke down… I can usually salvage it by repairing it myself, but this time, I couldn’t save it. I since then replaced it… more on this later.
2016
Sometime later, I passed my medical licensure exam, and my first purchase with my first salary, was the new case, a Phanteks Enthoo Evolv. Notice the plastic is still there at that time. I also added a new extended mouse pad and a Logitech G13, as well as a Logitech G430 headset, and a Logitech F310… this is when I was really starting to be a Logitech fanboy.
2016
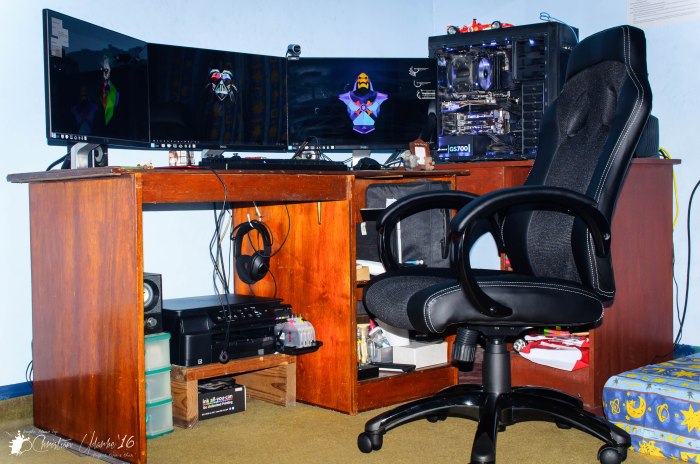
A year later, I finally bought an Ikea desk and a proper gaming chair. I also got a Logitech Z333 speaker system. Told you I was a Logitech fanboy.
2017
Later that year, I just upgraded my headset to the Logitech G933 and upgraded my controller to the Logitech F710.
2017
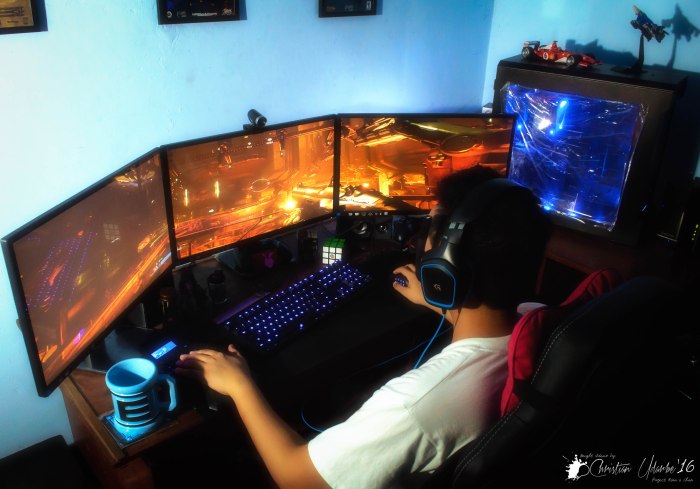
It is well known that I love Formula 1 and I love racing games, so I finally got me a new wheel and pedal set (my first one was sometime 2008, but it was from an unknown brand. I recently found it in our storage room at the back of our house, just gotta make time to retrieve it and show it off), the Logitech G920. Logitech yet again!
2017
I told you I love Formula 1! I then ordered a custom F1 rim from the guys at Speed Max Racing all the way from Italy, as well as a small LCD from them for my racing needs.
2017
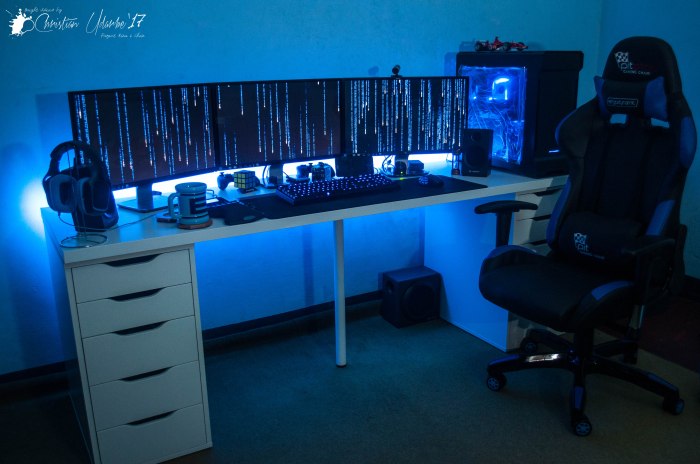
From this point, I haven’t really upgraded anything on my PC, but I did upgrade my RAM to 16GB (4x4GB) G. Skill Sniper 1600 RAM, I have since then added 2 SSDs (Plextor 128GB and a Samsung 250GB), I also sleeved cable extensions for my PSU, but I can’t recall when I got these anymore. Nice to note that I still rock the Seagate 500GB HDD in my rig, because I have 8TB NAS storage for my photography and backups; the 500GB is just used for documents, eBooks, and whatnot.
The latest upgrade were made when my PSU and GPU, the Corsair GS700 and the Radeon R9 390, both finally bit the dust. I replaced the PSU with the ThermalTake Tough Power Grand Series 650W RGB and the GPU with a MSI GTX 2060 (I have returned to nVidia!). The latter of which reminded me of my love for nVidia because the temps are 20-30 degrees C lower than the R9 390 even on triple screen ultra gaming. So, I think it is also due to MSI’s twin frozr cooling, but the overall nVidia architecture. I mean, I knew that long ago, it has become a meme, that Radeons are way hotter than Geforce cards, but the R9 390 had a sweet price back then.
I also had to replace my Logitech G600 because I can no longer repair it (soldering new Omron switches, etc.), with a Corsair Scimitar PRO RGB. It is surprisingly similar to the G600, just lacking a few buttons here and there, and the Corsair iCue software isn’t as good as Logitech’s. But hey, I can no longer find a new or even used Logitech G600 any more, unless I want pay for international shipping that is frankly not worth it. So I finally from my Logitech fanboyism and got the Corsair Scimitar PRO RGB. Overall, I love this mouse, too; it will definitely be as loved as the G600.
2019
And that’s it… for now… I think the next time I upgrade, it will be a new system… meaning a new processor, motherboard, RAM, etc. Whatever I can be salvaged from this current build, will be passed on to the new build, and you guessed it, I will build on the build from there.
So there, I didn’t buy all the components at once! I built upon it… it is evolutionary. So don’t fret, build upon your dream… after all, isn’t that what we do with our lives, too? Toil day and night at school, to one day get that dream job? So think of it that way. Heck think about grinding in video games: you are just level 1 now and it sucks, but later on, you are level 99 with all the best gear and buffs. And what’s more important? You can look back and see the journey to how you got to your dream build. Like I did. Like I will.
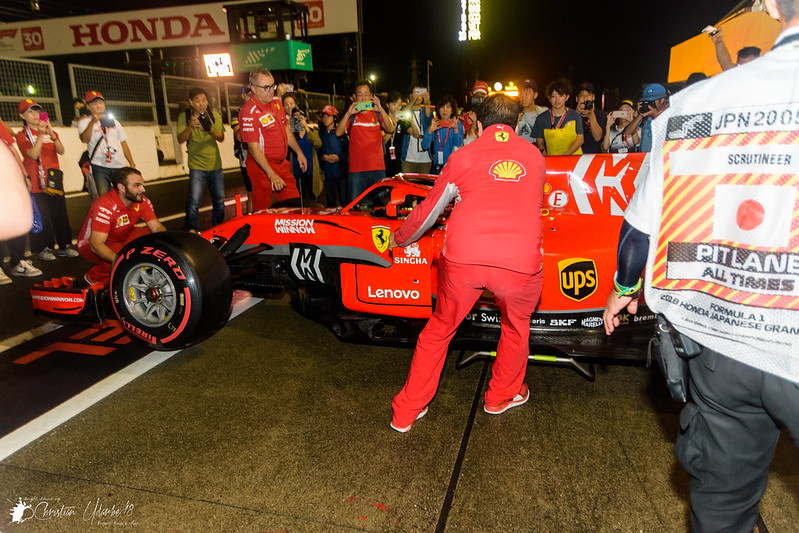
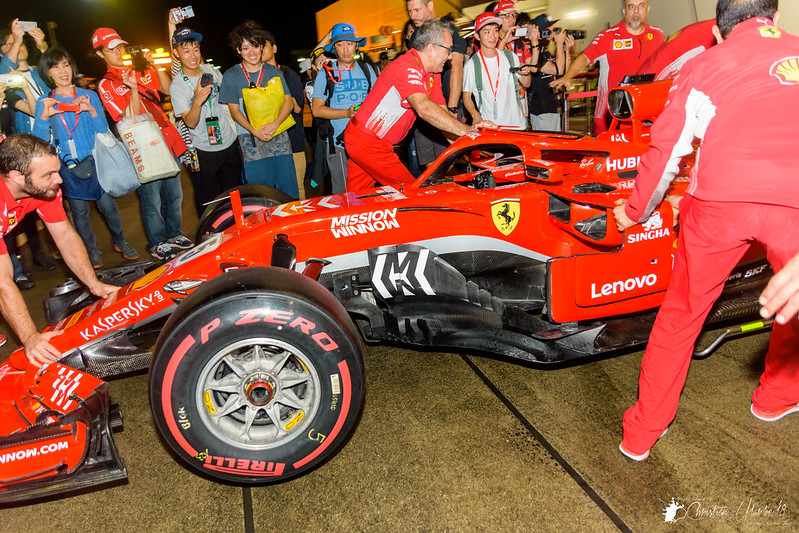
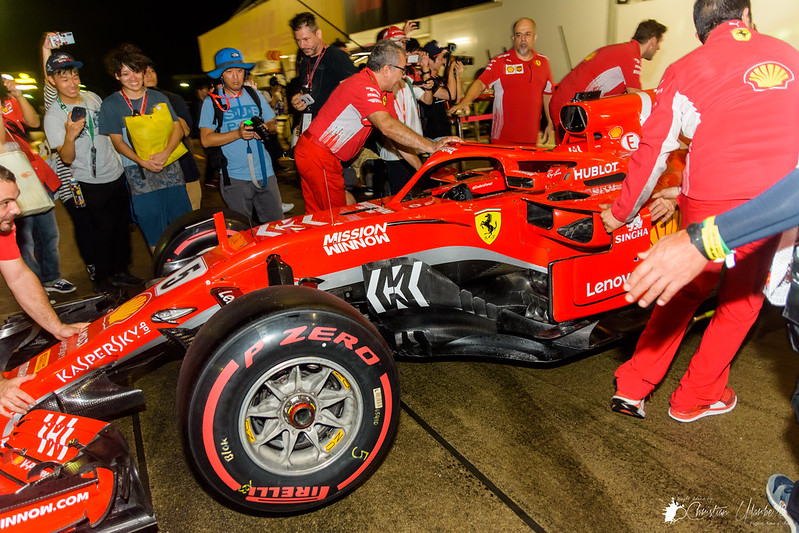
I get often asked by my friends what do I bring with me when I do street photography, since, after all, street photography is one my favorite genres of photography – I love taking the life of the city/street or the lesser known areas and not just the landmarks its known for; I love taking candid shots of people and how they naturally act; I love the thrill of walking the fine line of being artistic and not crossing anyone’s privacy; the list can go on… Thus the majority of my shots I usually post in social media are street photos.
But what do I bring with me in the streets?
Well, let us check out what is in my camera bag… and well, what is my camera bag, too! So, let’s start with the bag!
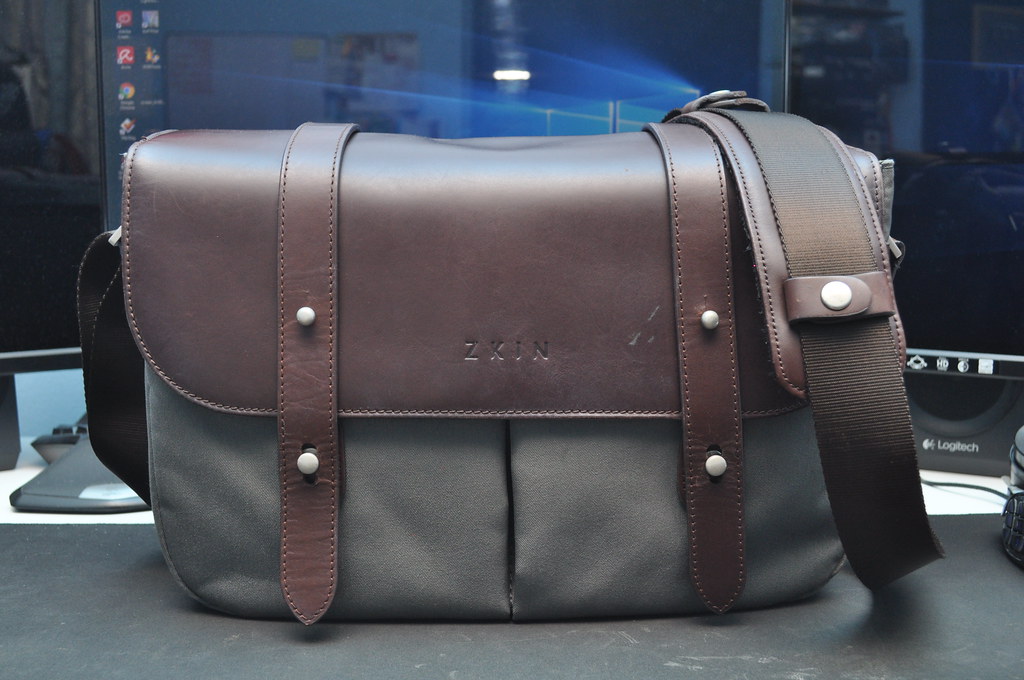
1. ZKIN Champ Camera Shoulder Bag
My first couple of shoulder bags were a small Lowerpro one (funny thing is, I don’t know where this bag is now) and a small Nikon branded shoulder bag. Back when I was still using the Nikon D5000 and didn’t have that much gear, these 2 bags worked like a charm. then inevitably, I upgraded my DSLR and got more lenses and other gear, I needed a new shoulder bag that can accommodate my needs for street photography.
I love simplicity in designs overall; retro/vintage shoulder bags fit the description I’m looking for. Not only do they look quite classy per se, but for the uninitiated, they wouldn’t know you are packing in expensive photography gear inside (until you whip out your gear, of course), and makes going around the busy streets of anywhere easy without getting too much attention (again, until you whip out your gear, of course).
Truth be told, I never heard of ZKIN (Heck, I thought it was pronounced as skin, but with a Z instead, when it is pronounced Z-KIN, or at least that is how it is as per their URL), but this seller caught my eye as the bag he was selling was the Champ series and it looked vintage/retro enough, and certainly quite simple in design, thus fitting the bill. Not to mention it was the right color, navy green cloth and dark brown leather. Perfect.
Upon receiving the shoulder bag, I just wanted to test its max capacity. Take note, I will never bring ALL the items I will mention in the next segment in this bag all the time, but it was only a proof of concept that this ZKIN Champ shoulder bag is indeed a good bag for my needs.
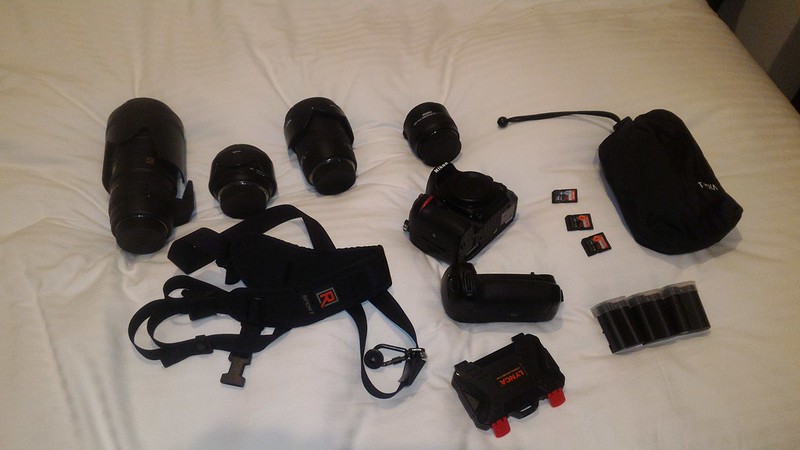
So, what are the things in the photo that the bag was able to hold?
Nikon D7200 with Nikon MB-D15 battery grip attached
Nikon SB-600 with diffuser and stand
Sigma 30mm f/1.4 EX DC HSM with lens hood (reversed)
Sigma 17-50mm f/2.8 EX DC OS HSM with lens hood (reversed)
Sigma 50-150mm f/2.8 APO EX DC OS HSM with lens hood (reversed) and tripod collar
Black Rapid RS-Sport Version 2
Extra 2x EN-EL15 batteries; 8x AA Eneloop batteries
LYNCA SD Card Case (an over glorified one, as this one has a USB 3.0 card reader, but had water damaged. Thus an over glorified SD Card Case now)
Transcend USB 3.0 Card Reader (with an OTG dongle)
Eneloop charger (with AC adapter)
Nikon MH25a (with AC adapter; I don’t bring this anymore though, as I use the Wasabi Power Dual EN-EL15 charger)
Romoss Solo 5 Powerbank (and Anker Micro USB cable)
M Square passport case (for overseas travel… duh)
Andoer 77mm filter kit (ND2, ND4, ND8, and CPL)
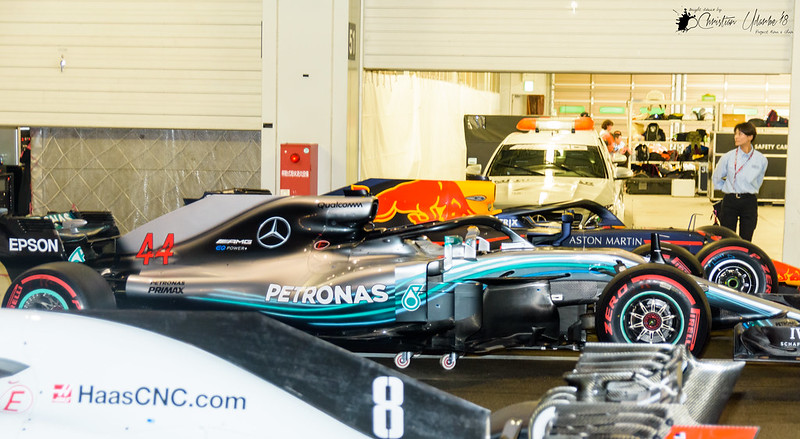
Quite bonkers to think that many items can fit in the ZKIN Champ! But it is heavy as you can imagine. Again, I don’t pack all these in the bag for most trips, this was just a proof of concept. I will make another post in this “What’s in My Camera Bag” series, this time what I would usually bring for Formula 1 weekends that uses a backpack instead of a shoulder bag.
I’ve owned this bag for almost a year, as I purchased this last April 2018, and we had a lot of adventures around the Philippines already, and been to Japan as well, and surely, I will be adding more places around the Philippines and more countries to its CV in the coming years.
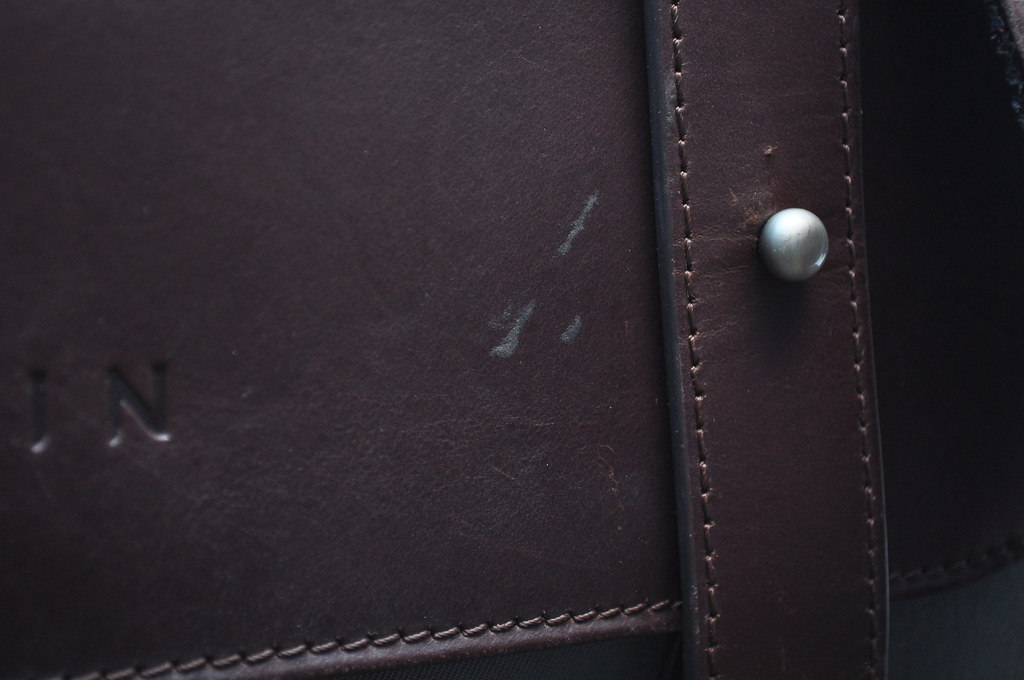
I am quite obsessive compulsive when it comes to anything I own, but this is one of the things I own that I don’t mind it getting scuffed up and such, as I consider them as battle scars for our adventures.
One of the scuffs or battle scars of my bag
Sadly, I can’t find the Champ series of shoulder bags in ZKIN website anymore. They have the Hydra series on the site, though it appears to be smaller in capacity; they also have the Cetus series and Amarok series that are the closest in capacity as the Champ series available on the site as well.
ZKIN HydraZKIN CetusZKIN Amarok
And just look at it! It looks great while out on the streets!
Now let’s go talk about my DSLR!
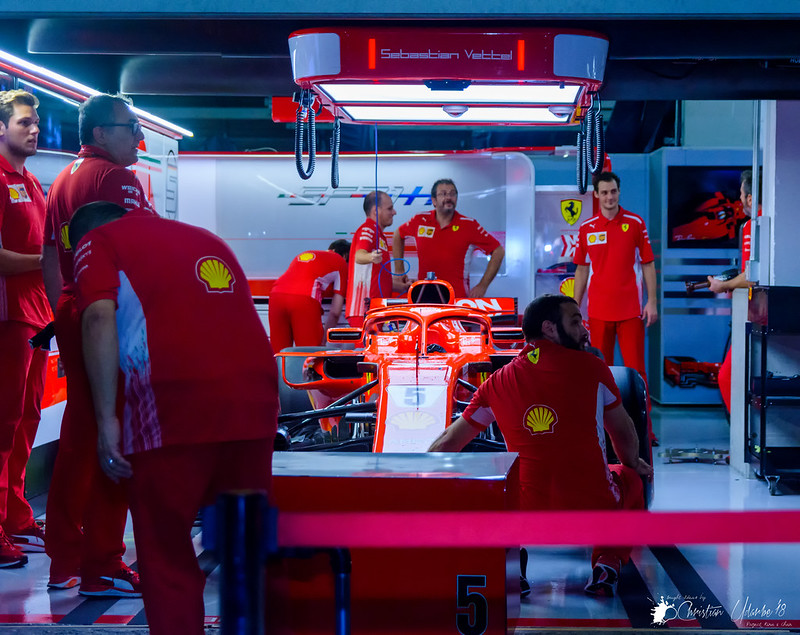
2. Nikon D7200
My first DSLR was the Nikon D5000 back in 2010 and as I gotten the lenses I wanted and other gear I wanted, it was time to upgrade the camera body as it was also starting to hinder my creativity and growth as a hobbyist photographer, thus I chose to upgrade to the D7200 in 2018.
Wait… isn’t the D7500 available at this time?
Yes by 2018, the D7500 was already out for a few months, so why didn’t I go for that simply by adding a little more cash to get the newer model? Well, a simple, almost shallow reason… okay, it is shallow… I liked the battery grip better on the D7200 since the D7200 has contacts on the bottom of the body, thus not needing an external wire connecting from the battery grip to the accessory terminal. The D7500 doesn’t have contacts on the bottom and has to rely on wiring up the battery grip and connect it at the accessory terminal… sure, I have a lot of things dangling or connected to my D7200 as it is, but I seriously wouldn’t like a shutter release cable connecting the battery grip and body permanently sticking out.
Very shallow reasoning isn’t it?
And truth be told, the Nikon MB-D15 battery grip doesn’t add any new feature to the D7200, heck, it only takes 1 battery, just like the body itself (you can place a battery in the D7200 prior to connecting the battery grip, then by using the menu, tell the D7200 what order of batteries to consume first – in my case, I have 3 EN-EL15 batteries, I can place one in the body and another one in the battery grip, tell the D7200 to use the one from the battery grip first, once consumed, replace it with my third battery, and when that is consumed, have the one in the body be used), so why even bother getting a battery grip for the D7200? Because I like big things… that sounded wrong. Another shallow reason, though. The battery grip makes it look like those high end pro DSLR bodies. That’s it.
Those shallow reasons over a better sensor and a newer model… I’m weird like that.
Though the D7500 has a better sensor, I still love the upgrade in resolution and quality of shots with the D7200, not to mention better features, coming from a D5000 over the years. So, I’m still happy with using the D7200 and opting out of the D7500.
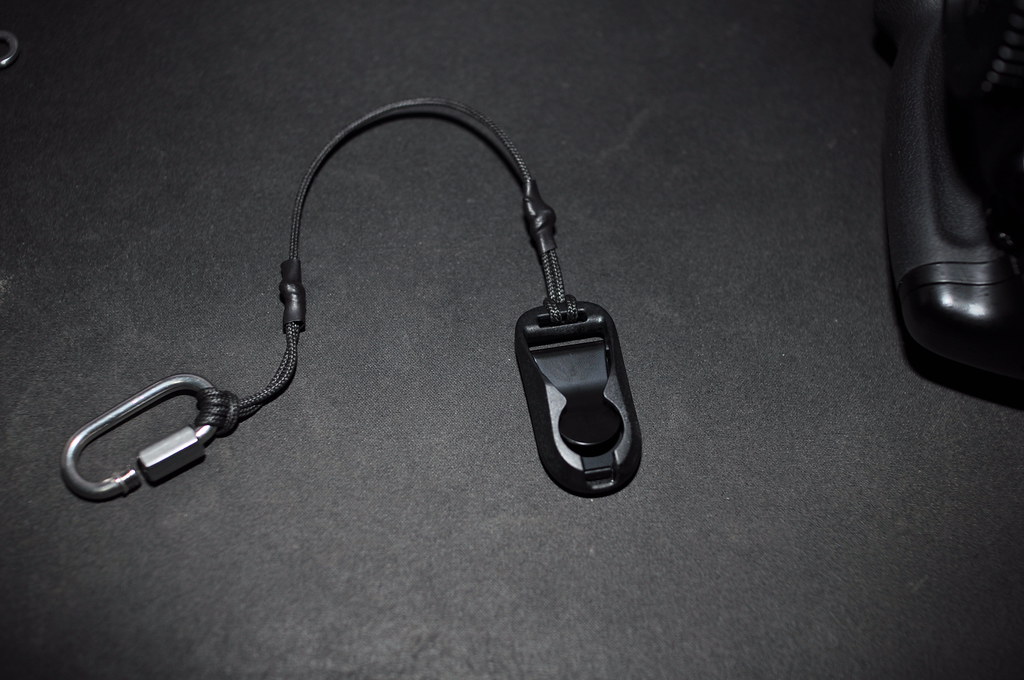
I mentioned that it has a lot of things attached on it as it stands, apart from the Nikon MB-D15 battery grip, I got the Peak Design V4 Anchors on each of the triangle split rings, and I also have the Andoer QR-60 on the bottom of the camera.
Andoer Qr-60 is an Arca Swiss compatible plate that has a loop/hook that can be tucked away for use with a monopod/tripod or be revealed to be used with a sling strap.
The Anchor V4, along with a Joby Tether, are for added security in case the loop/hook breaks off from the pivot point (unlikely, but no price for peace of mind), as seen in the following pics:
Now, wait again! Why not mirrorless interchangeable lens cameras (MILC)?
Definitely don’t have that much extra cash to spend on a Sony, maybe a Fujifilm is possible, but that would mean me getting an adapter to use the system with my current lenses, lest I buy proprietary lenses for those systems.
Then comes the new Z series MILC from Nikon that even selling my kidney won’t be able to purchase one without getting into debt.
Thus, I stuck around the DSLR system for now. Maybe sometime in the future I will switch to the Z system of Nikon, but for the foreseeable future, I will be holding on to my D7200 for as long as I did with my D5000, or even longer.
Certainly the D7200 is not a camera to just laugh at, it has great performance for its time, and still is in most cases compared to other cameras right now. And whatever camera you have is already the best camera, as is the words of Chase Jarvis: “The best camera is the one that’s with you”. And I will make the most of my current gear.
Time to show the lenses I bring for street photography:
3. Sigma 30mm f/1.4 EX DC HSM
The first lens I bought outside that of the kit lens that was included with the D5000.
I got this lens sometime September 2011, and it has been, and most of the time still is, my go to lens for most situations even if I have a Sigma 17-50mm f/2.8 EX DS OC HSM (more on that later) and the Sigma 50-150mm f/2.8 APO EX DC OS HSM (more on that on the next post on this series of “What’s in my Camera Bag”).
One of the reasons I wanted a prime lens was for me to think more of my shots instead of simply zooming. I also don’t crop my photos if I can, so putting that limitation on myself, forced myself to make framing shots better.
Also, primes are fast lenses for street photography, and yes, I was already thinking about street photography at that time as a genre I want to get into in photography. Having a fast lens in the city streets is very handy, so you can take that perfect candid shot at that moment or take a shot of a stranger so quickly they won’t even notice you took it.
It may be a f/1.4 lens, but as you can imagine, it can get very soft at wide open, but sometimes you can get a good shot with it at that aperture.
For me, I usually shoot between f/2 and f/2.8, and only when I can have more time on a subject in the street that I try the aperture range of f/1.4 to f/1.8. Otherwise, I stay between f/2 and f/2.8 if I want that bokeh effect, and f/4 or f/5.6 for more of the image being in focus, sometimes even reaching as low as f/8 or f/11 to get nearly everything in the frame in focus.
This lens acts like the nifty fifties if you use it on a crop sensor body. In my case the Nikon D7200 has a crop factor of 1.5x thus a 30mm acts like a 45mm prime (30 x 1.5 = 45; or just get half the focal length and add it to the max focal length: 30 + 15 = 45), close enough for a 50mm prime.
Here are but some sample shots with the D7200 and 30mm f/1.4 combo (the 30mm f/1.4 has more sample shots combined with the D5000; I will probably post those in a different blog post):
Next lens!
4. Sigma 17-50mm f/2.8 EX DC OS HSM
After purchasing the Sigma 30mm f/1.4 EX DC HSM in 2011, I haven’t bought another lens until 2017, December 2017 to be exact. I gotten busy with medical school and such, that I was content with my 30mm f/1.4 and the kit lens that came along with my D5000.
As part of my upgrading plan, I decided to buy the Sigma 50-150mm APO EX DC OS HSM the month prior in November 2017, which was one of my original dream lenses for the “Trinity of Lenses” that I was trying to collect when I first bought the 30mm f/1.4, then stumbled upon the Sigma 17-50mm f/2.8 EX DC OS HSM for a bargain price that I can’t say no to. Come on, it may not be the best standard zoom lens with f/2.8 fixed aperture, heck, the distance scale isn’t even in a window like my 30mm or 50-150mm lenses, but for its original store price being a bargain in itself, having it go on sale more, makes it all the more sweeter. And it does take good photos for what its worth.
The 17mm (17 x 1.5 = 25.5; simply 25mm) on a crop sensor body like the D7200 still offers quite a wide angle perfect for street photography, as it is effectively a 25mm at this point, practically 24mm like other standard zoom lenses for full frames, to literally get, the bigger picture, but can still zoom (max zoom at 50mm is effectively 75mm) to get those closer shots without having to be in the faces of people if they are your subject.
Being wide open at f/2.8 is more forgivable, unlike the 30mm at f/1.4, of course, so shooting at its widest is a pleasure. Then, like the 30mm, I stop down to f/4 or f/5.6 to get more of the frame in focus, and again like the 30mm, can go even lower to f/8 or f/11 to get even more of the frame in focus. It being a f/2.8 lens makes it quite a fast lens as well, and like I mentioned in the 30mm section, having fast lenses helps a ton in the streets.
Here are quite a number of sample shots with the D7200 combined with the 17-50mm f/2.8:
5. Nikon SB-600 Speedlight
Truth be told, you don’t need a flash during street photography, be it day time or night, well for me anyways, but I still bring it just in case I do need to illuminate an object or an area of interest in very, very, low light situations. Otherwise, I just bump the ISO quite a lot; on the D7200 I bump it up to 6400 if needed, it may get noisy, but not so much that a photo is unusable. Plus, if you try to take photos of the people candidly, a flash will surely make them notice you.
Again, I still bring one flash for other situations that may indeed call for it.
Now let’s go talk about the other accessories, starting with my sling strap:
6. Black Rapid RS-Sport Version 2
I was never fond of neck straps ever since I started with digital photography as a hobby. Back when I first began my hobby I got cheaper sling straps that are obvious knock offs of the Black Rapid variety.
Fast forward to when I got my license as a physician and got work as to not pester my parents for money for my hobbies anymore, I got myself the Black Rapid RS-Sport Version 2, finally, after years of drooling over the Black Rapid sling straps.
Sling straps divert the weight that would be on your neck to your shoulder, effectively making it seem you are carrying a messenger/shoulder bag. This comes in handy if your camera gear as a whole is heavy – lesser strain on your neck.
Another good thing is that since it is just dangling on beside your hip, you can be a lot more mobile without having it to be quite bothersome as the day goes on if you just use a neck strap.
Lastly, you look less like a tourist. Not that I don’t like looking like a tourist when I travel especially to different countries; playing the tourist card can get you forgiven for the stupid things you might have done during the trip because you don’t know any better. But with this, you stand out less, so to speak.
Been using a sling strap for nearly 8 years now and I don’t plan on ever switching to a neck strap or any other type of gimmicky strap other than this sling strap.
This strap has the Joby Tether and a Peak Design strap connector for added security when used with the Andor QR-60.
7. Spare EN-EL15 batteries and AA Eneloop batteries
You can never tell when a simple street photo session can be short one lasting an hour or a long whole day adventure, so having spare batteries for the DSLR is obviously needed.
I have 3 EN-EL15 batteries in total, one from Nikon that came with the camera, and 2 others bought 3rd party, the Wasabi Power EN-EL15, that also came with a dual charger that actually takes in Micro USB instead of the standard AC, which is great if I travel out of town or out of the country, because by then, I would have also packed an Anker 5-port USB charger, thus one less thing to take up a socket.
In terms of performance vs the original Nikon OEM, the Wasabi Power EN-EL15 batteries are really great; holding a charge just as good, if not, slightly better, than my Nikon branded one. I highly recommend this brand if you need spare batteries as they sell for Sony and Canon as well (haven’t checked if they started selling for Fujifilm).
The longest shoot I had was in Japan, for 3 consecutive days, I shot the whole day, for both street photography and during the Formula 1 race, and I never consumed more than 2 batteries on each of the 3 days. Having the 3rd one is still great just in case I do consume 2 batteries one of these days, but thus far, never consuming 2 batteries on a long day shoot.
The AA Eneloops are just for the flash if I really need it.
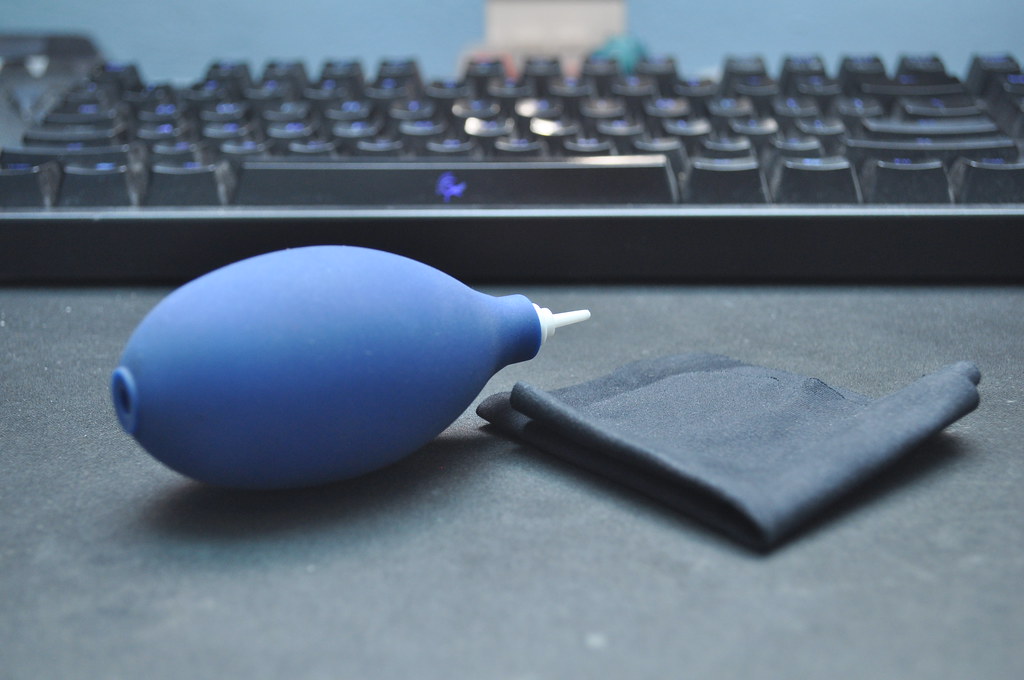
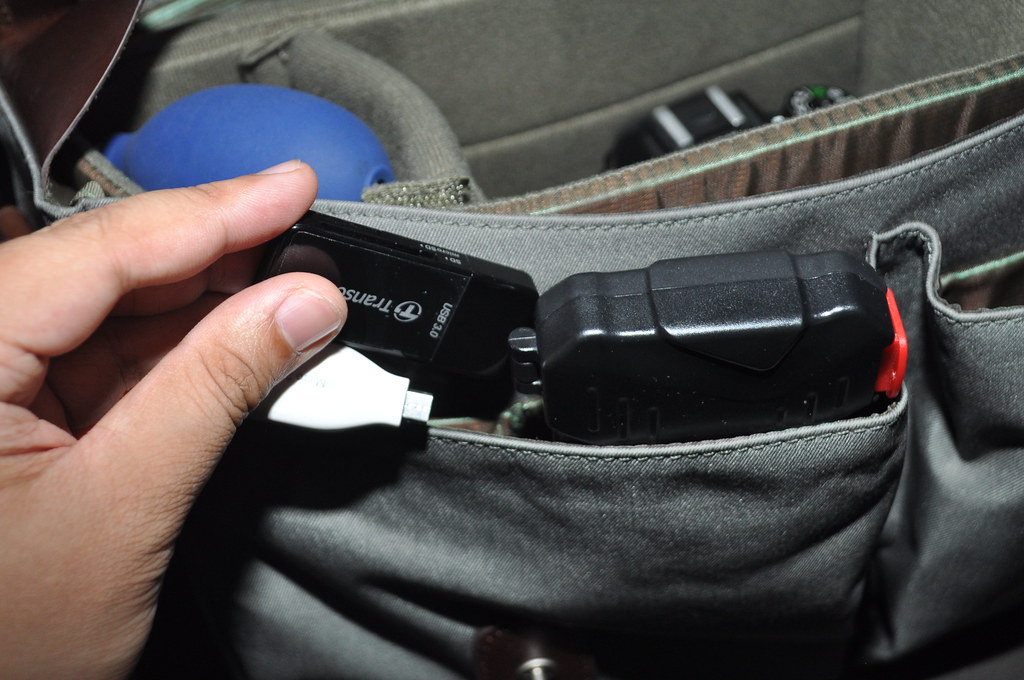
8. Spare SanDisk SDHC Cards, LYNCA Card Case, and Transcend USB 3.0 Card Reader
Like the batteries, it is best practice to have spare SD/SDHC or whatever memory cards your camera is using.
In terms as to what speed/performance for your memory cards, that is based on what you are shooting really. For me, I don’t mind just using the SanDisk Ultra SDHC 32GB what has a write speed of at least 10MB/s; good enough for any day to day shooting.
For instances, like in Formula 1 races where I shoot Continuous High, I use the SanDisk Extreme PRO, which have a write speed up to 90MB/s; great to avoid buffering during this shots. Also great for long exposures, since it can take a while for it to write on the card.
A card case is simply for convenience. My LYNCA card case is an over glorified card case as it was once my USB 3.0 card reader as well. But water got into the contacts rendering it useless… I have since replaced the car reading duties with the Transcend USB 3.0 card reader and have a generic OTG dongle, so I can connect the reader to my phone and post straight-out-of-camera (SOOC) shots, if I feel like it.
9. Andoer 77mm Filter Kit
I chose to bring a ND2, ND4, ND8, and CPL 77mm filters in case the need calls for it. The Sigma 30mm is a 62mm threaded lens, so I also got a step ring just for it – I need not get the same filters for 62mm threads.
Wow, this is the shortest section of the blog post yet! Because, what else will I say? Oh wait, why Andoer? It is cheaper, that’s why, and I hardly use ND or CPL filters anyways, it is just there for those rare moments I do need them.
The next for is shot with D7200, 17-50mm f/2.8, and a ND8 filter; not a street photo, but yeah, whatever:
10. Dust blower and micro fiber clothes
Because after a shoot, or even during a shoot, dirt, moisture, etc., can be built up on the front of your lens, causing awful artifacts in some of your shots.
Plus… I have Obsessive Compulsive Personality Disorder.
This is officially the shortest segment.
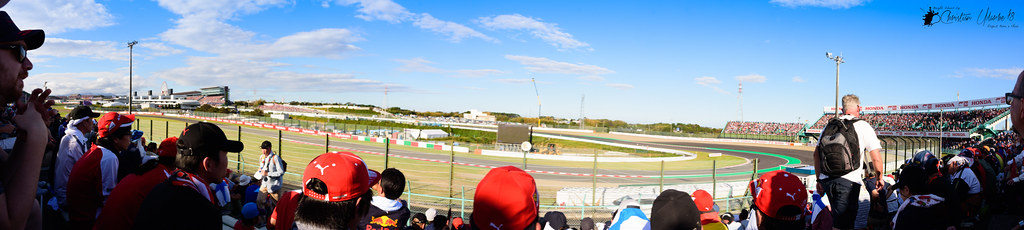
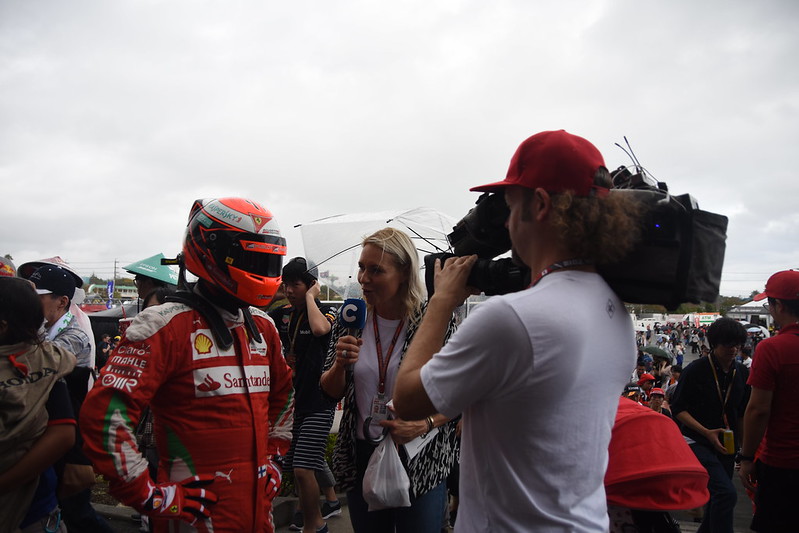
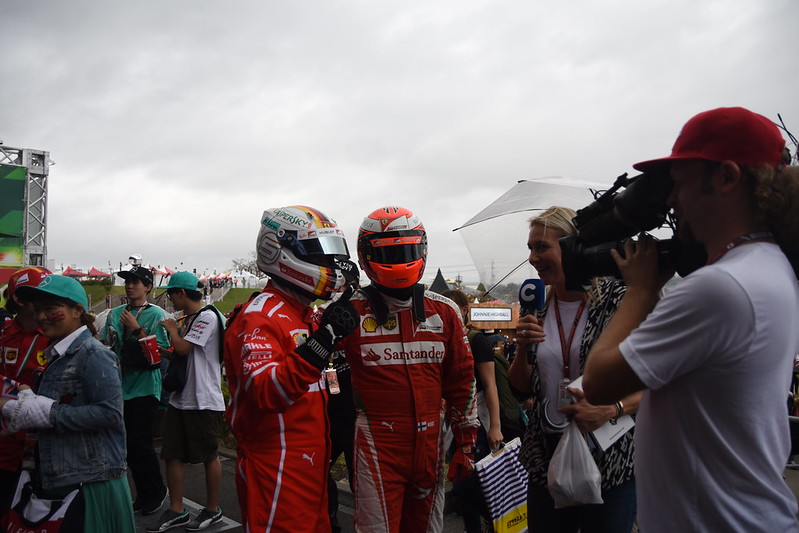
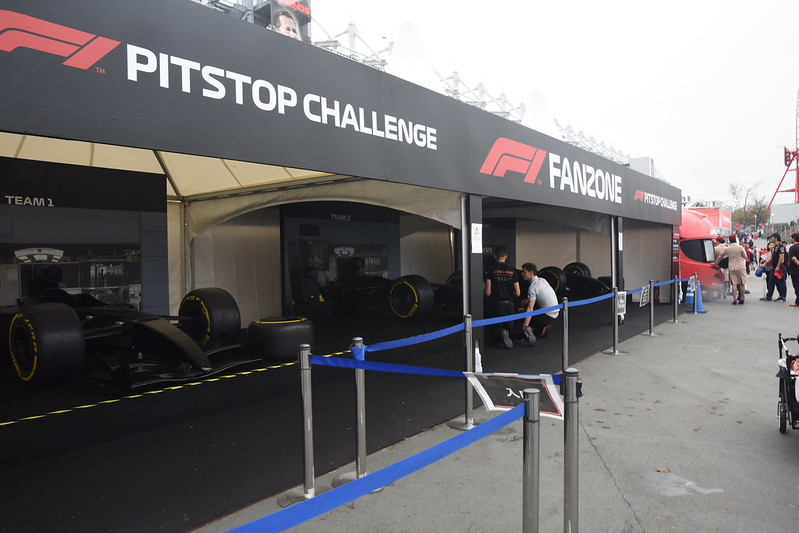
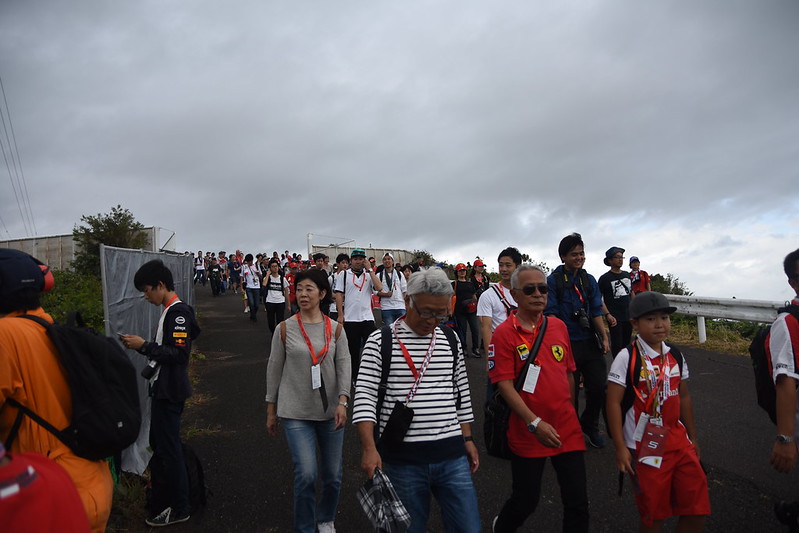
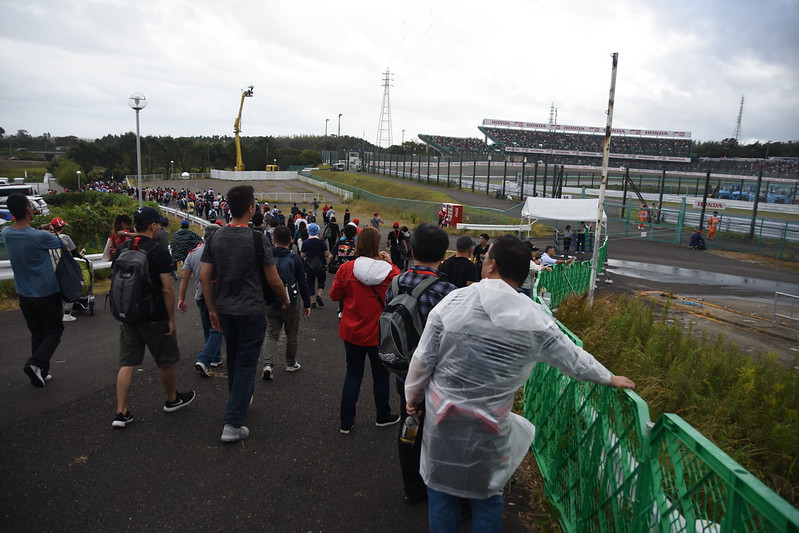
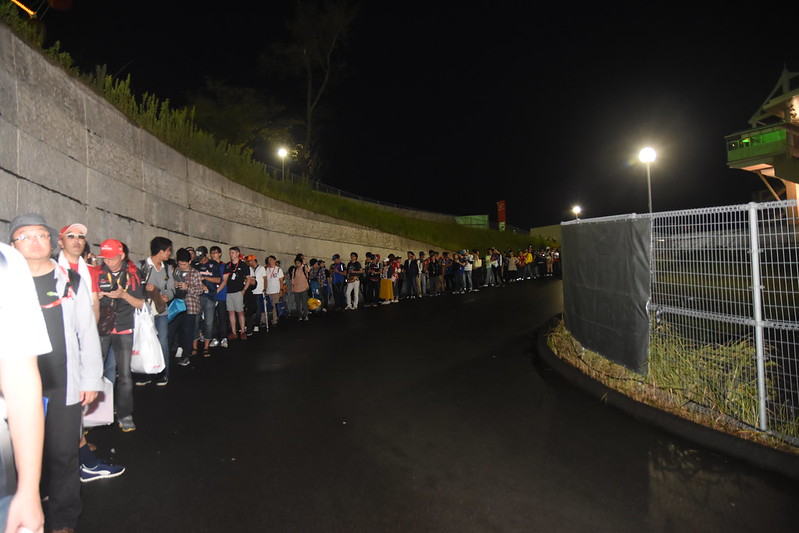
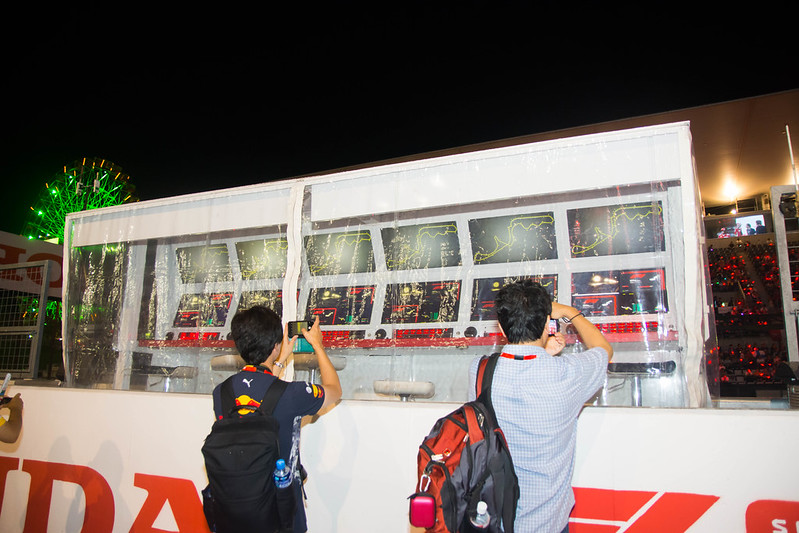
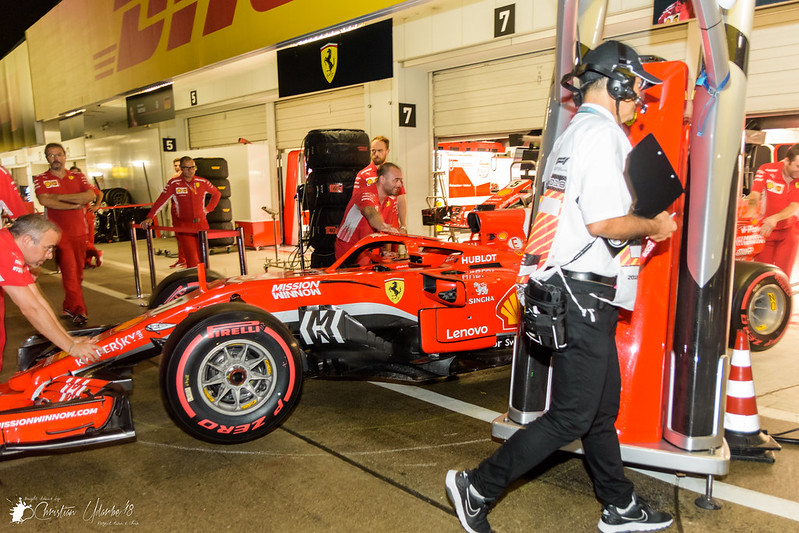
And those are the things I bring with me typically to a simple street photography session. Most cases I also travel out of town or country, so I have a backpack/luggage to keep the other things like chargers, AC cables, tripod/monopod/gorilla pod (if I deem that I need it), intervalometer (again, if needed), and rain cover for my gear (I usually read forecasts and pack accordingly. A great example was in Japan, where on the 3rd day I’m there, there will be a short afternoon shower during the Formula 1 race; I packed accordingly, and got to use the rain cover when the heavens opened up).
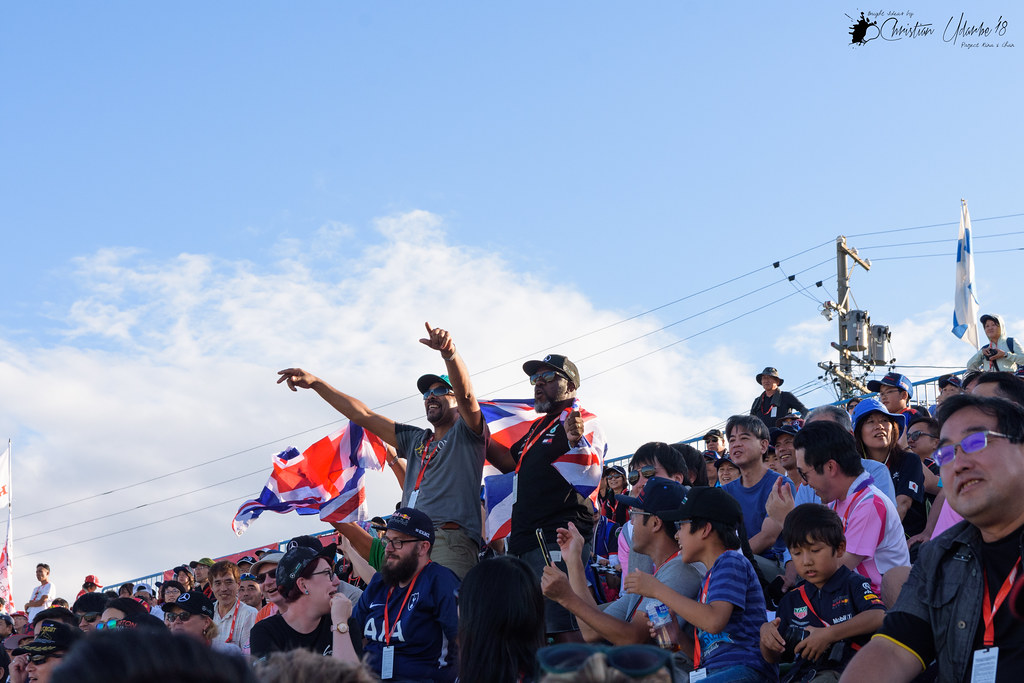
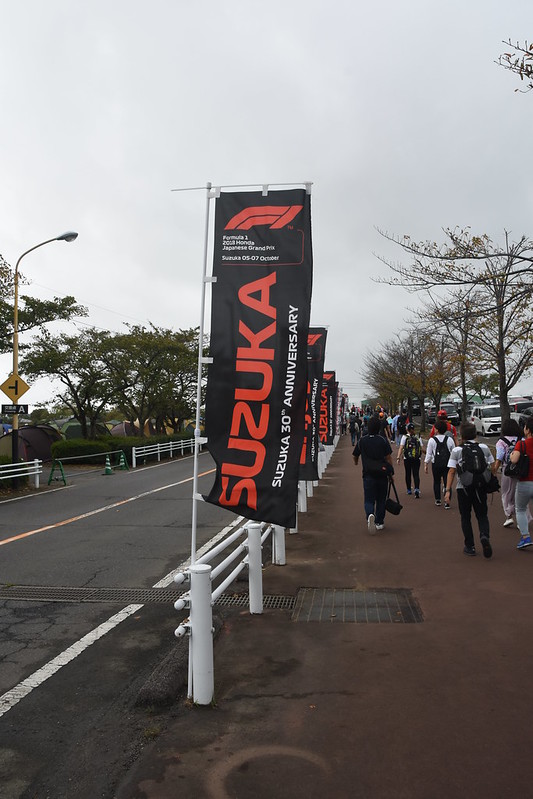
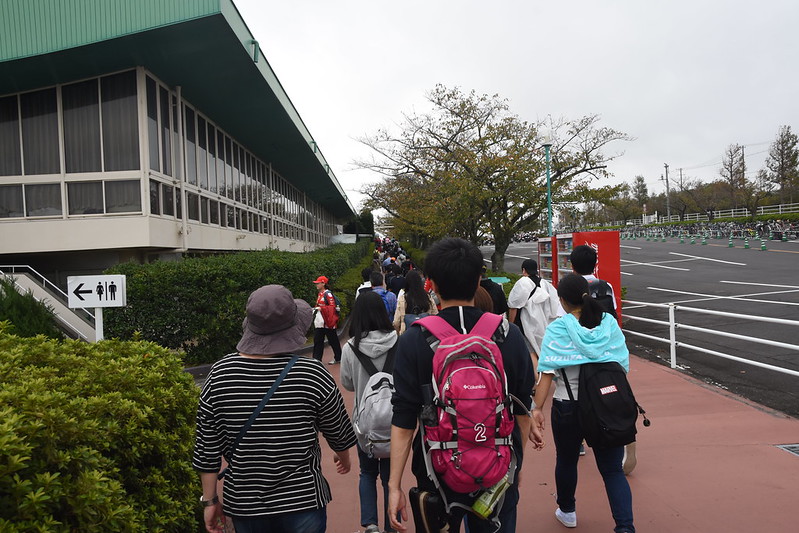
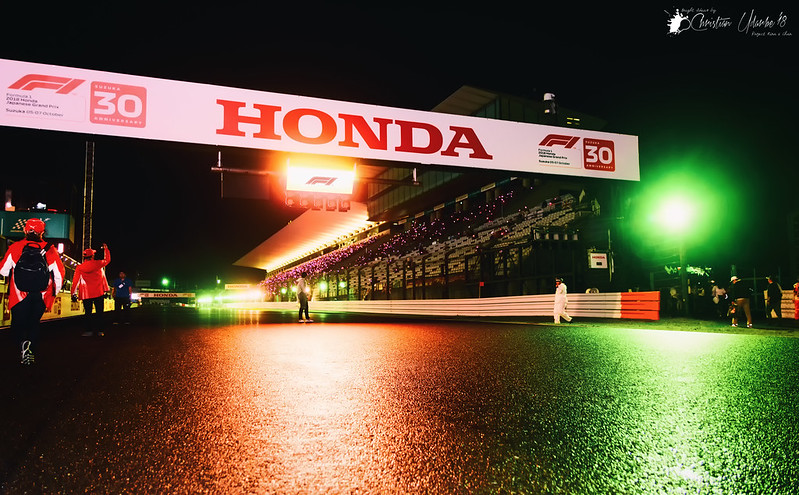
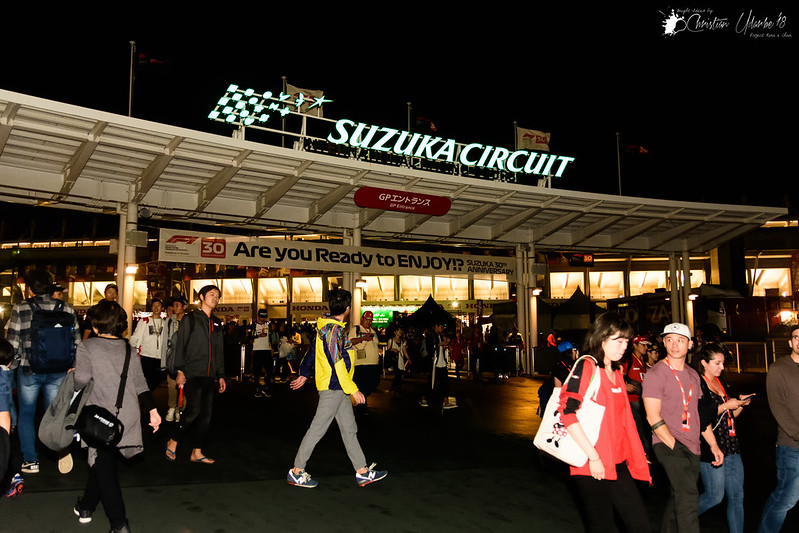
During qualifying for the 2018 Japanese Grand Prix; packed a rain cover for my camera since I read the forecast and packed accordingly. Again not a street photo shot, but whatever!
Other things like my phone, a powerbank and a micro USB cable, earphones, shades (just a pair, of course), can still fit inside the ZKIN Champ bag with my street photography gear if I choose to place them in there.
Knoll shot up ahead:
And the following photos are how I usually pack my ZKIN Champ bag with the street photography gear:
With the front of the bag facing me, I usually place the Nikon SB-600 on the left compartment and the dust blower can be tucked on top; in the middle, the Nikon D7200 lies and still have space on top of it in case I want to place anything else; and finally, the Sigma 30mm and 17-50mm stacked on top of one another on the right compartmentThe space between the case insert and the bag itself I can tuck away the Andoer filter kit and the Black Rapid RS-Sport Version 2 strapLeft front pocket is reserved for the SD/SDHC card case, card reader, and the OTG dongle; still room for anything elseThe right front pocket is the “power pocket” where the extra EN-EL15 batteries are placedContinuing the theme of “power pocket”, the Eneloop batteries can be placed in here, too; there is still space to place a powerbank if I choose to do so.Back pocket is a catchall, if you will, I place the flash stand, microfiber cloth, and anything else reallyAnd still looking good with all that!
Thus with that, this post is done! Tune in next time if ever I do make a sequel to this series, this time what I bring during a Formula 1 event!
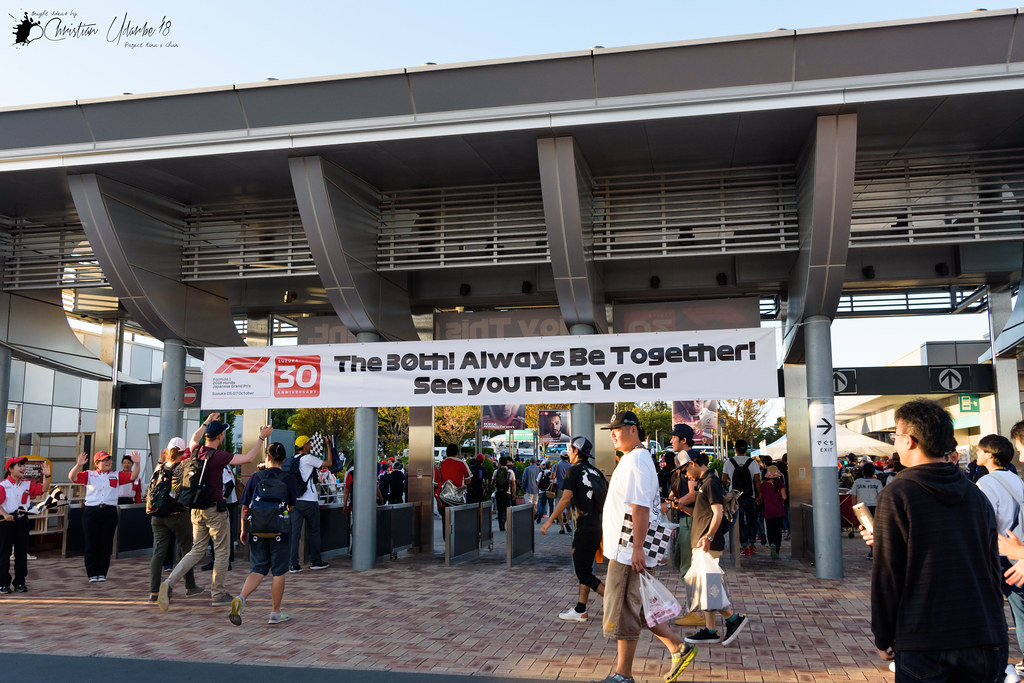
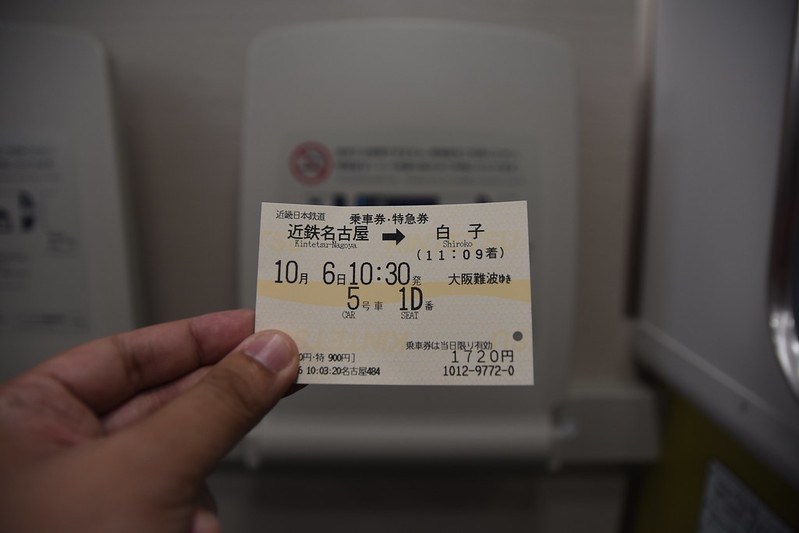
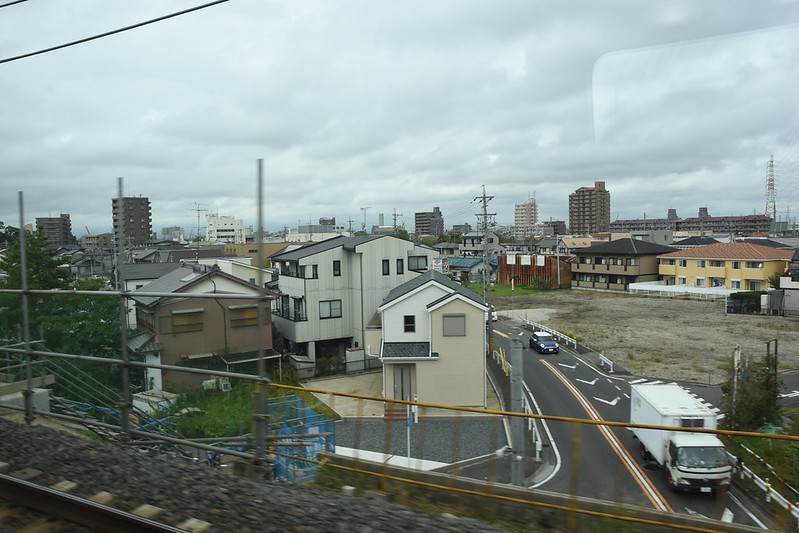
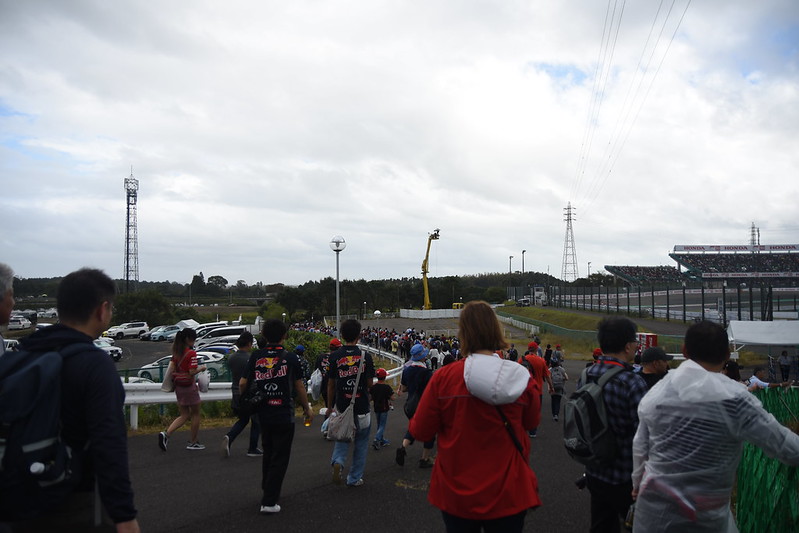
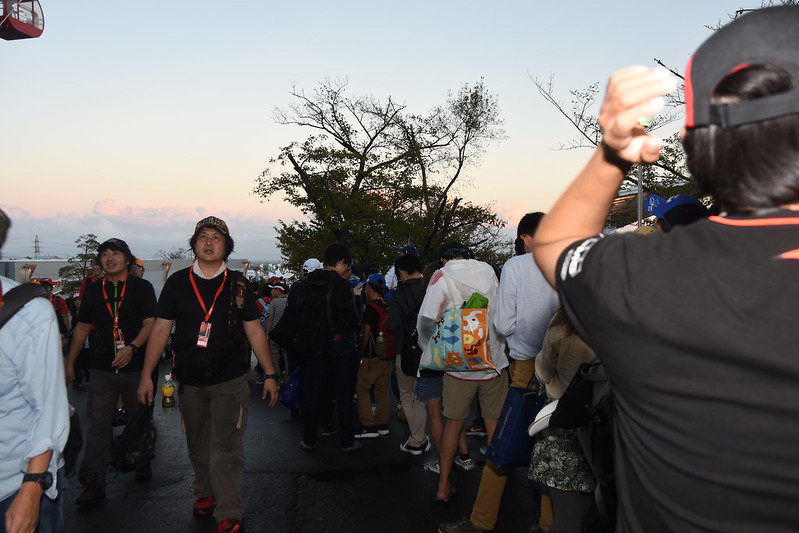
FINALLY! It only took over 3 months to completely post my Japan trip!
This post is dedicated to Days 3-4!
Again, this is a very word and photo heavy post!
DAY 3
Let’s Go!!!
Similar to Day 2, I packed the same gear and such, had the same big breakfast at the hotel, made my way to the station, but this time, the Kintetsu first class tickets were sold out and the earliest was 10:30AM departure, which isn’t entirely too bad, as the race will begin at 2PM and the dirvers’ parade, for which I missed the drivers’ parade in Singapore last year, is at 12PM, and calculating the travel time, I might just be able to make in time for the parade.
I would have opted for the non first class ticket, which I should have, if I really wanted to see the parade , but I guess I just wanted to have good seating for the trip back to the track.
Needless to say, I didn’t make it on time for the parade, since there were some unexpected slowdowns of the train ride, due to how busy that day is, so knowing that I missed yet another drivers’ parade, I opted to just rest up before the race that will start in a little over an hour and just eat.
Won’t really be exploring a lot before the race as I know there will much time for that after the race; it is nice to not as well that I have purchased a return ticket for the shuttle service this time around since I don’t plan on going as late as the day before, but that would be slightly my undoing, as we will get to that later.
Grabbed a bottle of water and Coke once again, this time bought a few more F1 tokens, but smaller compared to the day before, so lugging it to my designated seating area is not so bad this time. And there I went, through the same uphill and downhill walkabouts towards my seat before the race begins. With my exhaustion from the past two days catching up to me in record time, I really felt the fear that my right knee will just give way and I will be carried off by the medical staff around the track. Thankfully, my knee held up, but the day is still young, and it will be tested until I reached my hotel later this day. Well, then some, seeing I had a hard time walking when I got back to the Philippines for a week at least.
I got to my seat, panting like there was no tomorrow, but I had to hold it in and save face, as the day before, I forgot to mention, that I befriended a man from Australia, James, and I also befriended a family of 3 from the States, but for the life of me, I only remember 1 member of the family, their daughter, Taylor. Curiously, the day before, there was an empty seat between me and James, so I knew it will be occupied this day, and yes, I was right, and I made yet another friend, Wei-Ting, who resides in Taiwan.
I mentioned that Day 2 is probably the best day of the entire trip, and nothing can get better than going thru the pit lane and track, but establishing friendships is just as much of a highlight as those things that happened in Day 2.
I made friends as well in Singapore during the race, and it was great to meet new people that love the sport you do and are from different ethnicity and such, for when the time comes you visit their country, they will be more than happy to meet you up and show you around. Such is the case with Robert, from Hong Kong, whom I met during the Singapore Grand Prix, and when I went to Hong Kong last year, he went out of his way to meet me and my sister for dinner and talk about, none other, but F1!
And I, in turn, if they ever visit here in the Philippines, I will surely meet up with them!
Got a lot of better pictures this time around since the lighting was better than it was during Qualifying, so here are at least 1 per driver… Again, I will not bombard you will all the pictures.
Kimi Raikkonen, #7, Scuderia Ferrari, SF71H
Sebastian Vettel, #5, Scuderia Ferrari, SF71H
Lewis Hamilton, #44, Mercedes-AMG Petronas Motorsport, W09Valtteri Bottas, #77, Mercedes-AMG Petronas Motorsport, W09Daniel Ricciardo, #3, Aston Martin Red Bull Racing, RB14Max Verstappen, #33, Aston Martin Red Bull Racing, RB14Nico Hulkenberg, #27, Renault Sport F1, R.S.18Carlos Sainz, Jr., #55, Renault Sport F1, R.S.18Fernando Alonso, #14, McLaren F1 Team, MCL33Stoffel Vandoorne, #2, McLaren F1 Team, MCL33Charles Leclerc, #16, Alfa Romeo Sauber F1 Team, C37; notice the broken nosecone after colliding with Kevin Magnussen in the start/finish straightMarcus Ericsson, #9, Alfa Romeo Sauber F1 Team, C37Pierre Gasly, #10, Red Bull Toro Rosso Honda, STR13Brendon Hartley, #28, Red Bull Toro Rosso Honda, STR13Sergio Perez, #11, Racing Point Force India F1 Team, VJM11Esteban Ocon, #31, Racing Point Force India F1 Team, VJM11Kevin Magnussen, #20, Haas F1 Team, VF-18Romain Grosjean, #8, Haas F1 Team, VF-18Sergey Sirotkin, #35, Williams Martini Racing, FW41Lance Stroll, #18, Williams Martini Racing, FW41
When the race was through, we just had to have a picture as new found friends. And exchanged social media information, then it was time to part ways and hope to meet each other again somewhere and some time in the future.
Panorama!New found friends! Wei Ting from Taiwan and James from Austrailia!New found friends! Taylor and her father, from the States!Just had to ask Wei Ting to take a photo of me overlooking Turns 1 and 2!
Happy Hamilton Fans!
I wanted to reach my hotel by 7PM or 8PM at the most to buy some more souvenirs for my friends and maybe eat some more sushi nearby, so seeing as it wasn’t even 4PM, I wanted to photograph and get photographed in the places of interest I missed out the day before.
Since this is Japan, of course, Honda is the star, thus why Toro Rosso (whose engine supplier is Honda after the debacle with McLaren; and Honda will supply big sister, Red Bull, next season) is big during the race event. Also, Honda had a very successful run with McLaren in the late 80s and early 90s, with drivers like Ayrton Senna and Alain Prost manning the helm (yes, McLaren and Honda had a great run!). Also to note that Senna already had a history with Honda in the Lotus before he moved to McLaren and Honda also supplying McLaren from that point onward.
I say these, because since Honda is obviously a Japanese brand, they will showcase the Formula 1 cars that they powered!
So here are the more famous Honda powered cars!
1968 Honda RA301, famously driven by the 1964 Fq World Champion, John Surtees1968 Honda RA301, famously driven by the 1964 Fq World Champion, John Surtees2006 Honda RA106 as driven by Jenson Button, who would late with the F1 World Championship in 2009, where the Honda team was bought outright by Ross Brawn and became Brawn GP2006 Honda RA106 as driven by Jenson Button, who would late with the F1 World Championship in 2009, where the Honda team was bought outright by Ross Brawn and became Brawn GP1987 Lotus 99T driven by the legendary Ayrton Senna; this marked his last year in Lotus before switching to McLaren the following season1987 Lotus 99T driven by the legendary Ayrton Senna; this marked his last year in Lotus before switching to McLaren the following season1991 McLaren MP4-6, a car in which Ayrton Senna won his third F1 World Championship; McLaren also won the F1 Constructors Championship for the 4th consecutive season1991 McLaren MP4-6, a car in which Ayrton Senna won his third F1 World Championship; McLaren also won the F1 Constructors Championship for the 4th consecutive season
After seeing this cars, I had a little more exploration, made more friends, that’s when I decided it was time, with a heavy heart, to leave for Nagoya, so I can buy more souvenirs and start packing for my flight the next day.
Closest I got to a grid girl the entire weekend lolWith The Ice Army of China! More Kimi Raikkonen fans!
Thank you Suzuka Circuit!
When I reached the main entrance, a big banner saying goodbye to us and that “always be together” is perfect; indeed, we may not really know each other, not all fans got the result they want for their team or driver, but we share one thing in common… the wonderful, magical, experience of a grand prix weekend… and it will be that common thing that will bring us together… always.
Worked my way back to where the shuttles were at, bypassing the ticket booth since I already bought my return ticket, and boy, the line… was… crazy. I think it took me over an hour to finally got on to a shuttle, and upon arriving in Shiriko Station, I just missed out on the Kintetsu first class ticket once again, and had to wait well past 9PM to avail for one, so I took the non first class ticket and went on my way.
It was at this point that I thought to myself that next time there is a shuttle service at the end of a grand prix event, that it is better to do what I did the night before and just use a taxi. Thought it may be expensive, at least it will be less hassle.
At first I thought I can just stand on the train ride back home, since there wasn’t that many seats available, but I was wrong in about 30 or so minutes time, my legs were giving way, so I asked if I can squeeze in between some nice fellows since my knees were dying.
I was a bit embarrassed to do so, but I just can’t stand any longer as my knees were really giving up on me. This is why a DSLR backpack trolley will be immensely useful in future travels.
I also made sure that if any of my seatmates left their seats, I will create a big space for anyone else that wants to use it.
I then reached Nagoya, but it isn’t over! I still had to walk to my hotel… But before that, I decided to buy the souvenirs just in case the shops will close.
After buying the souvenirs, I let in a deep breath and make my way to the hotel. I was very hungry… I was very thirsty… My knees were not cooperating… I was sweating profusely… I was just hoping to make it safely to my hotel. AND I DID!
I let out a triumphant cry in my hotel room!!
IT WAS A SUCCESSFUL DAY YET AGAIN!
Rested up my knees… drank a bottle of Coke I had in the fridge… and took some pain killers. I was recuperating.
Before I went out yet again to eat, preferably sushi, I had to once again reflect on this day, and the whole trip.
I said I learned a lot last year in the Singapore Grand Prix, and indeed, I took what I learned to the Japanese Grand Prix, and with what I learned in the Japanese Grand Prix, I can improve on that further and be even more prepared for the next Grand Prix weekend than I felt that I already was in Japan.
I will invest on a DSLR backpack/trolley; I will get one of those reusable grocery bags with a zipper for my drinks, towels, and whatnot, during the Grand Prix weekend; I will also buy a stadium cushion that can be used on bleachers or seats for extra comfort, while watching the race; and a monopod – even if my Nikon D7200, with a Nikon MB-D15, a Sigma 50-150mm f/2.8 APO EX DC OS HSM, and Sigma APO 2x Teleconverter, all combined, isn’t all too heavy for whole day hand held shooting, I feel I will have more stable shots consistently with a monopod. Just remember when you zoom in completely far out with a telephoto lens, that the minute movement makes it hard to keep a subject in place, so a monopod will keep me consistent in that regard.
Rested enough and my stomach begging for some sustenance, I went my way back out and went to a nice little sushi shop near the station.
You just gotta have sushi in Japan!
It was a perfect way to cap off my day and trip.
It was cozy for someone like me, and I loved it.
Explored a little bit more of the city, without a camera to take pics with, soaking in as much of Nagoya and Japan I can before heading back to the hotel and pack up.
Nothing like watching “Love Live! Sunshine!!” while packing!
Before I knew it, it was 2AM when I got done packing, and I plan to leave for the airport before 7AM, which thankfully, I bought a first class Meitetsu ticket after dinner.
Slept only an hour before I had to ready up myself and that is how I consider now it is Day 4… time to go home.
DAY 4
Thank you Nagoya, Japan! Stay awesome!
Went out to find a vending machine to get coffee and still soak in more of Japan before I check out and go to the station. It was, again, a surreal feeling. Being in the country I am so in love with, and having to watch the race in a track that I had dreamed of many times when I was a kid. All this, traveling alone, in a country I have never been to before, and only using my prior research of the place, and my lackluster Japanese phrases. I was really at the top of my game… I was really accomplished. The only thing left is to have enough energy and enough right knee left to make it back to the Philippines.
Check out in VIA INN was pretty awesome, just stick your key card in a machine, and you are good to go. Then I used their PC to print out my ticket, gave my thank you to the staff, and off I go to the station one more time in this trip.
The train ride, at 7AM, going through different areas of Japan, from Nagoya going all the way to Chubu Centrair International Airport, provided a nice, heartfelt “farewell, and see you later!” from Japan. The skies were so clear, the sun was happily out, caressing the beauty that is Japan. I was close to tears again at this point at what I just accomplished.
Having some more souvenir purchases inside the airport, maybe find anything else I want to buy for my camera since they have a BIC Camera inside as well, drowned in so much more coffee so I can use up my coins, but later found out I can just donate them in a box, and so I did.
Time to head back home…
Finally, it was time to board. And I just had to think to myself, “Arigatou, Japan! I will see you again real soon!”
Back home in the Philippines, as per usual, a wall of heat greeted me, telling me that I am indeed back in the Philippines. Met up with my mom and our driver, Rico, and we all drove back to Angeles City, a good 2 hours away from NAIA, and boy, I think my exhaustion caught up big time, and I got dizzy in the drive back home.
When I got back home, I gave my dad a hug, and greeted him a belated happy birthday since I was in Japan when it was his birthday, when straight to the bathroom, vomited because I was so dizzy from the drive back, went to my room without talking about the souvenirs I got for my family or that of my friends, didn’t change out of my clothes, and didn’t even bother going to my mattress that was already on the floor, and just decided to lay on the rug and I got knocked out for several hours.
Upon waking up, I was so eager to show my family my pictures I got from the trip. It was at this point, that my dream, indeed came true.
And with that!
My blog for the entire trip is done! Took only over 3 months to post!
Til’ next time!
PEACE!
P.S.
It is not easy attending a Grand Prix weekend! I got some bruises from the event lol
Bruise on my right forearmBruise on my left handWound on my right leg
I, for one, never got into using neck straps for cameras. Even when I got my Nikon D5000, I only used the neck strap once while I was waiting for a sling strap. Now take note, that sling strap I bought back then when I first started in my hobby of digital photography was a cheapo Black Rapid knock off, because, well, I was still a medical student, and it was my parents that helped me pay for my Nikon D5000, so I don’t have much of my oen money to spend on accessories. But simply put, as early as I got into photography, I knew I would not be using a neck strap.
Granted, I am talking about the stock neck strap that comes along with a brand new DSLR, MFT, MILC, etc. Most of the aftermarket neck straps like the Cecilia or Peak Design neck straps are indeed a far better cry that the stock ones, but I still had my reasons for not wanting to use a neck strap.
My reasoning for not using a neck strap were a bit odd, but some are justified. Let us go through them:
They are not comfortable:
shooting all day, especially with the stock straps, can give me neck pain and it can be a bit annoying when you consciously feel it on your neck the whole day.
They can be quite attention grabbing:
practically, you are a walking ad with that big camera manufacturer logo; I do take a lot of street photography and want to be incognito as much as possible. TAKE NOTE, THOUGH! I am still very interested in the Black Rapid Nikon AN-SBR2 sling strap, albeit, attention grabbing (lol)
When travelling to a different city/country, you can look more of a tourist than you already are (lol)
May slip off shoulder if used as a shoulder strap:
If using it as a neck strap isn’t for you, you can always make it like a shoulder bag and carry it that way, but the stock strap does not grip too well and may slip off your shoulder.
Too small to be used as a cross body sling:
Like using it as a shoulder strap, you can just try and use it as a cross body sling strap, but it is far too small to do so.
Future proofing my comfort with heavy lenses:
Even when I first started out with my Nikon D5000, I knew I will be collecting heavy lenses and most likely upgrade my DSLR body. It may be 4-5 years off, but I always like to at least try and future proof my comfort – using a neck strap while using a telephoto lens will tip the center of gravity.
Too mainstream (lol)
Yeah… everyone has it.
See? Told you my reasoning is shallow, but here we are.
Cheap Black Rapid knock off… the Quick Strap
The very first sling strap I own, as mentioned above, was a cheapo sling strap simply called Quick Strap. From 2010-2015, I actually used this in every event, every trip, absolutely anything.
Around 2015, I would have already owned a Sigma 30mm f/1.4 EX DC HSM (bought at 2011) and a Yongnuo YN465 Speedlite Flash (also bought 2011), along with my Nikon D5000, it was fairly heavy altogether. I mean, nowadays, I realized that combination wasn’t at all heavy, since my current gear are more heavy, but for what it’s worth back then from 2010-2015, even if this is a knock off sling strap, it did it job well.
Black Rapid FastenR
One thing I like about the Quick Strap quick release plate system is that the 1/4″ screw that is used to attach the quick release plate also has 1/4″ threading on the opposite side, so you can still use you tripod without having to remove the strap’s plate, unlike that of the Black Rapids that use a D-ring fastener, named FastenR, as seen above.
Black Rapid RS-7
By 2016, I wanted to finally get a Black Rapid strap. I got the Black Rapid RS-7, though a bit late to the party, because this was released around 2010, if I am not mistaken, and there was already a Black Rapid RS-Sport available with the Brad Strap (the strap that loops around under your armpit to keep the strap from sliding too much), but around 2016 I just starting working as a physician since I just passed my licensure exam earlier that year. So I wasn’t in the realm of affording the more expensive sling straps from Black Rapid.
I loved the RS-7, since knowing that the cheapo knock off worked so well, I had no doubt that the Black Rapid RS-7 will hold up to any sort of condition.
My only gripe was, as was already mentioned, is that the FastenR takes up the tripod mount screw from the bottom of the camera, so if you want to use a tripod, you have to unscrew the FastenR, screw in the quick release plate from your tripod, and when you are done, you do the opposite. Time consuming. But I wasn’t all too bothered.
By 2017, I started to get into photography again big time, so it was time to complete my version of Holy Trinity of Lenses: I got a Sigma 50-150mm f/2.8 APO EX DC OS HSM and a Sigma 17-50mm f/2.8 EX DC OS HSM, to join my “go-to” lens that I already own, the Sigma 30mm f/1.4 EX DC HSM. I also got a Nikon SB-600 Speedlight Flash to finally replace my Yongnuo YN465 Speedlite Flash.
Now with my new gear, especially if I attach the 50-150mm lens along with the SB-600 flash, unto my Nikon D5000, it was certainly very heavy and the center of gravity certainly shifted towards the front, so I have to screw in the FastenR onto the telephoto lens’ tripod collar to alleviate it. This adds to another set of time consuming screwing/unscrewing if I switch lenses (thus changing the center of gravity again), or if I need to use the tripod on the tripod collar for the telephoto lens. Again, I wasn’t all too bothered.
As 2018 rolled in, I did upgrade my Nikon D5000 to a Nikon D7200 and also grabbed the Nikon MB-D15 battery vertical grip (one of the major reasons why I chose the D7200 over the D7500 – the latter doesn’t have contacts on the bottom of the camera to communicate with a battery vertical grip without using a cable on the side). This is definitely a big heavy upgrade once again, and the Black Rapid RS-7 had no problems with my new current gear, even at its heaviest configuration. And the comfort, as always with any sling strap I ever used, was there.
Some would argue that it bumps on your hip too much, but overall, I don’t even notice it too much.
Focus F1Black Rapid RS-Sport version 2
It is at this year I also added 2 more sling straps: a Focus F1 sling strap and (finally) a Black Rapid RS-Sport version 2 (slimmer version than the original). The former is more of a backup and the latter is more of my “go-to” sling strap. As for my Black Rapid RS-7, I gave it to my dad, and he is still using it to the fullest.
The comfort is there… all throughout the years that I have been using a sling strap, no matter the brand, or lack thereof, but the screwing/unscrewing for the tripod mount, is starting to annoy me.
Zomei Z699C
I also recently got a Zomei Z699C (review later on), that takes advantage of an Arca-Swiss standard quick release plate, so I thought, there has to be an Arca-Swiss compatible quick release plate that can also easily hook up with a sling strap.
There was a famous video on how to still use your tripod easily that uses Arca -wiss standard, while your camera either has a L-bracket or the tripod plate:
Black Rapid FastenR Tripod
And there is of course, the Black Rapid FastenR Tripod, that is essentially a D-ring that can hook up to your sling strap and the can be tucked away if you need to use the tripod/monopod. The idea here is that you replace the screw from the quick release system with one of these.
The former method, since I live in the Philippines, is not as easy to get the items shipped here for a decent shipping fee… Heck, I recently got 4 SDF Macros figurines, shipping was 60 bucks and then I had to pay another 80 bucks for import fees… I nearly died.
The latter seems to be too thin of a metal holding in the ring to really carry my gear in its heaviest configuration.
I chanced upon a the Fusion Plate from Fusion Photo Gear. As seen from above, it is an Arca-Swiss compatible quick release plate that happens to have a loop for your sling strap and that can be tucked away when it is time to place it on a tripod/monopod.
Sadly, as already mentioned, it is tough for me to get it shipped here in the Philippines, so I was just looking for any product similar that is available locally, or granted, if it were shipped, have it easily shipped without too much fuss.
Plus the price… I wasn’t willing at first to spend 65 bucks on this plate (maybe later on lol), so I found one that is of similar design from Andoer.
Andoer QR-60Andoer QR-60
As you can see, it is similar in design, and the price is better, but you get what you pay for, as they say; so far, it is holding up VERY well even with my current gear on its heaviest configuration.
I even spent an entire day using this on the tripod collar of the Sigma 50-150mm f/2.8 APO EX DC OS HSM (plus lens hood for the heck of it) with the Sigma APO 2x Teleconverter, all attached on the Nikon D7200 that has the Nikon MB-D15 (I placed 1 EN-EL15 battery inside the D7200 body and another on the MB-D15 battery vertical grip to add more weight), and added the Nikon SB-600 (4 AA Eneloop inside), and it had no problem carrying it all in the loop. NOTE: This is my gear’s heaviest config, but I don’t find myself using this config for any future shoot… it is just to test the QR-60.
What I feared at first for both the Fusion or Andoer plate is if the aluminum loop is a single piece of metal that hinges on the bigger black aluminum plate. It turns out that the loop is of several components: 1 is the actual aluminum loop, a couple of ball bearings to lock the loop in certain angles, and a very sturdy metal rod to attach the loop on the metal plate. This is important to me, because if it was a single piece of aluminum hinging on the plate, there is a bigger chance of failure, but having a separate rod, lessens the failure. It can still fail… but not as likely.
Joby Tether
Of course! I am still worried that a failure will indeed occur, so I added a Joby Tether, which according to research, can hold up to 15lbs of gear; now my gear in its heaviest is not 15lbs, it is more of 10lbs, but upon receiving this item in the mail, I tested it with my gear, holding the tether, and dropping my gear towards my bed (DUH!), and it does carry my gear perfectly without snapping it. This isn’t meant to carry your gear the whole day, though it can, it is more of security, so when something fails, this will give you enough time to pick up your gear as it dangles.
And so, the last problem with this tether is that I have to hook it to one of the strap eyelet or the triangle split ring on the camera body itself, then the carabiner to be hooked on to your sling strap, but as you can see from the pic above, the carabiner on the tether is not that easy to unhook. I will not place this carabiner on the Black Rapid CarabineR itself, because I also categorize that as a possible failure point, so the tether’s carabiner should be hooked on the sling on its own directly.
Peak Design Anchor Links Strap Connector V4
Thus I decided to purchase a Peak Design Anchor Links Strap Connector V4; well, I wanted to purchase it, but my mom insisted she buy it for me for my upcoming birthday. So there.
I looped one end of the Joby Tether to one of the Peak Design Anchor Links, and one of the Anchors will be looped on one of the strap eyelets/triangle split ring of the camera it self, acting as a quick release system, while the carabiner of the tether is permanently in placed in the sling.
So, let us see how I set it up!
The Andoer QR-60 attached to the tripod mounting screw; this is important, because with the Black Rapid FastenR, I had to unscrew it in order to place the Arca-Swiss compatible plate to use it on my tripod/monopodIf I want to use my Black Rapid RS-Sport V2 or any sling strap, I just pull down the loopHook up my sling strap!Combined the Joby Tether with one of the Peak Design Anchors LinksAdded one of the Peak Design Anchor V4 to one of the triangle split ringsHooked up the Joby Tether’s carabiner to the sling strap; best if it is ahead of you sling strap’s own carabinerThen link up the Peak Design Anchor Link and Anchor V4! You are done!All I have to do is reverse the process, then I can now mount it on a tripod/monopod, granted it uses Arca-Swiss compatible mounts, without having to unscrew anything… except the actual screw to lock or unlock the plate on the tripod/monopod (told you from the title… almost…)I also added another Andoer QR-60 on my Sigma 50-150mm f/2.8 APO EX DC OS HSM’s tripod/monopod collarSame concept, pull down the loop from the Andoer QR-60, hook up your sling strap’s carabiner, then connect the Peak Design Anchor Link and Anchor V4 for added security if something fails, and you are good to go!Again, just reverse the process, then you can mount it easily on a tripod/monopod! Note, I also added the Sigma APO 2x Teleconverter just for testing of carrying around the heaviest configuration of my camera. That is: Nikon D7200, with Nikon MB-D15 battery vertical grip (1 EN-EL15 inside the actual body and 1 EN-EL15 on the battery vertical grip for added weight), Sigma 50-150mm f/2.8 APO EX DC OS HSM, Sigma APO 2x Teleconverter, and I then added the Nikon SB-600 (with 4 AA Eneloops insde), just to have the heaviest configuration and walk around the house for some time. It all held up wonderfully.
And there you have it! That is how I use my DSLR that has a Black Rapid RS-Sport Version 2 (or any sling strap that applies) on an Arca-Swiss compatible tripod/monopod! It may be quite a lot of components, but it works, and it is quick to switch between the use of a sling strap and then mounting it on a tripod/monopod.
Hope this helps!
Cheers!
Nikon D7200 “Peaked”
NOTE: ALL PHOTOS USED IN THIS POST BELONG TO THEIR RESPECTIVE OWNERS.
Continuing from my previous post of my trip to Japan!
This post is dedicated to Day 2!
Again, this is a very word and photo heavy post!
DAY 2
The night before, I packed up my gear that included Fancier DSLR Backpack (which funnily enough, I bought way back in 2011 when I only owned a Nikon D5000, kit lens, and a Sigma 30mm f/1.4 EX DC HSM lens; I knew I would, one day or another, have more, bigger lenses, and DSLR… I was right):
Nikon D7200 with a Nikon MB-D15 battery grip
Nikon Speedlight SB-600 with Eneloop Batteries
Sigma 17-50mm f/2.8 EX DC OS HSM
Sigma 50-150mm f/2.8 APO EX DC OS HSM
Sigma APO 2x Teleconverter EX DG
3x EN-EL15 batteries (2x Wasabi branded and 1x Nikon OEM)
2x SanDisk Extreme PRO 32GB SDHC, 1x SanDisk ULTRA 32GB SDHC (kept inside SD card case of course)
Transcend USB 3.0 Card Reader (since my LYNCA card reader/card case swallowed a ton of water and buggered out), along with an OTG cable (The Nikon D7200 can be wirelessly tethered to my Android phone, but if you take more than 100 shots, it takes a long time to find those couple of photos to upload without post processing, thus an OTG cable with a card reader is much faster)
BlackRapid RS-Sport Version 2 Sling Strap
Joby GorillaPod (not used lol)
ND Filters (also not used lol)
DSLR Rain Cover (because I knew it would rain)
ROMOSS Solo 5 10,000mAh Power Bank
Then I also packed in a separate plastic bag:
LOTS of face towels
Umbrella (because of course)
Couple of bottled water (some tracks don’t allow you to bring outside drinks, so double check on the track you are visiting; of course the sell drinks track side, but sometimes it can get a bit pricey, so getting a couple of bottles will hold you off until the time you really need to buy from trackside)
Extra shirt
Alcohol (of the Isopropyl variety of course)
Ate a big breakfast at the hotel to keep me satisfied during the train ride to Suzuka as it takes at least an hour to reach Shiriko Station in Suzuka, and at least 30 mins to reach the track by way of shuttle service.
I used the Kintetsu line to get to Suzuka, and much like the Meitetsu line, I opted for the first class tickets in order to enjoy the ride, and again, I usually spend a bit more to be comfortable during travels/commute because of my right knee, and boy was my right knee tested this whole trip and I learned new things to better prepare on my next travels to ease the pain on my right knee.
The train ride was really comfortable and fast; great to see the scenery, but since this is a main train line between lots of cities and such, you don’t really see the country side, but there are some areas of pure green fields to marvel at. And not to turn down the city side view, as we all know, that Japan, and not limited to Tokyo, have beautiful cities that are well managed and well planned. So it still quite a beautiful sight!
Arriving at Shiriko Station at Suzuka, you can clearly see the signs to help you reach the shuttle service in order to reach the track since the track is not close to the station. You are certainly not alone, so you will see fellow fans locally or fellow foreigners, so if you can’t see the signs, just follow a fellow fan, and you will be all right.
After the shuttle parked up near Suzuka Circuit, it is at this moment where you have to purchase a ticket for the shuttle you used in order to enter the track, for 900 Yen; this is also where you can get a return ticket for the shuttle service – the combined price for the return ticket is 1700 Yen – also purchasing the return ticket now not only gives you a slight discount, but let’s you avoid queuing up at the ticket booth later in the day. At this day, I just got the 1 way ticket because I knew I will be going home late and will use the taxi services instead.
First thing I noticed is that the Suzuka Circuit has a lot of uphill and downhill walkways; don’t get me wrong, they are made in a way that the average person can traverse to (well some walkways are REALLY steep, which I will get into later on), but having come from Singapore Grand Prix in the Marina Bay Street Circuit, being a street circuit, it was definitely more flat terrain that was far more easy for me to walk around the track in. Plus having to carry like 10lbs of camera gear may not sound a lot, but having to lug it around on a not so flat terrain for the majority of the day on a bad right knee, can certainly take its toll on me. This is one of the new lessons I learned in this Grand Prix weekend – that is to invest on one of those DSLR backpack that doubles as a trolley so I can just drag my gear around the circuits in the future.
After a couple of minutes walking from the shuttle stop to the main entrance, it was a sight that made me want to tear up.
Note: I already got my plastic ID ticket when I started having self portraits lol
I mentioned already that I have always dreamed of visiting Japan because of my numerous hobbies that are link to the culture of Japan, and being a F1 fan since 1996, Suzuka Circuit is one of those tracks I always dreamed of visiting on a Grand Prix weekend, but honestly never thought it can come true, yet, there I was… in Japan… And right in front of the famous main entrance for the famous Suzuka Circuit… God is great indeed!
Inside the circuit premises, it is like home for a Formula 1 fan as you’d expect; I see everyone wearing their colors to support their team and/or driver… I see everyone interacting with strangers to talk about the sport we love, befriending them, and helping one another getting photos of each other or even together to mark a special weekend and keep for memories.
You see all the booths much like I did in Singapore, selling what can be considered overpriced F1 gear if you haven’t already ordered some of the gear online elsewhere prior to the event. They also sell limited edition memorabilia, like the Kimi Raikkonen Suzuka Edition that was sold out minutes as soon as the shops open I heard, and thus, one of the special edition shirts I was so hell bent on purchasing was gone before I even got to the track that Saturday morning. F1 fans, I included, will pay a premium for any F1 gear we deem worth it… and Raikkonen is one of my all time favorite drivers, who is famous everywhere, but ever more so in Japan.
Lots of places to eat and grab drinks as well. From your typical western style food, to the more local Japanese food.
Since the track premises also house MOTOPIA, a themepark, there are numerous rides if you are into that sort of thing. Deeper within the track premises and ever closer to the actual track, you can also ride the famous Ferris wheel that is a fixture in the skies eavh time I watch the Japanese Grand Prix on TV. I was about to avail for the ride, but I did so much elsewhere around the track, and the queue was really getting long for that particular ride, that I thought to myself that this will give me another reason to return to Suzuka in the near future just to ride this Ferris wheel.
Many of my friends called me out for wearing Ferrari colors last year for the Singapore Grand Prix, calling me crazy spending on the gear (not gonna lie, the Formula 1 shirts, caps, and whatnot are pretty pricey indeed), as if they themselves don’t spend a lot on basketball jerseys or the like, but unlike Singapore, the fans here in Japan are all out! The fans in Singapore (plus the fans that traveled to Singapore) also showed their love and colors for the sport, but here in Japan (and again the fans that also traveled to Japan), the fans are not shy to show their love and passion for the sport! I mean, they aren’t shy to show their love for any hobbies they have, and that is one of the major reasons why I love Japan and its people.
You see people wear face tattoos, wearing racing overalls and helmet, you see them making big banners for their favorite team/driver, etc. This may not be a big deal for other sports like basketball, but unlike basketball, though F1 being famous, is just not as famous to my friends. So seeing other passionate people as I am gives me a warm fuzzy feeling that I finally belong somewhere.
It is also of note, that I still haven’t gotten my plastic ID ticket yet, since the pick up point is in the GP Square right next to the track that is a bit further from the main entrance.
Thus, walking towards the pickup point, I obviously took my time to look around the track, maybe buy a couple or more gear and such; meet new people, befriend them, and trade social media info; and of course, take a ton of photos of the life inside the event and have some self portraits for memories.
I then got my ID ticket and felt more empowered… well it doesn’t really do much, but having to wear the ID around the track feels oh so good.
Did a little more exploring, then grabbed a big bit to eat, stocked up on another bottle of water and Coke, then I headed towards my designated seating. The skies were also beginning to darken and hints of rain by way of a drizzle.
This was the toughest part; I was already quite tired from my exploration before the Qualifying Session even started, but going to my seat entails going around Turns 1 and 2 which is also quite long, but having to go down a steep hill then up again was worrying me if my right knee can take it especially when I’m carrying a lot.
Eventually, luckily, and unbelievably, I made it to my seat, and a few minutes to spare before the Qualifying Session began, so I started to setup my Nikon D7200 by messing around with the settings that will be perfect for the current cloudy conditions and that with my Sigma 50-150mm f/2.8 APO EX DC OS HSM and Sigma APO 2x Teleconverter EX DG, which with the teleconverter, loses 2 stop of light, so with the cloudy conditions, it really isn’t helpful if I want to shoot at a higher shutter speed. Thankfully, I still managed to find the sweet spot in order to get the shots I wanted.
So here are a few shots of each driver during the entirety of the Qualifying Session:
Kimi Raikkonen, #7, Scuderia Ferrari, SF71HSebastian Vettel, #5, Scuderia Ferrari, SF71HLewis Hamilton, #44, Mercedes-AMG Petronas Motorsport, W09Valtteri Bottas, #77, Mercedes-AMG Petronas Motorsport, W09Daniel Ricciardo, #3, Aston Martin Red Bull Racing, RB14Max Verstappen, #33, Aston Martin Red Bull Racing, RB14Nico Hulkenberg, #27, Renault Sport F1, R.S.18Carlos Sainz, Jr., #55, Renault Sport F1, R.S.18Fernando Alonso, #14, McLaren F1 Team, MCL33Stoffel Vandoorne, #2, McLaren F1 Team, MCL33Charles Leclerc, #16, Alfa Romeo Sauber F1 Team, C37Marcus Ericsson, #9, Alfa Romeo Sauber F1 Team, C37Pierre Gasly, #10, Red Bull Toro Rosso Honda, STR13Brendon Hartley, #28, Red Bull Toro Rosso Honda, STR13Lance Stroll, #18, Williams Martini Racing, FW41Sergey Sirotkin, #35, Williams Martini Racing, FW41Sergio Perez, #11, Racing Point Force India F1 Team, VJM11Esteban Ocon, #31, Racing Point Force India F1 Team, VJM11Kevin Magnussen, #20, Haas F1 Team, VF-18Romain Grosjean, #8, Haas F1 Team, VF-18
Near the end, of the Qualifying Session, Qualifying 3 to be exact, the skies began to open up and it poured. Having my DSLR rain cover at the ready, my gear is certainly safe. I also had a rain cover for my back pack and learning from last year in Singapore, I also bought a rain poncho at trackside knowing that the rain may be coming.
Results wise, it wasn’t a good day for Ferrari, but experience wise, it was just perfect. No rain will dampen my parade for sure.
When all was said and done, there was a special historical lap event for the past F1 cars; they will give an exhibition of sorts, but I decided to forego that and make my way back to the GP Square, because my ticket enabled me to have a pit lane walk and be close to the actual cars, albeit behind barriers, or so I thought… wink wink.
Knowing others will also take advantage, I quickly had another bottle of Coke, another bottle of water, and headed my way to to queue up for the pit lane walk.
It took an hour I think to queue up, but it was well worth it; to be in the pit lane, seeing and talking to some of the teams’ engineers, getting close enough to the cars to photograph, being right underneath the podium…
IT WAS A MAGICAL. I thought to myself, I have been quite lucky in this trip so far… how can it get better than this!?
AND IT DID.
Working my way up to Ferrari’s garage, knowing that much like other garages at that moment, it will be empty as per FIA mandate, all cars after the Qualifying Session must be parked up next to the Scrutineering Garage just to make sure that was no exploits to have gained an advantage in the session. But I felt I took enough photos of the Ferrari and that of the other cars while I past by the FIA garage where they are being scrutineered, so I still headed onward through other garages and that of Ferrari’s.
I chanced upon meeting two of Ferrari’s engineers and thought having a photo with them, because why not!? It was at this moment I wanted to shoot myself in the foot because I forgot to show them a video of me and my racing simulator playing F1 2018! Not saying they will be so impressed by my driving, but maybe at least be impressed by my set up… who knows, maybe they would have invited me inside to show their friends my set up. Sigh. But still, having a nice little chat and a picture with them was awesome.
Finally made it to the Ferrari garage, just taking pictures of the heading, the equipment, the engineers, all inside the 2 empty garages, again, because the cars are being scrutineered at this moment, but all of a sudden, I was hearing so much commotion, I also heard some people speaking lots of Italian, and when I turned around, lo and behold! It was Kimi Raikkonen’s Ferrari SF71H car being hauled back into the garage! It was so close, I can taste it! Sadly, I wasn’t too close because I was caught off guard thus, others had a better vantage point than me, but I took a great garage photo of it, in my opinion. Just being that close to the Ferrari SF71H was beyond a dream come true!
Knowing way better at this point, even if I was taking so many shots of Kimi’s car, that Sebastien Vettel’s Ferrari SF71H will also be hauled in soon. And it did. This time, I was at a better position, to the point that the car’s rear right tire was so close to my leg, so close to the point that if I ever tripped, I was would have scuffed up any part of the car and be sent to jail. It would have been worth it though. And I got a good enough garage photo of Seb’s car. But that is give and take: I got a great pics of Kimi’s car in the garage, yet so and so pics while it being hauled in; I got great pics of Seb’s car being hauled in, though I got so and so pics of his car in the garage. And that is like the cherry on top! I was so satisfied with my trip and my visit to the track… that I really can’t think of anything topping this. Everything else is just more cherry on top, and trust me, I ended up with lots of cherry upon the end of my trip.
Another car that I was able to brush right up against was Lewis Hamilton’s Mercedes AMG F1 Wo9 Power+ (Simply, the Mercedes W09) car; admittedly, I was never ever a Hamilton fan, but I respect him as a great driver, and amazed at all his accomplishments. Being a Ferrari fan since I started watching the sport, of course, my allegiance lies with the team and most of the drivers that either drove for us for a time, still drive for us, or left (Like Fernando Alonso, I never really liked him before, but became a fan when he drove for us, and since respected him until he eventually retired this year. Same goes for Kimi Raikkonen, didn’t like him at first, but when he drove for us and grabbed a title for us in 2007, I became a fan of his and he remains my number 1 current driver, even if he will return to Sauber next season).
Having my fix of the pit lane, I moved on to the start/finish straight, a sight that we all know too well when you are a racing fan… where obviously the starting grid is placed and the race starts, and ultimately ends with the chequered flag. I was really blessed to even just walk a few meters of the actual race track… I should have asked someone to photograph me pretending to kiss the tarmac, but I was so overwhelmed that I have forgotten to do so. Next time…
After all that was said and done, I then worked my way back out the main entrance of the circuit and since it was pretty late and the shuttle service is over for that day, hence why I decided to just purchase a 1 way ticket earlier in the day and not the return ticket, so I waited in queue for a taxi; it took awhile, but it afforded me yet another few minutes to take a breather and just reflect on what I have achieved so far in this trip. It is surreal.
Got on a taxi eventually, was able to get the first class Kintetsu ticket, and soon enough, I made it back to the hotel, feeling so accomplished… so empowered… I was ecstatic.
I did a lot this day, but there are still more things to see the next day that I failed to do so this day, certainly more photos of the other points of interest around the track, and the weather forecast for the next day is clears skies with no chance of rain, so taking photos of the cars running laps will be so much better.
Capped off this amazing day with a random dinner and even more Coke…