First off, there is a slight delay in making my WordPress account. LOL I can get lazy trying to learn new sites. In the mean time, I will update some photos that were recently added in my Flickr Photostream (You can view my whole photostream
HERE).
Now it isn’t the first time that I am shooting macro (link to previous post on my previous attempt at macro below); since I had no events and no real new creative ideas for new shots, I decided to practice more macro photography by using a reverse ring. But it certainly has been awhile and in doing so, what was once another skill in photography that I am progressing in, judging by my latest macro shots, I think I had a set back…
Being a cheap bastard and still only a student, I opted for a reverse ring instead. What you get is an incredible magnification ratio but with the price to pay that everything is in manual apart from the ISO and shutter speed. It is also a good way to keep your kit lens to good use rather than disposing of it.
 |
| My 52mm Reverse Ring for Nikon from JJC; a cheapo brand, but it gets the job done! (Shot with my Iphone) |
 |
| Was planning to sell this to a desperate beginner or someone but decided to have this as a keeper for the purpose of macro! (Shot with my Iphone) |
I was asked how to calculate for the magnification of a lens in reverse, there is this great post by Peter Forsell entitled “Math for macro photographers” where you can find HERE; it has tons of neat information about the calculation of magnification of certain macro techniques from reversed lenses to macro extensions tubes. Great place for more info as I am just going to speak about reversing lenses.
Borrowing words from Peter Forsell, “We cannot directly calculate the zero extension magnification (Zm) of the lens we wish to mount in a reverse position. Instead we have to take a test photograph of a ruler to determine this value or find the information in the lens manual.” By visiting his site, you can see an example of the calculation, but I will also post my test and calculation here since he used a Nikkor AF 50 f/1.8D and I will be using the regular 18-55mm f/3.5-5.6 kit lens.
So here goes! Take a photo of a ruler with your reversed lens and get the width in mm. This is considered Subject Width. Then get your sensor size for your camera, in my case, I shoot with a Nikon D5000 and it has a sensor size of 23.6 mm in width. This is now considered your Image Width.
Next whip out your calculator!
Formula:
Zm = image width/subject width = X
First Test Shot: 55mm, max aperture, focus ring fully rotated clockwise (in reverse configuration)
 |
| Roughly 31-31.5mm; I will go for 31.5mm |
Zm = 23.6mm/31.5mm = 0.75X
Second Test Shot: 55mm, max aperture, focus ring fully rotated counterclockwise (in reverse configuration)
 |
| 23mm Subject Width |
Zm = 23.6mm/23mm = 1.03X
Third Test Shot: 18mm, max aperture, focus ring fully rotated clockwise (in the reverse configuration)
 |
| Roughly 8mm |
Zm = 23.6mm/8mm = 2.95X
Fourth Test Shot = 18mm, max aperture, focus ring fully rotated counterclockwise (in reverse configuration)
 |
| Roughly 7mm |
Zm = 23.6mm/7mm = 3.37X
So the 18-55mm kit lens in reverse has a magnification ranging from 0.75X to 3.37X. Be wary, the higher magnification may be tempting, but it becomes difficult to minimize camera shake, so a monopod or tripod is essential. Also take note that I had the max aperture while taking these shots causing a paper thin depth of field. And also of note! I am not 100% sure if I have done the tests right, with the knowledge of how to calculate for the magnification of an 18-55mm kit lens in reverse, please correct me if my calculations are wrong! Thanks in advance!
As mentioned above, everything is in full manual (Yes, use Manual Mode otherwise the camera won’t function since it cannot detect a lens) and it can get really challenging and annoying to say the least; here you trust your good ol’ eyes if it is in focus, but even with a sharp eye, that can be hard because essentially, once you remove your lens, in this case, the kit lens, out of the camera body, the aperture will automatically be at its minimum (if I am not mistaken, the kit lens’ minimum aperture is f/38), add to it being reversed therefore using the smaller back lens, little to NO light can enter and you will just see pitch black in the electronic viewfinder.
This can be remedied by simply putting a card in between the aperture arm (or whatever it is called) to force it wide open. This will effectively lower the depth of field and focusing (manually) becomes extra challenging.Like so…
 |
| Once out of the body, the aperture resets to its minimum; this has little to no light entering the lens but has a larger depth of field keeping most of the subject well in focus. (Shot with my Iphone) |
 |
| Maximum aperture after the addition of a makeshift card to force it open; this increases the light going in but reduces the depth of field immensely. (Shot with my Iphone) |
 |
| Encircled Aperture Arm (Shot with my Iphone) |
Remember, using the max aperture in an un-reversed lens already lowers the depth of field and even more so if reversed. It is simply give and take: max aperture, more light, reduced depth of field; minimum aperture, little light, greater depth of field.
You can however, remove the card once you have focused (enough) of your subject, and adjusting the ISO, Shutter, and Flash Output, to illuminate the subject enough to be seen after taking the shot (with the greater depth of field thanks to the minimum aperture, the subject should more or less be in focus). You can even use a continuous strobe to illuminate the subject while having the minimum aperture to focus. There are certainly a number of ways to remedy that problem, it is just your own creativity that is your limit.
Also note that the reverse ring is only body/manufacturer specific on the side that is going to be attached to the camera body; that is, if you have a Nikon DSLR, get a reverse ring for Nikon, same goes for Canon. However, the side of the reverse ring where the front of the lens is to be placed is filter thread size specific; So if you purchase a reverse ring for a Nikon body that caters to a 52mm filter thread, you can use a lens for Nikon, Canon, or a Sony, so long as they have a 52mm filter thread size.
Phew! Now forget about all that technical stuff! Heck, I can even be wrong with what I just said!
Anyways, on to the actual macro photos. Yes, I decided to practice some more macro with the reverse ring, but sadly, like the ones before the recent macro shots, they are quite soft and not as sharp as I hoped they would be. To fix this problem, I will mostly likely purchase me a monopod because it difficult adjusting a tripod by slowly lifting it closer or away from the subject; definitely easier to go closer/away if you just lean instead of lifting LOL. And maybe a light stand… so I can replace my biological light stand (he makes me laugh so it is especially more difficult to focus!)
Just to show my supposed progress in macro photography using a reverse ring, I will repost photos that I have taken before (you can read my past post on macro:
HERE)
The series of photos below are my first ever attempt and my most creative macro to date (what can I say? I was inspired I guess). Being it my first attempt, I was satisfied even if the flower in the dew isn’t all that sharp; I have gotten too used to autofocus that I can’t trust my eyes anymore… and the fact I had the aperture at max lowering the depth of field and an off shoe flash at the right causing little light for me to see through the viewfinder.


Next series of shots is of a mosquito that is left to die on my bed… I didn’t kill it, okay!? It was just there half dead and I decided to take a shot. Somehow improving my manual focusing here, but still not the best. I used what I mentioned above about the continuous strobe and I had the aperture at midpoint.


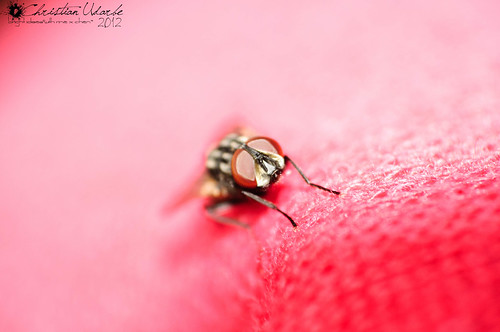
The following shots are of a house fly that was on my mom’s red blouse (no she wasn’t wearing the blouse… otherwise she won’t let me take a shot of the fly at all. LOL. Plus she was my biological light stand for these shots!). Some soft, some sharp. I thought I was getting better for sure. LOL but I may just be wrong…


And now, the following are my recent shots, having no insects or better subjects, I opted to shoot my dad’s Bougainvilleas in his garden. I added the dew to an otherwise boring subject. I like the lighting on the shots and I might even make a separate post on the lighting set up. But like I mentioned above, I thought I was getting better with reverse ring macro photography, sadly, with these recent photos, apart from the lack of true creativity, I feel that they are very soft. You be the judge:


Thankfully, I will be going to a province this coming April 30th to I have no idea when I will be back in the city LOL and there should be interesting macro subjects to increase my skills in it. In fact, many great subjects not limited to macro!
Photography, much like the study of medicine, is a life long education. I may feel saddened that my macro skills may have had a step backwards or so, but that doesn’t mean I will never ever be able to step forward again! In time, and some perseverance, we can become better, if not, greater than we ever were when we first started.
As always! One must give credit where credit is due! First, I will give my very big thanks to fellow #Cazillion (join our forums, by the way, at Cazillo.com), Roy Panaguiton, who inspired me to buy a reverse ring and try out macro in the first place; thanks to Greg Cazillo, for making great video tutorials in all aspects of photography (you can find him at YouTube and his own site Cazillo.com); to Mr. Chua of TayHua.com where I have most of my online purchases locally; and to Peter Forsell for his informative post in his site (peterforsell.com) on calculating the magnification of lenses in macro.
And this caps off my longest post thus far in this site!
So keep shooting, my friends! And never look back!
PEACE!!


